Ga door naar hoofdinhoud

Wat je nodig hebt

Deze demontage is geen reparatiehandleiding. Om je Nintendo DSi XL te repareren, gebruik onze reparatiehandleidingen.

  1. Nintendo DSi XL Teardown, Nintendo DSi XL Teardown: stap 1, afbeelding 1 van 1
    • The Nintendo DSi XL is the latest iteration of Nintendo's ever-popular handheld gaming console, the Nintendo DS.

    • Along with fancy new packaging, the new features include:

    • Two screens that are 93% proportionally bigger than those found in the DS Lite.

    • A new full size stylus for added precision on larger screens.

  2. Nintendo DSi XL Teardown: stap 2, afbeelding 1 van 1
    • Contents of box:

    • Nintendo DSi XL

    • Operation Manual

    • Quick Start Guides

    • AC Adapter

    • Full Size Stylus

    • Mario, Mario, Mario...when will you understand...no matter how many invitations you send for Club Nintendo, our answer is still no...

  3. Nintendo DSi XL Teardown: stap 3, afbeelding 1 van 3 Nintendo DSi XL Teardown: stap 3, afbeelding 2 van 3 Nintendo DSi XL Teardown: stap 3, afbeelding 3 van 3
    • The DSi XL measures in at 161 x 91.4 x 21.2 mm and weighs in at a whopping 314 g. That's 45% heavier than the 217 g DSi.

    • Side by side comparison of the DSi (left) and DSi XL (right).

    • The featured specs of the DSi XL are the twin 4.2" LCD panels.

    • The back side of the DSi XL. What a surprise! It's made in China.

  4. Nintendo DSi XL Teardown: stap 4, afbeelding 1 van 1
    • The full-sized stylus, measuring 10 x 130 mm, takes a little getting used to but fits more comfortably in the hand than its 5 x 90 mm smaller twin.

  5. Nintendo DSi XL Teardown: stap 5, afbeelding 1 van 2 Nintendo DSi XL Teardown: stap 5, afbeelding 2 van 2
    • Remove the two Phillips screws securing the battery door to the outer case of the DSi XL.

    • Lift battery door off the bottom outer case and remove the battery from its housing.

    • Both screws remain captive within the battery door.

  6. Nintendo DSi XL Teardown: stap 6, afbeelding 1 van 1
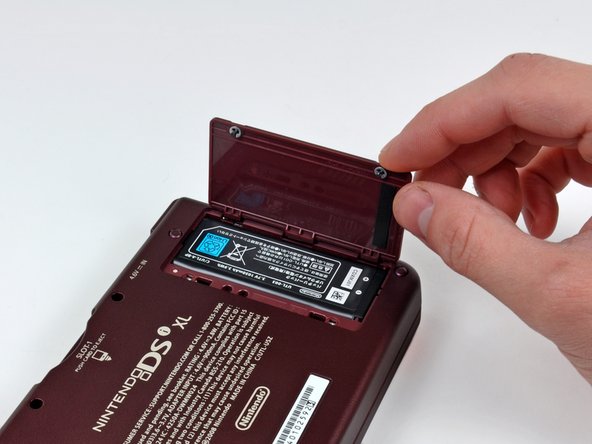
    • Nintendo provided quite a hefty upgrade in battery size from 840 mAh in the DSi (Right) to 1050 mAh in the DSi XL (Left).

    • For all you math haters out there, that's 25% more capacity!

    • Larger capacity comes with the cost of more weight. The XL's battery weighs 23 g compared to the 19 g DSi battery.

  7. Nintendo DSi XL Teardown: stap 7, afbeelding 1 van 1
    • A total of seven Phillips screws are all that stand in the way between us and the innards of the DSi XL.

    • Keep track of each screw's location because they have different lengths.

  8. Nintendo DSi XL Teardown: stap 8, afbeelding 1 van 1
    • After a bit of careful prying, the lower case comes off without a hassle.

    • An orange ribbon remains connected to both cases. Pry with care to prevent any damage to this connector.

  9. Nintendo DSi XL Teardown: stap 9, afbeelding 1 van 1
    • Pry the following connectors straight up using the flat end of a spudger:

    • SD board cable connector

    • Volume control cable connector

    • The lower case should now be completely detachable from the upper case of the DSi XL.

    • Thankfully, Nintendo designed the DSi XL to eliminate a long ribbon cable spanning the width of the old DSi.

  10. Nintendo DSi XL Teardown: stap 10, afbeelding 1 van 3 Nintendo DSi XL Teardown: stap 10, afbeelding 2 van 3 Nintendo DSi XL Teardown: stap 10, afbeelding 3 van 3
    • Lift the Wi-Fi board from its edge nearest the center of the DSi, and it comes right off the logic board.

    • Use the flat end of a spudger to pry both antenna cable connectors from their respective sockets on the Wi-Fi board and logic board.

  11. Nintendo DSi XL Teardown: stap 11, afbeelding 1 van 2 Nintendo DSi XL Teardown: stap 11, afbeelding 2 van 2
    • Removing the main board is a piece of cake:

    • Remove the five Phillips screws.

    • Disconnect the six connectors on the front side, flip the board over and remove the one last connector hiding on the back.

    • Whenever unlocking flat ribbon cable sockets, use your fingernail to flip up the small retaining flap.

  12. Nintendo DSi XL Teardown: stap 12, afbeelding 1 van 1
    • The lower display is held in place by the pressure of the board secured over it. No screws!

    • After freeing it from the light adhesive around its perimeter, lift the lower display out of the DSi XL.

    • The displays on the DSi XL conveniently integrate the digitizer, LCD, and backlight into one package.

  13. Nintendo DSi XL Teardown: stap 13, afbeelding 1 van 2 Nintendo DSi XL Teardown: stap 13, afbeelding 2 van 2
    • Remove the seven Phillips screws securing the battery/control board to the upper case.

    • The D-Pad and I/O buttons are conveniently integrated onto the face of the battery/control board.

  14. Nintendo DSi XL Teardown: stap 14, afbeelding 1 van 2 Nintendo DSi XL Teardown: stap 14, afbeelding 2 van 2
    • Four red plastic covers need to be removed to reveal the Phillips screws underneath.

    • Removing the four Phillips screws allows access to the top display.

    • Push the top outer case toward the top edge of the DSi XL, then use a spudger to pry it off the clips holding it to the inner case.

  15. Nintendo DSi XL Teardown: stap 15, afbeelding 1 van 3 Nintendo DSi XL Teardown: stap 15, afbeelding 2 van 3 Nintendo DSi XL Teardown: stap 15, afbeelding 3 van 3
    • Use a spudger to pry the outward facing camera from its resting place on the top outer case.

    • Remove the single Phillips screw securing the inward facing camera's bracket to the top inner case.

    • Carefully pull the camera ribbon cable through the hollow right hinge, being careful not to rip it or the display ribbon cable.

    • The DSi XL has two digital cameras; one on the internal hinge pointed toward the user and the other pointed away from the top outer case.

  16. Nintendo DSi XL Teardown: stap 16, afbeelding 1 van 1
    • The antenna board for the Wireless LAN rests in the upper right corner of the top outer case.

    • Removing it is as simple as lifting it up.

  17. Nintendo DSi XL Teardown: stap 17, afbeelding 1 van 1
    • After prying up the speakers, carefully de-route the display ribbon cable through the hollow right hinge.

    • Remove the upper LCD assembly from the inner case.

  18. Nintendo DSi XL Teardown: stap 18, afbeelding 1 van 1
    • The DSi XL's twin supersized screens.

    • Touchscreen controller: NB-F7B AB1 018

    • Each screen measures 4.2 inches diagonally.

    • Although the screen size has been enlarged, the resolution still remains the same at 256 x 192 pixels per screen.

  19. Nintendo DSi XL Teardown: stap 19, afbeelding 1 van 2 Nintendo DSi XL Teardown: stap 19, afbeelding 2 van 2
    • Remove the seven Phillips screws securing the left trigger, right trigger, and the stylus holder to the bottom outer case.

    • Lift the SD board and the stylus holder out of the case.

    • The electronic right trigger button is integrated into the SD board.

    • Reassembling the triggers is quite difficult. Take them apart if you dare.

  20. Nintendo DSi XL Teardown: stap 20, afbeelding 1 van 2 Nintendo DSi XL Teardown: stap 20, afbeelding 2 van 2
    • Samsung and Fujitsu chips are identical to the DSi:

    • Samsung 1st generation MoviNAND KMAPF0000M: 256 MB NAND Flash and MMC controller. The integrated MMC controller allows the CPU to offload the complex work of directly talking to the flash memory.

    • 82DBS08164D-70L: Fujitsu Ltd 128-bit FCRAM (fast-cycle RAM) chip.

    • TI (TXN) 72071B0 power managing and charging circuit. This used to be a Mitsumi chip in the smaller DSi.

    • PAIC3005B: We assume it stands for Primary Antenna Interface Controller, given that it's located right by the antenna.

    • Primary Nintendo ARM CPU, manufactured the last week of 2009. This chip's markings are identical to the DSi. It's definitely not the Tegra chip that had been rumored.

  21. Nintendo DSi XL Teardown: stap 21, afbeelding 1 van 2 Nintendo DSi XL Teardown: stap 21, afbeelding 2 van 2
    • Slide by slide comparisons of the DSi XL layout and the DSi layout.

    • DSi XL, hear us now! You've been slain by iFixit!

6 opmerkingen

The 4 screws at the bottom corners are covered by something ans I cant' get the battery out. If there's some procesure to doing this please tell me.

Watermelon Toastface - Antwoord

You should be able to pry the rubber feet at the corners out with an Xacto knife or a small flathead screwdriver.

As for the battery, you should be able to get it out by putting your fingernail or a flathead under the the small ridge at the end closest to the charger port and then pulling upwards.

Guanglai Kangyi -

thanx now i can change the buttons

Maximus Spirt - Antwoord

how much is one battery

Hansini Perera - Antwoord

Is there something I must know not to touch if I want to change the D-Pad?

Carlo Lara - Antwoord

Voeg opmerking toe

Weergavestatistieken:

Afgelopen 24 uren: 12

Afgelopen 7 dagen: 84

Afgelopen 30 dagen: 391

Altijd: 101,183