Inleiding
In honor of the 20th anniversary of its release, I decided to give the Nintendo 64 a proper teardown, and take a look inside the legendary console that defined a generation.
Wat je nodig hebt
-
-
The Nintendo 64 was Nintendo's third home console. Released in 1996 for the US and Japan, the N64 boasted 64-bit graphics for the most realistic gaming experience ever made to date. The N64 was co-developed by Nintendo and Silicon Graphics.
-
NEC VR4300 64-bit CPU, running at 93.75 Mhz
-
Silicon Graphics Reality Coprocessor (RCP) GPU
-
576i (720×576) Composite output
-
Support for up to 4 players
-
-
-
Let's begin by removing the top cover.
-
Remove the 6 Gamebit 4.5mm screws found at the 4 corners and near the top-middle and bottom-middle.
-
Using a metal spudger, take out the Jumper Pak from its slot and set it aside.
Protip: If you do not have a spudger handy, the corner of the door for the Expansion Pak slot will do the trick.
-
-
-
-
Flip the console upright, and the top cover just comes right off.
-
Remove the 10 crossbar screws using a Philips #2 screwdriver.
-
Take out the 2 screws holding in one piece of the expansion slot shield, also with a Philips #2
-
The 2 black screws and the one at the bottom left of the expansion slot shield are easily removed with a Philips #2.
-
Finally, remove the 2 long screws from the 2 ends of the slot with a Philips #0.
-
-
-
The heatsink crossbar comes right off, which gives us access to the motherboard shield.
-
The 5 screws on the two sides of the shield are swiftly removed with a Philips #2
-
The 2 screws on each side of the Game Pak slot are quite long, and are removed with a Philips #2.
-
With that, the shield slips right off, letting us gaze at the Nintendo 64's source of power.
-
-
-
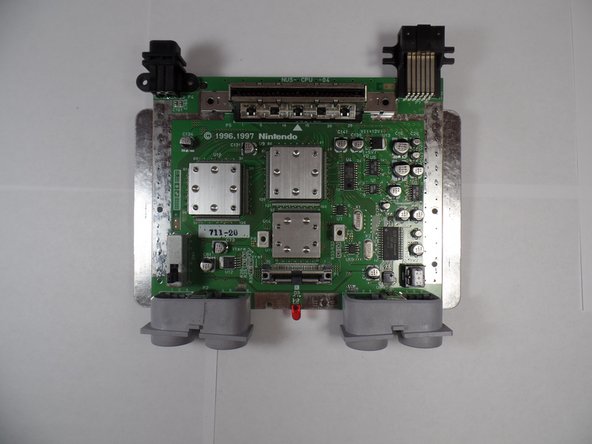
On the motherboard are 3 very pronounced steel blocks, which indicates that the important stuff is under there. But before removing these, it's best to take the motherboard out of the bottom case.
-
In order to remove the motherboard, unscrew the 4 Philips #2 screws from the two back I/O ports, allowing extraction of the motherboard.
-
-
-
Using a Jimmy, pry off each chip's heatsink, revealing the console's processing units.
-
Nintendo CPU-NUS-A
-
Nintendo RCP-NUS
-
Nintendo RDRAM18-NUS-B (2x2MB modules)
Did some research, apparently you don't want to pry off the heatsinks if you plan to put the unit back together and don't have thermal pad replacements (the rubbery squares between the chips and the heatsinks that's holding it together), otherwise some small gaps will form between the chips and the heatsinks when reassembling, which is obviously bad for cooling.
Can standard Arctic Silver thermal paste work?
you will want actual thermal pads instead of thermal paste, since the thickness is needed for the heatsinks to reach the main heat spreader (with the 10 screws from step 4), otherwise overheat conditions exist.
I just wanted to know what thermal pad thickness I need because for some reason I can find the sizes for the GameCube and wii but nothing on N64.
-


4 opmerkingen
Thank you, this tear down was real helpful. I was able to open up an N64 and clean the corrosion between some pins that kept it from turning on. :D
I’m really glad to hear that! The N64 has always had a special place in my heart since it was the first home console I ever had.
dang one in the same Christian same first console my second was the PlayStation 1(actually just called PlayStation) and the PlayStation 2 my third the Nintendo GameCube then handheld consoles the game boy, game boy advanced, and Nintendo 2dsi , and the Nintendo 3-DS, and then fourth the non-handheld online consoles the Wii and the Xbox 360.
This in my opinion was one of the best consoles. The Zelda games for the 64 were amazing. Love the idea I can fix mine.