Inleiding
The Magic Leap One’s mixed-reality tech has been so much pie in the sky for so long, we can hardly believe we have it on our teardown table. Based on the amount of money raised for this project, we’re hoping it’s powered by pixie dust—but only a teardown will tell.
Want to see more hardware secrets? Then plug in with us on Facebook, Instagram, or Twitter for up-to-the-minute teardown news.
Wat je nodig hebt
Video overzicht
-
-
There's a lot to unravel here. Let's start with some specs ... err, specifications:
-
Nvidia Tegra X2 (Parker) SoC with two Denver 2.0 64-bit cores and four ARM Cortex A57 64-bit cores
-
Integrated Pascal-based GPU with 256 CUDA cores
-
8 GB RAM
-
128 GB onboard storage
-
Bluetooth 4.2, Wi-Fi 802.11ac/b/g/n, USB-C, 3.5 mm headphone jack
-
-
-
After Magic Leap's claims about this headset's otherworldly experience, we had to try it ourselves.
-
Thanks to our trusty infrared camera, we can see a strobing IR projector for depth sensing just above the nose bridge—similar in principle to what we found in the iPhone X, and before it, the Kinect.
-
If you look closely, you can also spot four additional IR LEDs in each lens, "invisibly" lighting up your eyeballs for tracking. (We'll dig up the trackers shortly.)
-
-
-
Content creation begins in the Lightpack. It provides power and handles the processing, sending image and sound data to the headset.
-
Meanwhile, the Lightwear headset tracks the controller's position and orientation, and maps your surroundings to help insert the virtual elements.
-
How those virtual elements are generated is a whole other can of worms.
-
-
-
“Mixed reality” is hard. It’s one thing to augment what you see on a screen (like a smartphone or a VR display with a feed from exterior cameras).
-
It’s much harder to augment actual, unfiltered reality coming directly into your eye. To pull off this illusion, the Magic Leap One uses a couple neat pieces of tech:
-
Waveguide display - Essentially a transparent screen that’s lit invisibly from the side. The waveguide (what Magic Leap calls a "photonic lightfield chip") guides light—in this case, an image—across a thin layer of glass, magnifying it and angling it into your eye.
-
Focus planes - On a VR display, everything is in focus all the time. Reality is different—some things look crisp while others can look blurry, depending on where your eye is focused. Magic Leap mimics this effect by stacking multiple waveguides to create focus planes—slicing up the image into crisp and blurry areas.
-
-
-
Let's get to the optical treasure in this thing! A quick test rules out polarized lenses—we'll have to dig deeper to make any discoveries.
-
The insides of the lenses are surprisingly ugly, with prominent IR LEDs, a visibly striated waveguide "display" area, and some odd glue application.
-
The waveguide consists of six not-so-prettily laminated layers, each with a small air gap.
-
The edges look to be hand-painted black, likely to minimize internal reflections and interference.
-
-
-
Inside the headband, we note a Class 1 Laser label. It might seem like a scary thing to find on your eyewear, but it's safe for all normal use conditions and likely no more dangerous than a CD player.
-
Twirling away the standard Torx screws and removing the panel reveals the first of two speakers, wired via spring contacts, and protected by color-coded gaskets—great repairability so far!
-
Also hiding under those panels: the two upper ends of the device's single built-in cable—and a few of the magnetic bits that help adjust the fit.
-
But what's that odd little black box protruding from the right side of the headband?
-
-
-
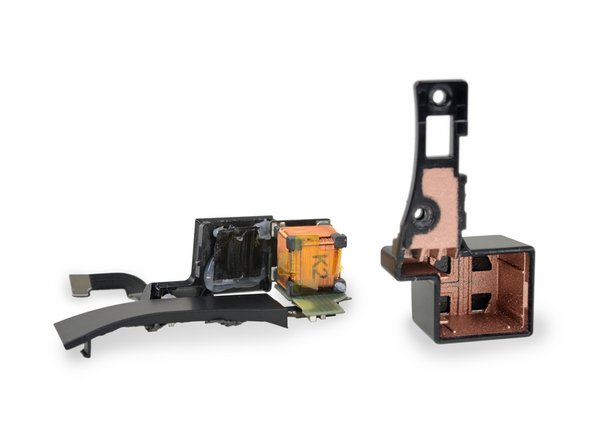
Survey says: a six-degrees-of-freedom magnetic sensor coil for tracking the position of the controller.
-
Cracking open the controller, we find the (much bigger) emitting half of the tracker, and an 8.4 Wh battery to boot.
-
The copper shielding sprayed into the coil housings likely protects from RF interference, while letting the magnetic field through.
-
Interference could explain the tracker's odd placement, and this may be a temporary solution. It's "old" tech, and will probably be worse for left-handed use.
-
-
-
After detaching the headband and inner faceplate, we have a better view of the eye-tracking IR emitters. We note they're all wired in series, rather than individually controlled.
-
And finally, at our fingertips, the heart of the Magic Leap: the optics and display assemblies.
-
We're going all the way here, so strap in.
-
-
-
-
Lifting up one of the external sensor arrays, we find beneath: the optical system for injecting images into the waveguides.
-
Each spot lives at a different depth—corresponding to a single layer of the waveguide.
-
At the back, we find the actual display device: an OmniVision OP02222 field-sequential color (FSC) LCOS device. It is likely a customized variation of the OmniVision OP02220.
-
-
-
Let's take a deeper dive into the projector and waveguide optics.
-
So what's all this about six layers? There's a separate waveguide for each color channel (red, green, and blue) on two distinct focal planes.
-
Without color-specific waveguides, each color would focus to a slightly different point and deform the image.
-
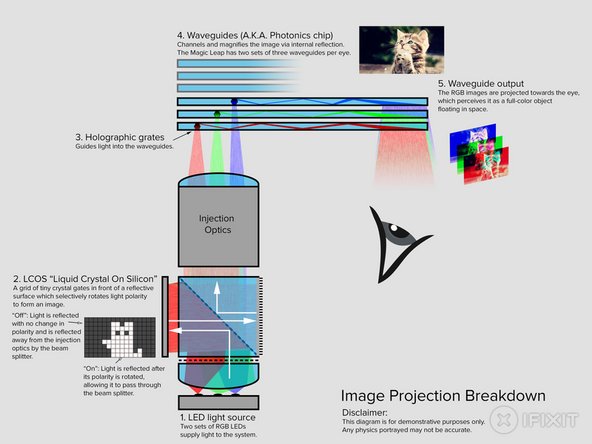
"Figure 6" from the Magic Leap patent application 2016/0327789 shines some light on the optics' inner workings.
-
For your edification and delight, we've included our own "tl;dr diagram" for this system, complete with cats.
-
-
-
A cast magnesium block holds all the optics and sensors, and is surprisingly hefty for an HMD. The VR headsets we've taken apart all used lightweight plastic.
-
But metal makes a better heat sink, and the electronics and IR illumination (likely VCSEL devices) all produce heat.
-
That pink stuff is a thermal pad to help transfer the IR rangefinder's heat into the aluminum frame.
-
Metal also offers a stiffer mounting place to keep the optics stable and focused after their rigorous calibration.
-
But stiff isn't always best—some of these components are mounted with foam adhesive, which will be more forgiving as things flex when heated.
-
-
-
No longer perfectly placed, we may as well pop the covers off the sensors for a closer look.
-
These twin sensor arrays sit at each of your temples, with the strobing IR depth sensor perched right in the middle.
-
AKM Semiconductor and Invensense (now TDK) motion sensors likely found at the top of the camera PCB.
-
A closer look at the nose-bridge depth sensor gives us the room-reading hardware in the form of:
-
IR sensing camera
-
IR dot projector
-
-
-
Connecting all that sensory equipment to the headband, we have pricey, layered flex cables hosting:
-
Movidius MA2450 Myriad 2 vision processing unit
-
SlimPort ANX7530 4K DisplayPort receiver
-
OmniVision OV680 sensor bridge for processing simultaneous image streams from multiple cameras (like we found in the Amazon Fire Phone)
-
Altera/Intel 10M08V81G - 8000 logic cell FPGA, possibly for glue logic, or managing MV part or camera bridge data
-
Parade Technologies PS8713A bidirectional USB 3.0 redriver
-
NXP Semiconductors TFA9891 audio amplifier
-
Texas Instruments TPS65912 PMIC
-
-
-
Popping off one of the two IR emitter rings, we find the elusive eye-tracking IR camera hiding behind a dark filter.
-
These appear to be OmniVision CameraCubeChip cameras with externally-mounted dichroic filters.
-
-
-
Now things get a bit destructive, but it's worth it to get a peek at the optics chain.
-
A tiny ring of six LEDs starts the process—red, green and blue, times two for two focus planes.
-
The LEDs then shine on the LCOS microdisplay to generate an image. It's mounted to the black plastic housing next door.
-
From inside that housing, a collimating lens aligns the raw light output from the LEDs, and is mounted to a polarizing beam splitter.
-
The polarized beams then pass through a series of lenses to focus the image into the entrance gratings on the waveguides.
-
The entrance gratings themselves look like tiny dots embedded in the six (now slightly shattered) waveguides.
-
We pick up the "injection" unit for a closer look, revealing the colors associated with each entrance grating: two red, two green, and two blue.
-
-
-
Now that we've had our tasty optical treat, it's time to turn our attention to the brains of this operation, the Lightpack!
-
It's hard to miss those prominent cooling vents. Does this little pocket PC have an active cooling system? We'll soon see.
-
These FCC markings don't yield up much, other than it's designed by Magic Leap and assembled in Mexico. The identity of the actual hardware manufacturer is said to be a closely guarded secret.
-
-
-
Cracking the Lightpack open takes a lot of work, but heat and careful prying does the trick eventually.
-
Most VR headsets seem to take after PCs with lots of cables, but this is a single permanent cord—trapped under a status LED strip, some screws, and some copper tape.
-
Another solid bit of cast magnesium out of the way, and we behold the motherboard!
-
-
-
We ignore the modular headphone jack and button board, in favor of that shield-filled field of silicon.
-
A PC favorite Cooler Master fan graces this PCB, explaining those vents we saw earlier.
-
Twirling away screws isn't enough to free the heat sink, which is very stubbornly glued in place. After a good ten minutes of heating and prying, it finally loosens its conductive grip.
-
-
-
A few shields later and its time to look at the chips that make the magic happen:
-
2x Samsung K3RG5G50MM-FGCJ 32 Gb LPDDR4 DRAM (64 Gb or 8 GB total)
-
Murata 1KL (likely Wi-Fi/Bluetooth module)
-
Nordic Semiconductor nRF52832 RF SoC
-
Renesas Electronics ISL9237HRZ buck-boost battery charger
-
Altera (owned by Intel) 10M08 MAX 10 field programmable gate array
-
Maxim Semiconductor MAX77620M power management IC and Parade Technologies PS8713A bidirectional USB 3.0 redriver
-
-
-
And a little more magic on the back side:
-
Toshiba THGAF4T0N8LBAIR 128 GB NAND universal flash storage
-
Spansion (now Cypress) S25FS128S 128 Mb quad SPI NOR flash memory
-
Texas Instruments TPS65982 USB Type-C and USB power delivery controller
-
uPI Semiconductor uP1666Q 2 phase buck controller
-
Texas Instruments INA3221 bi-directional voltage monitor
-
Invensense (now TDK) accelerometer
-
Winbond W25Q80DVUXIE 8 Mb serial NOR flash memory
-
-
-
IC Identification, continued:
-
Texas Instruments TLV320AIC3206 stereo audio codec
-
ON Semiconductor NC7SB3157L6X SPDT analog switch
-
Texas Instruments TS5A21366 and likely ON Semiconductor analog switches
-
Texas Instruments LP5523 9-ch. LED driver
-
Texas Instruments PCA9306 voltage level translator and SN74AVC4T245 dual-bit bus transceiver
-
Texas Instruments TLV809J25 2.25 V voltage detector and LM4132AMF-2.5 2.5 V LDO voltage reference
-
Texas Instruments TPS630252 4 A boost converter
-
-
-
Next the saucer section lifts off, leaving the battery housing vulnerable to our prying hands.
-
Getting to the battery was so tough it's almost ironic to find pull-to-remove tabs, but they're better than nothing!
-
Magic Leap packs this twin-cell battery sandwich with 36.77 Wh, running at 3.83 V. That's in the same range as some popular tablets.
-
-
-
The Magic Leap One is clearly an expensive, short-run piece of hardware. Every bit of construction is intended to maintain the precise calibration for the life of the device. Our guess would be that this was pushed out at full speed, regardless of the price, to get something on the market.
-
Let’s hope for a consumer edition that maintains the thoughtful design and dedication to durability, while also avoiding the short-sightedness of this device.
-
Special thanks to Karl Guttag of KGonTech, who contributed his invaluable time and expertise to help us navigate this teardown.
-
VR expert, and our sometimes-nemesis, Palmer Luckey also contributed some great content, as well as hardware access. You can read his full take on the Magic Leap One here.
-
Lastly, it's time to assign a repairability score.
-
- The speakers are easy to remove and replace with just a single screwdriver.
- The threaded fasteners are all of the standard Torx and Phillips variety.
- Disassembly is mostly nondestructive—on paper, anyway. With this much glue on this many fragile components, you’d better have buckets of patience and a very steady hand.
- The battery is only replaceable if you’re willing to remove the motherboard and tiptoe your way past several intense glue barriers.
- There is no upgrade path for any of the optics or processor—slightly disappointing on a $2,300 piece of gear.


Laatste gedachten
Repareerbaarheidsscore


(10 is gemakkelijkst te repareren)
15 opmerkingen
In Step 10, figure 2 (the figure from the patent) the ‘optional’ polarizing filter (2072) is not very optional. And you skipped it in your summary image.
It’s likely a three-wavelength, 1/4-wave retarder used to rotate linearly-polarized light to circularly-polarized light before it bounces off the LCOS. The reflected light goes through another 1/4 wave so it’s now 1/2 a wave from the input light. That is - it’s linearly polarized 90 degrees from the original light. That’s why the polarizing beam splitter cube is able to separate the input field (100% coverage) from the LCOS-reflected fields. They’re 90 deg. different polarization.
Also, that means the RGB emitters aren’t likely LED’s. They’d have to be laser diodes (or VCSEL’s) to have the narrow spectrum necessary for the 1/4 wave retarding film.
Wick, you seem to know something about this subject, but you are wrong about the Figure from the patent. The beam splitter will polarize the light but having two might work better.
In the final configuration and as diagrams by iFixit (the 3rd figure with respect to Step 10) they absolutely need a polarizer (as show) right after the LEDs or else half the light will go strait into the injection optics without modulation. This 3rd figure does leave out a quarter-wave plate and polarizing mirror on the right side of the beam splitter cube that is necessary to bounce the light back to the beam splitter so it can be directed out to the injection logic. As drawn, the light from the LCOS would go through the beam splitter and out the side of the cube.
I want to add to my prior comment that I have only seen the teardown pictures and had to mentally reconstruct what was going on from picture. I did not see the components as they were taken off. Based off the pictures, I was trying to make it work based on what I was seen from static pictures.
Something that concerns me in this design is that the LED light is shot straight at the beam splitter and if the polarization is not great with the first/LED polarizer and the beam splitter, there will be a spot of uncontrolled light (about the size of the LEDs) in the center of the image. I’m assuming they are using wire grid polarizers in both locations.
Another issue with the design is that the image has to pass through and reflect off the beam splitter (if based on what I was shown and was told is correct). Usually with a wire grid polarizer, you don’t want to pass the “image” of the LCOS through the polarizer as it will do damage to the image. The FIG 6 from the patents would be the “normal” configuration.
Ye-gods, thats a lot of impressive technology squeezed into a small package! No wonder it has taken so long to develop. I’m skeptical that it will ever be a commercially viable product. They are surely shipping significant dollars along with each developer unit. My prediction is that, at best, it will be a high-end business-use product, never a consumer product. Most probably MagicLeap will be acquired by a major before too long, and a year later the major will kill it, having found the skeletons in the closet and determined it will never be profitable — especially with consumers now embracing lower-tech, lower AR quality devices. But hey, congrats to ML for being aggressive with technology, and I wish them the best of luck. Thanks for the superb tear-down, finally revealing the long-standing mystery of ML, IFIXIT!
The device is reminiscent of a camcorder, with a lot of optics and electronics compressed into a small volume and not a lot of consideration to repairability. There’s a lot more engineering here than a VR headset and I’m impressed how far Magic Leap has iterated the design for a developer release. That said, having a non-replaceable battery would be a disaster for a consumer release IMHO. Great teardown!