Ga door naar hoofdinhoud

Deze demontage is geen reparatiehandleiding. Om je HP Chromebook 11 G5 EE te repareren, gebruik onze reparatiehandleidingen.

  1. HP Chromebook 11 G5 EE Teardown/Disassembly, HP Chromebook 11 G5 EE Teardown/Disassembly: stap 1, afbeelding 1 van 3 HP Chromebook 11 G5 EE Teardown/Disassembly, HP Chromebook 11 G5 EE Teardown/Disassembly: stap 1, afbeelding 2 van 3 HP Chromebook 11 G5 EE Teardown/Disassembly, HP Chromebook 11 G5 EE Teardown/Disassembly: stap 1, afbeelding 3 van 3
    • This is the HP Chromebook 11 G5 Education Edition, Commonly used in schools.

    • DO NOT REPAIR SCHOOL OWNED DEVICES YOURSELF. Schools enact specific policies and generally do in-house repairs. You can get in a lot of trouble with your school IT department for opening your school issued device yourself.

    • Graciously donated by my employer for the express purpose of creating guides on ifixit

    • To start, remove all screws on the bottom of the device. This includes 10 PH1 screws, all of which are hidden by a rubber insert. This can be easily done with your smallest flat head screwdriver or something like a paperclip.

  2. HP Chromebook 11 G5 EE Teardown/Disassembly: stap 2, afbeelding 1 van 3 HP Chromebook 11 G5 EE Teardown/Disassembly: stap 2, afbeelding 2 van 3 HP Chromebook 11 G5 EE Teardown/Disassembly: stap 2, afbeelding 3 van 3
    • Flip the device over (and turn it off if it turns on) and remove the keyboard.

    • This can be done by prying the keyboard out working your way around the edges

    • Do not pull the keyboard out immediately, the keyboard is anchored by 2 ZIF connectors, one for the touchpad and another for the keyboard. Be sure to unfasten these before continuing.

  3. HP Chromebook 11 G5 EE Teardown/Disassembly: stap 3, afbeelding 1 van 3 HP Chromebook 11 G5 EE Teardown/Disassembly: stap 3, afbeelding 2 van 3 HP Chromebook 11 G5 EE Teardown/Disassembly: stap 3, afbeelding 3 van 3
    • Turning our attention to the underside of the removed keyboard, the touchpad and it's ZIF cable can be seen.

    • The ZIF cable is adhered to the touch pad using a light amount of adhesive, which is extremely easy to remove.

    • The touchpad can be pulled out by removing the 3 PH00 screws and popping it out by applying pressure to the other side, slightly towards the keyboard.

  4. HP Chromebook 11 G5 EE Teardown/Disassembly: stap 4, afbeelding 1 van 2 HP Chromebook 11 G5 EE Teardown/Disassembly: stap 4, afbeelding 2 van 2
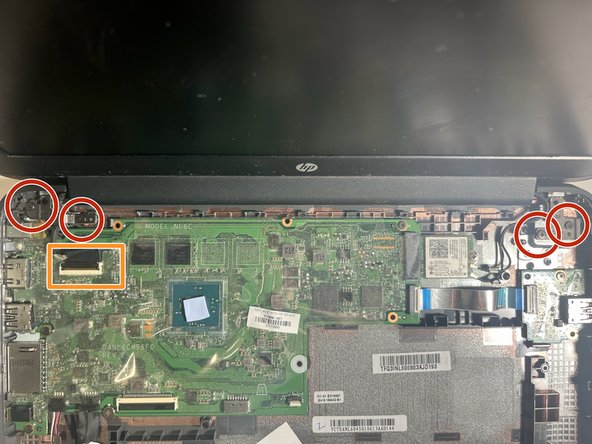
    • There is also a strange plastic piece that is removable. Given I have never had to deal with this in the entirety of working in school IT, I cannot assertively say what it is for.

    • Best guess? Standoff to keep pressure applied to the keyboard from bending it inwards.

    • Nonetheless, this piece can be removed by removing the single PH0 screw that fastens it in.

  5. HP Chromebook 11 G5 EE Teardown/Disassembly: stap 5, afbeelding 1 van 1
    • Turning our attention once again back to the main assembly, several core components can be immediately identified.

    • The Battery

    • The right USB daughterboard

    • WLAN/Bluetooth Card

    • DC Input barrel plug

    • The motherboard

    • The stereo speakers

  6. HP Chromebook 11 G5 EE Teardown/Disassembly: stap 6, afbeelding 1 van 3 HP Chromebook 11 G5 EE Teardown/Disassembly: stap 6, afbeelding 2 van 3 HP Chromebook 11 G5 EE Teardown/Disassembly: stap 6, afbeelding 3 van 3
    • Starting with the removal of the battery, which appears to be made of 3 cells.

    • Disconnect the battery by pulling the cable out of the motherboard

    • The battery is held in with a single PH0 screw. Once removed, it can be pulled out.

    • Opening up the battery does, indeed, affirm it is made of 3 cells, as wekk as a controller.

    • Never ever EVER open a battery, even if you believe it is made of more cells. One slight mistake can result in a fireball of toxic gasses. Even if you do open it, no parts in the assembly can be individually replaced. This is due to how multi-cell lithium batteries are balanced and calibrated.

    • The battery appears to have an internal sensor for temperature, to protect against it exploding in unsafe environments.

  7. HP Chromebook 11 G5 EE Teardown/Disassembly: stap 7, afbeelding 1 van 3 HP Chromebook 11 G5 EE Teardown/Disassembly: stap 7, afbeelding 2 van 3 HP Chromebook 11 G5 EE Teardown/Disassembly: stap 7, afbeelding 3 van 3
    • As for the display, it can be removed by unfastening 4 PH1 screws, 2 on each hinge.

    • Ensure you detach the display ZIF cable

    • As well as the antenna cables on the WLAN card. you can do this by peeling back the protective plastic layer slightly to expose the connectors.

  8. HP Chromebook 11 G5 EE Teardown/Disassembly: stap 8, afbeelding 1 van 3 HP Chromebook 11 G5 EE Teardown/Disassembly: stap 8, afbeelding 2 van 3 HP Chromebook 11 G5 EE Teardown/Disassembly: stap 8, afbeelding 3 van 3
    • Once you have unscrewed and disconnected the display it can be removed by closing the lid, at which point it will "unhook" from the main body.

    • The display bezel can now be removed by prying along the edges.

    • There are 2 hidden PH0 screws under stickers on the bottom left and right of the display.

    • The bezel is secured with tabs. and the aforementioned screws (I forgot about the screws and ripped them out :^)

  9. HP Chromebook 11 G5 EE Teardown/Disassembly: stap 9, afbeelding 1 van 3 HP Chromebook 11 G5 EE Teardown/Disassembly: stap 9, afbeelding 2 van 3 HP Chromebook 11 G5 EE Teardown/Disassembly: stap 9, afbeelding 3 van 3
    • Now with the display assembly exposed, you the webcam (top board) and LCD itself can be seen.

    • The LCD can be detached by removing 4 PH1 screws, one in each corner.

    • Do not immediately yank the LDC out, it is still connected to the main display assembly via a cable.

    • This cable can be disconnected by peeling off the clear tape and pulling the cable out.

    • While not as blatantly stupid and reckless as dismantling a battery, I pulled off the tape on the LCD controller board. You shouldn't do this yourself, as there can be high voltages as well as the fact their are no replaceable parts under the cover.

  10. HP Chromebook 11 G5 EE Teardown/Disassembly: stap 10, afbeelding 1 van 3 HP Chromebook 11 G5 EE Teardown/Disassembly: stap 10, afbeelding 2 van 3 HP Chromebook 11 G5 EE Teardown/Disassembly: stap 10, afbeelding 3 van 3
    • Focusing our attention back on the main body of the display you can remove the metal hinges from the top cover by removing 8 PH1 screws

    • You may notice 1 missing in the bottom left of this image. I cannot say if there will be a screw there on your model, as this specific device may have been repaired previously by my department.

    • There is also a sort of sticker holding the right hinge in. this can be carefully peeled off.

    • The display/webcam cable can be eased out by lightly pulling it out of its grooves, and disconnecting it from the webcam.

    • you can now remove the webcam by lightly prying it from the top cover, making sure to not actually break it.

  11. HP Chromebook 11 G5 EE Teardown/Disassembly: stap 11, afbeelding 1 van 1
    • The antenna cables can be removed similarly to the display cables, except make sure to carefully peel the copper ends off, avoiding damage

  12. HP Chromebook 11 G5 EE Teardown/Disassembly: stap 12, afbeelding 1 van 2 HP Chromebook 11 G5 EE Teardown/Disassembly: stap 12, afbeelding 2 van 2
    • Now, moving onto the speakers we can unplug them by disconnecting the connector on the left of the device. This connector can be quite tight, so you can leverage it out with tweezers.

    • from there, the speakers can be lifted out. (this may require some force)

  13. HP Chromebook 11 G5 EE Teardown/Disassembly: stap 13, afbeelding 1 van 1
    • We will now remove the WLAN card, this can be done by peeling back the protective plastic and removing the single PH1 screw and pulling out.

  14. HP Chromebook 11 G5 EE Teardown/Disassembly: stap 14, afbeelding 1 van 2 HP Chromebook 11 G5 EE Teardown/Disassembly: stap 14, afbeelding 2 van 2
    • We can now remove the daughterboard by first removing the ZIF connecting it to the motherboard

    • Then, remove the single PH1 screw to release the board.

  15. HP Chromebook 11 G5 EE Teardown/Disassembly: stap 15, afbeelding 1 van 2 HP Chromebook 11 G5 EE Teardown/Disassembly: stap 15, afbeelding 2 van 2
    • The motherboard is the next component to be removed.

    • First, disconnect the barrel plug from the motherboard.

    • Next, remove the 4 PH1 screws that secure the motherboard to the enclosure

    • Finally, remove the single PH1 screw securing the barrel plug to the enclosure, and remove the motherboard.

    • The barrel plug cable can then be pulled out with the barrel plug by simply lifting it off the enclosure, as it uses very little adhesive

Aiden

Lid sinds: 09/19/15

17.429 Reputatie

21 handleidingen geschreven

0 opmerkingen

Voeg opmerking toe

Weergavestatistieken:

Afgelopen 24 uren: 4

Afgelopen 7 dagen: 38

Afgelopen 30 dagen: 163

Altijd: 1,528