Inleiding
Je zult vast weleens gehoord hebben van de nieuwe Fairphone 2—het kleine Nederlandse bedrijf dat naam heeft gemaakt met hun betaalbare, modulaire, conflict-vrije mobiele telefoon. Deze keer is het ons opnieuw gelukt om als eerste onze handen op een nieuw exemplaar te leggen. Toen we de originele Fairphone demonteerden, waren we erg verheugd over de modulariteit en de goede toegang tot de telefoon. Vandaag zijn we net zo verheugd om te zien wat de tweede generatie van dit verantwoordelijk ontworpen toestel ons gaat brengen. Join ons joining de movement!
Wil je op de hoogte blijven van alle spec-en-tech nieuwtjes? Check en volg ons dan op Facebook, Twitter en Instagram!
Wat je nodig hebt
-
-
Hier hebben we dan eindelijk de tweede generatie van de Fairphone. Niet alleen is deze aanzienlijk gegroeid qua afmetingen, maar ook qua stijl:
-
5" 1080p LCD-scherm (446 ppi) met Gorilla Glass 3 bescherming
-
Qualcomm Snapdragon 801
-
2 GB LPDDR3 RAM
-
32 GB intern geheugen met uitbreidbare opslag via MicroSD slot
-
2420 mAh door de gebruiker verwijderbare lithium-ion batterij
-
8 MP achterste camera
-
Android 5.1 Lollipop
-
-
-
Met afmetingen van 43 x 73 x 11 mm is de Fairphone 2 wel degelijk aangekomen ten opzichte van het toestel van de eerste generatie.
-
Met 168g (waarvan 20g van de behuizing) is de Fairphone 2 slechts 6 gram zwaarder dan de 1e generatie.
-
We kunnen nu al twee SIM-kaart slots zien onder de doorzichtige behuizing. Hoera voor flexibiliteit!
-
Wat is dat? Een vijfpinsaansluiting die nergens op aan lijkt te sluiten? Daar moeten we later nog eens naar kijken...
-
Deze telefoon is—hoe schattig?—gelabeld met "Designed to open." Dat klinkt ons als muziek in de oren!
-
-
-
Het eerste item op onze agneda is de lichtdoorlatende achterste behuizing. Het ziet er knus en stevig uit, maar komt eraf zonder dat we ook maar een tool hebben aangeraakt.
-
Waar is alle lijm? Is dit een droom? Pats. Nee, dit is zeker geen droom.
-
"Verwijder de batterij voordat je het scherm verwijdert" Is dit een demontage-tip op de batterij?
-
Er zijn weinig dingen die ons nóg gelukkiger maken dan producenten die hun reparatie-instructies bij hun toestel voegen—laat staan op of in hun toestel zetten.
The picture is misleading. You cannot remove the cover as a whole, it has two pieces that must come separately.
Hi Aloïs, at the time we did this teardown the back cover was one-piece. It was the first issue ever of the Fairphone 2. A teardowns is not a guide and therefore does not represent the proper way for disassembly or replacing a part. We are planning to update the actual back cover guide to the two-piece version soon. Stay tuned
-
-
-
Net zoals vroeger, tillen we de batterij uit de telefoon en... dat is dat! Geen lijm, geen klemmen, geen drama.
-
De batterij gebruikt zelfs veercontacten in plaats van de met beugels beschermde drukaansluitingen waar we inmiddels al zo aan gewend zijn geraakt. We kunnen nu weer batterijen uitwisselen alsof het 2005 is!
-
Deze handige 3.8 V lithium-ion batterijcel overlegt een ampèrage van 2420 mAh met een vermogen van 9.2 Wh.
-
-
-
Het gebrek aan zichtbare schroeven verontrustte ons enigszins. Gelukkig duurde dat niet lang, aangezien we deze handig gelabelde klemmen vonden.
-
Het verwijderen van de schermmodule is niets meer dan een kwestie van het omzetten van de schakelaars en het eruit schuiven van het paneel.
-
Op het midframe vinden we een verzameling aan pogo-pinnen, terwijl hun tegenhangers op de achterkant van de schermmodule te vinden zijn.
-
We halen het metalen schildje, direct onder de contactkussens van de schermmodule, weg en zien vervolgens precies waar het scherm met het breakout board verbonden zit.
Hi
I just tried pulling out the screen and I must add that it's not that simple to do it safely...
The assembly is quite tough, you must give a good amount of strength to disassemble the screen from the board. My technique was to take in my 2 hands the body and to use a strong flat surface (a table is OK) to help me sliding the screen.
The brackets are very resisting.
At least it won't be too easy to tear it apart ^^
You are right. The display is mounted very well.
The steps and descriptions of the teardown aren't meant to be read as replacement guides.
You will find more information and pictures in the display replacement guide over here:
Fairphone 2 Vervanging van de schermmodule
(don't forget to unlock both sliders)
I saw a very useful tip on youtube, which comes from the Fairphone support: Give the phone a soft massage, push the display against the chassis forwards and backwards several times, only one or two milimeters, and after a short time it will move. I did that wearing latex gloves, because they have a very good friction and I didn't have to give to much pressure on the display, and in the end it was quite easy to remove.
hello,
I'm currently designing a modular laptop concept for a project at university and I'm trying to get my hands on some of the pogo / spring loaded contact connectors which they use in this.
Does anyone have any recommendations for where to find some?
Can't help with that, but must mention that that's pretty cool.
The wikipedia article on Pogo pins has links to manufacturers: https://en.wikipedia.org/wiki/Pogo_pin
I guess you find them in Huaqiangbei ( Shenzen, China)
-
-
-
-
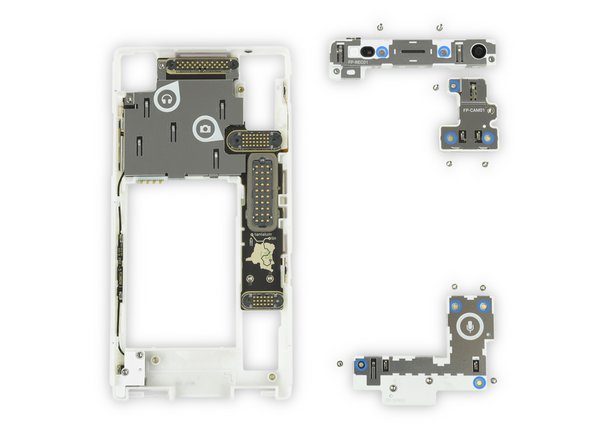
En voilà, hier hebben we het hoofdframe met drie individueel verwijderbare modules. De kleine icoontjes ernaast laten zien wat iedere module doet:
-
Hoofdtelefoonjack, oorstukspeaker en de naar voren gerichte cameramodule
-
Naar achteren gerichte cameramodule
-
Microfoonmodule
-
We vinden ook een kleine plattegrond die de bronnen van de conflictvrije tin en tantalum, die in de telefoon zijn gebruikt, laat zien.
-
-
-
Het is tijd om die schroeven eindelijk eens aan te pakken en om eens echt goed te testen hoe repareerbaar de Fairphone 2 werkelijk is.
-
We pakken onze vertrouwde Phillips #0 schroevendraaier en verwijderen, met groot gemak, alle drie de modules.
-
Eronder vinder we nog een laag aan veercontacten—niet één flexkabel of drukaansluiting te vinden.
-
-
-
De modules zijn bevestigd met Torx T5-schroeven—waarschijnlijk om de gemiddelde gebruiker ervan te onthouden te diep in de telefoon door te dringen—welke nog steeds vrij gemakkelijk zijn te verwijderen.
-
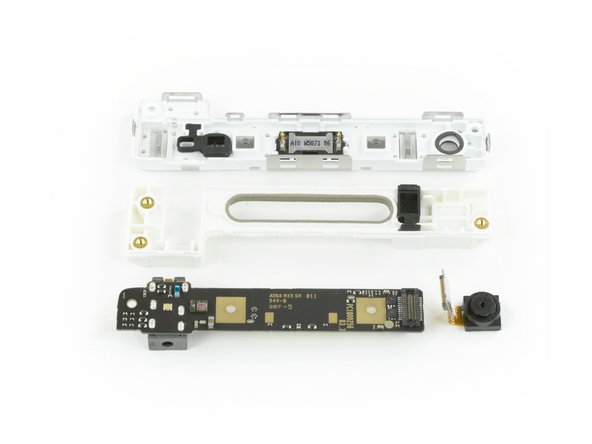
De beginnen met de bovenste module: de naar voren gerichte camera komt er direct uit dankzij een simpele flexkabelaansluiting.
-
Veercontacten zorgen ervoor dat de oorstukspeaker vermogen heeft, wat het tevens gemakkelijk maakt deze te vervangen.
-
De hoofdtelefoonjack, het laatste onderdeel, is aan het moederbord vastgesoldeerd. Gelukkig blijft er niet veel over, wat betekent dat een vervangende printplaat niet heel duur zou kunnen zijn.
-
-
-
Het volgende slachtoffer: de achterste cameramodule.
-
Hopelijk kunnen we dit onderdeel in de komende jaren ook upgraden, à la Project Ara. We branden onze kaarsjes.
-
Deze camera zelf is een 8 megapixel CMOS camera met een 1/3.2 inch sensor en een diafragma van ƒ/2.2.
-
Deze module is op eenzelfde wijze ingebouwd als de andere modules: een plastic behuizing rondom een off-the-shelf onderdeel, verbonden met een pogo-interface board via een flexkabel en bijbehorende aansluiting.
-
-
-
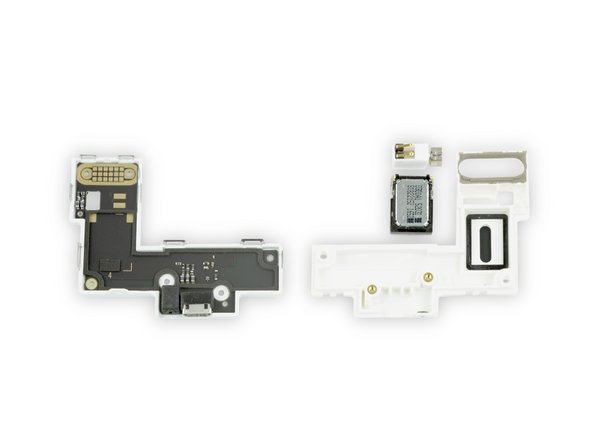
Nog een laatste module om aan te pakken—hoewel het enkel een icoontje bevat van een microfoon, bevat deze module eigenlijk best wel wat onderdelen.
-
De trilmotor en speakers zijn verbonden met veercontacten—nog meer makkelijk te verwijderen onderdelen, yay!
-
De USB-poort en de microfoon zitten op het bord vastgesoldeerd—niet per se slecht, aangezien de USB-poort wel wat extra stevigheid kan gebruiken en significant meer pinnen bevat dan een speaker.
-
-
-
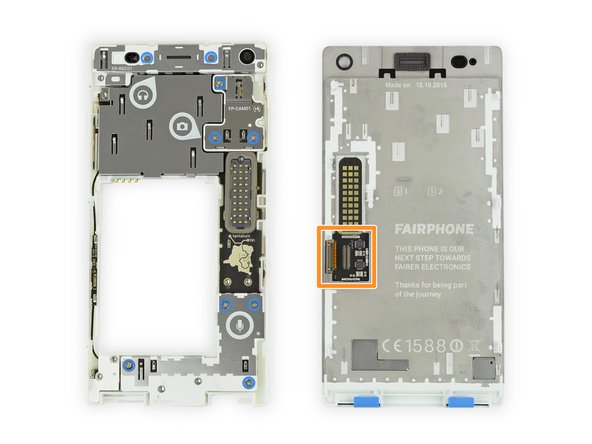
Het is de hoogste tijd om diep in het hart van de Fairphone 2 te duiken.
-
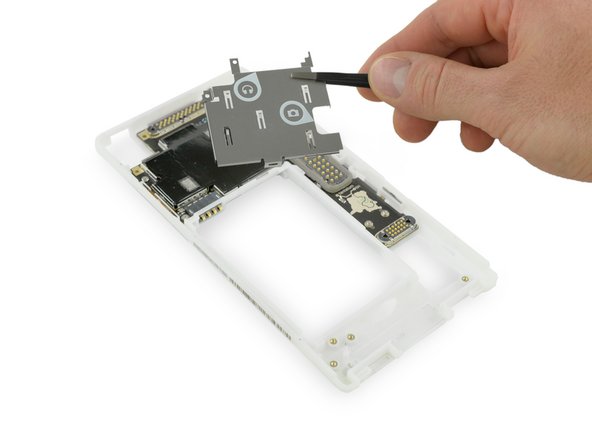
De metalen beschermplaat, vol met handige en informatieve icoontjes, komt er als eerste uit en onthult een warmteverdeler, welke op zijn beurt nog een aantal verheugende onderdelen verhult.
-
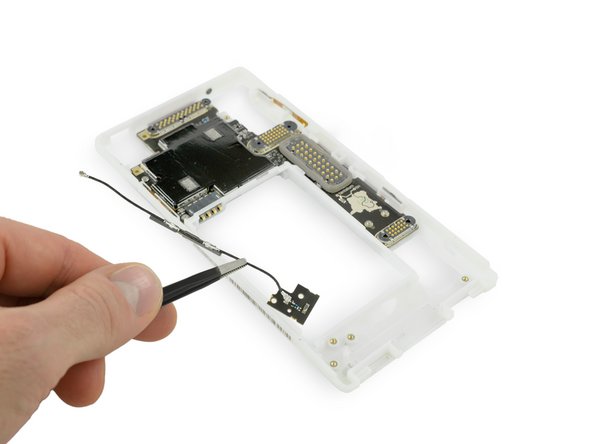
Onderweg komen we nog een RF-kabel tegen. Deze kabel stuurt het radiosignaal langs de zijkant van het frame naar de hoofdantenne. Je weet echter wat er gebeurt als we dit soort dingen tegenkomen: we halen ze eruit!
What kind of tool do i use to open the 2 screws?
Those are Torx T-5
Da mein Handy baden gegangen ist, sieht man am linken, unteren Federkontkat rote Farbe, wohl ein Indikator für den Wasserschaden im Innern, kann man als “Anfänger/Nichtskönner” diesen selbst beheben, wenn man die Metallabschirmung abschraubt oder macht man dann diesen Hitzeverteiler kaputt?
-
-
-
Wat een schoonheid, niet? We trekken het doorzichtige plastic frame helemaal leeg door alle ingebouwde en geïntegreerde antenne's en knoppen te verwijderen—deze zijn allemaal met het moederbord verbonden door middel van veercontacten.
-
En verder naar beneden vinden we die vijf pogo-pinnen die we eerder al tegen kwamen. Dit is eigenlijk een USB 2.0 interface met power input—klaar voor toekomstige uitbreidingen en meer extra fancy behuizingen.
I've had SIM card and SD card sockets go wrong on me before so I was hoping these would be replaceable without throwing away the entire core unit. No such luck it seems. It would have been cool if these had been embedded in the frame instead. I guess that would imply a lot of spring connectors though.
Ist schon Einiges diese Bilder. Leider vermisse ich die klassische Art von iFixit mit Angabe der Schauben und der heiklen Stellen.
Grund: Ich erhielt ein FP 2 mit defektem erstem Slot. Diesen wollte ich reparieren, aber beim Anblick der geklebten gedruckten Leitungen (Antene?) von aussen habe ich es sein gelassen. War mit zu heikel, da ich nicht wusste, ob sie fest mit der Platine verbunden sind. Also habe ich diese “letzte” Platine nicht entfernt, um zu den Slots zu gelangen, die von der weissen Abdeckung geschützt sind. Hier in diesem Beitrag ist auch nichts angegeben, wie man die Platine entfernt. Ich hoffte, wenn ich an die Slots von hinten komme, dass ich die vermutlich verbogenen Kontakte mit Vorsicht wieder zurechtbiegen könnte.
-
-
-
En dan nu de tech-specs:
-
Samsung KLMBG4WEBC 32 GB eMMC NAND Flash
-
Qualcomm WCN3680B Wi-Fi 802.11ac Bluetooth Combo (gebaseerd op informatie van het Fairphone-team!)
-
ST Microelectronics LSM330DLC 6-assige Accelerometer + Gyroscope
-
-
-
Aan de achterkant vinden we nog meer:
-
Samsung K3QF2F20EM 2 GB LPDDR3 RAM, geplaatst op de Qualcomm Snapdragon 801 MSM8974AB
-
Qualcomm WTR1625L RF Receiver (eenzelfde als in de iPhone 6)
-
RF Micro Device RF7389EU Multimode Multiband stroomversterkingsmodule
-
Qualcomm QFE1100 Envelope Tracking Power Management
-
Qualcomm PM8841 PMIC
-
Qualcomm WCD9320 Audio Codec
-
-
-
De Fairphone 2 verdient 10 van de 10 punten op onze repareerbaarheidsschaal (10 is het gemakkelijkst te repareren)
-
De LCD en het glazen scherm zijn samengevoegd, wat het verwijderen vergemakkelijkt maar vervanging aanzienlijk duurder maakt.
-
De onderdelen die het meest vervangen moeten worden, het scherm en de batterij, kunnen worden vervangen zonder het gebruik van tools.
-
Interne modules zijn bevestigd met Phillips #0 schroeven en simpele veeraansluitingen.
-
Individuele modules kunnen worden geopend en veel onderdelen kunnen individueel en los van elkaar worden vervangen.
-
Alle knoppen en kabels zijn makkelijk toegankelijk. Veercontacten zorgen ervoor dat toekomstige upgrades mogelijk zijn en onderdelen makkelijk kunnen worden vervangen.
-
Naast de in de telefoon aangebrachte informatieve icoontjes en instructies wordt de Fairphone 2 ook nog eens geleverd met ingebouwde reparatie-informatie.
I would have given this a 9/10, and 10/10 if the glass and LCD could be replaced separately, as the glass is a very common point of breakage in drops, as well as being susceptible to scratching. Knowing that replacing damaged glass will not result in the cost of an entire LCD assembly definitely gives a bit more peace of mind. A 9/10 reparability score is still very good though.
i disagree. for now a perfect 10 score is fair,.
it might warrant a drop in point in the future if a better phone comes out, but for now Repairability Score of 10 is a valid point, as it is the easiest to repair compared to other phone.
milkboy -
I disagree, the fusion of display and front glass has a good reason. By removing the air gap between the LCD and the front glass, they can reduce the Light reflections in this surfaces by a good amount.
So I wouls give this Phone a 10 out of 10.
Thoth -
Just to be fair, I believe the idea is to make the phone so robust that the glass is unlikely to get cracked in the first place. Cracked screens are absurdly common because it doesn't hurt the manufacturer to make them fragile. LCD faults are also pretty common though. If you reduce the smashed glass rate to lower than the LCD fault rate, then the risk tradeoff looks much better. And so the phone is designed so that you can drop it from 6 feet without smashing the glass, something I wouldn't suggest trying with an iPhone.
At least that's the idea. Nothing short of real-life statistics will prove it true or false.
I agree, the fused front assembly should make it a 9/10.
but they are fused by design and repairability doesn't involve that. You could maybe give it a 7/10 or 8/10 on modular design but it shouldn't affect repairability score which we're concerned with here.
By that logic even phone gets 10/10 because it's a single module and you can replace the whole thing.
From the overall design, I'm expecting this phone to be very user repairable, but also pretty unreliable.
For most users that is a pretty negative trade off.
alex -
Hi, the fusion between the LCD ans the screen is understandable but FP should offer discount the price for those who send back the broken screen units for refurbishing.
I think a 10/10 is warranted because a 9/10 would put it in the same class as many lesser phones.
But being a happy owner I'm potentially bias.
Ist es denn möglich einen einzelnen Prozessor (Schritt 14) zu tauschen und wo würde ich den bekommen?
Hanno
Da der Prozessor am Motherboard verbaut ist, würde dies einen Tausch des Boards bedeuten. Lediglich den Chip zu tauschen (auslöten und wieder einlöten) würde einen sehr großen bis technische fast unmöglichen Aufwand für einen normalen Verbraucher bedeuten. Ob die Chip-Architektur kompatibel ist mit den restlichen Komponenten ist eine ganz andere Frage.
Is it technically possible to extract the nand flash without damaging it from one Fairphone (totally dead) and to put it into another working Fairphone ? I need this in order to recover the otherwise lost pictures from the dead phone…
If yes, could you please give me some tips / advice on how to do it properly ?
Thank you in advance !
Yes this absolutely is possible! You ideally would need an reflow oven but an heatgun should work too. Look up how to reball/reflow chips for more info.
t h -
-


Met dank aan deze vertalers:
87%

Thomas Keulemans helpt ons de wereld te herstellen! Wil je bijdragen?
Begin met vertalen ›

Team

20 opmerkingen
Hi people, I am a volunteer in the Repair Café of Deventer and we are very excited about the new Fairphone2 because it showcases what we are working for: Repairable design. We are with over 300 Repair Café's in Holland now and promoting the Fairphone is one of the things I like to do. I cannot wait to receive mine, should be end of this month. So I can take it to Paris on the 12th Decmber for the big Climate March. Super glad and proud with Fiarphone, they deserve 10/10 score all the way!
Aside from making the phone thinner, fusing the display and digitizer eliminates the issue of dust infiltration (specks of crap under the glass that just can't be cleaned off) which is a warranty/service concern on devices where the two are separate. The combination is also more rigid, providing a subjectively better (firmer) "feel" when the user taps the screen. It's also, all else equal, more resilient against impact or drop damage. From an engineering standpoint, the case can easily be made that these advantages outweigh the potentially increased repair cost, especially since the fused glass is less likely to break to begin with.
Hey iFixit, there is a dead link in step 6 (Demontage van de Fairphone 2 link in the word 'map'). We changed our site so that is probably the reason. Can you fix it?
Thanks!
@Riqz: The GPS is in the Core module.
@Mgehrking: It can, but you have to research yourself where there is coverage with which carrier. Do realise we do not ship outside Europe (also not for after sales support). https://fairphone.zendesk.com/hc/en-us/a...
Esmée - Fairphone Customer Support
The dead link is now fixed. Thanks for the tip! :)
The Philips #1 Screwdriver didn't work that well, I had to use a flat 1.4mm driver to remove the screws. Maybe better to recommend using a #00?
Victor
Is there going to be a US LTE variant available anytime soon? Me want!
I'm unable to get beyond step #4 - I flipped the blue switches but I can't slide the screen out. Too bad there is no real-life Fairphone community nearer to me than London (I'm in Leamington Spa in Warwickshire). I would so much rather have a hands-on demonstration than attempt to follow a video.
Hello louisaradice, a teardown is not meant for repairs. You might want to look at the display assembly guide for that. There are also additional comments on step 4 to get the display off. Here you go: Fairphone 2 Vervanging van de schermmodule
I have looked at Fairphone 2 Display Assembly Replacement but I'm still none the wiser. Try as I can, I still can't slide the screen out.
Louisaradice, Have you looked at Fairphone's screen replacement video guide on YouTube? It's also possible that your clips have somehow jammed? If you are still unable to replace the display I suggest posting a question inn our Answers forum, and take photos of the clips to share with our users. Hopefully we can help you troubleshoot!
Hello,
my Mother's phone has fallen in the water. How can I diagnose which module(s) have to be replaced?
Hello Francesco,
first, make sure it is completly dry. You should have removed the battery immediately after the dive.
you can remove all three modules. Then clean the contacts with alcohol.
Then WITHOUT the modules (just screen and core) try start the phone.
If its boots up replace one module at a time then check again.
For futher help: check the fairphone forum https://forum.fairphone.com/
pa sch -
Hi, Do you know the spec of the antenna, and where I can order another one? Thanks!
Mine does also very often NOT connect to a telephone network (either 2G, 3G or 4G), all other phones I tried are much better (at the same location and with the same network provider). Would changing the antenna resolve this (I mean, how likely does such a simple part become defective)?
Ist schon Einiges diese Bilder. Leider vermisse ich die klassische Art von iFixit mit Angabe der Schauben und der heiklen Stellen.
Grund: Ich erhielt ein FP 2 mit defektem erstem Slot. Diesen wollte ich reparieren, aber beim Anblick der geklebten gedruckten Leitungen (Antene?) von aussen habe ich es sein gelassen. War mit zu heikel, da ich nicht wusste, ob sie fest mit der Platine verbunden sind. Also habe ich diese “letzte” Platine nicht entfernt, um zu den Slots zu gelangen, die von der weissen Abdeckung geschützt sind. Hier in diesem Beitrag ist auch nichts angegeben, wie man die Platine entfernt. Ich hoffte, wenn ich an die Slots von hinten komme, dass ich die vermutlich verbogenen Kontakte mit Vorsicht wieder zurechtbiegen könnte.
Im Teardown findest du solche Angaben generell nicht. Allerdings haben wir tatsächlich keinen Guide um das Motherboard zu entfernen. Hier im Bild lässt sich erkennen, dass es mit Torx Schrauben befestigt ist (ich schätze Größe T4 oder T5). Viel Erfolg
Now that the FairPhone 5 came out with a new 10/10 score, with more modularity than ever, I would be curious to know what the score of the FP2 would be if released today.
Wow! That is one ugly looking brick of a phone!
The cheap looking plastic and design would make me stay way clear of it, even if offered to take itself apart.before repairs.
I find it hard to believe that there really is a market for something like this... What's the price?
Victor Szulc - Antwoord
I'm not too sure what makes this black rectangle any uglier than the rest available for purchase. The clear back is something of a turn-off, personally, but that's hardly a difficult thing to remedy.
Dave Davidson -
The price is 529.38€. The back cover is also available in black matte, black translucent, blue matte, blue translucent.
Julian Andres Klode -
a) Beauty is in the eye of the beholder, so you finding this phone ugly is uninteresting. b) If you prefer to continue using a 'beautiful' phone like an iPhone or Samsung, then you understand nothing about the fairphone project.
Doc Brown -
I totally love the idea and engineering behind this phone. They even noted how almost all consumers buy a rubberized case after they buy a phone, so they built that right in. That save $30 right there.
I would buy one in a second if it worked well on American phone frequencies. For all it’s modular design, they didn’t make the radio modular or global which is the only failing I can see.
The original comment optimizes what is wrong with the phone market today. There isn’t a single high end phone made today that has a removable battery (except this one) or slide out keyboard. Things I miss from my old G1. They all worry about aesthetics rather than repair-ability and battery life. Sure, it’s obvious why the phone manufacturers don’t want these devices to be easily repaired, built in obsolescence. It’s the consumers acting like sheeple parroting the manufactures promotional material that really disappoints.
Ben Zack - Antwoord
The main problem is not the phone companies but the people who will spend $1,300.00 for the latest models. These new units do not make phone calls any better or you internet service any faster than what is available. Yes they may have a lot of fancy bells and whistles. But in the end they are just cell phones. Now I must admit I do like the camera/ video cability, but do not buy them for that. ITS A PHONE. And my old flip phone will do the job just as well as the latest Apple IPhone.
tjhoodless - Antwoord