Ga door naar hoofdinhoud

Wat je nodig hebt

Deze demontage is geen reparatiehandleiding. Om je Dell Chromebook 3100 te repareren, gebruik onze reparatiehandleidingen.

  1. Dell Chromebook 3100 Teardown, Removing the backplate: stap 1, afbeelding 1 van 1
    • Unscrew all 9 screws, with a Philips screwdriver then pry open the back of the Chromebook with a spudger.

  2. Dell Chromebook 3100 Teardown, removing the battery: stap 2, afbeelding 1 van 2 Dell Chromebook 3100 Teardown, removing the battery: stap 2, afbeelding 2 van 2
    • Unscrew the 3 screws holding the battery in place and unseat the battery from the motherboard. Be careful when removing the battery as there is a sticker.

  3. Dell Chromebook 3100 Teardown, removing the motherboard: stap 3, afbeelding 1 van 2 Dell Chromebook 3100 Teardown, removing the motherboard: stap 3, afbeelding 2 van 2
    • There a 6 screws holding the motherboard in place.

    • Remove these screws and then remove an additional screw securing the black and white connection to the WiFi card.

    • Once all the screws are undone, unplug the wire to the speakers and the display cable and the ribbon cable for the mouse.

  4. Dell Chromebook 3100 Teardown, removing the hinges: stap 4, afbeelding 1 van 1
    • 3 screws on each hinge hold the top screen to the bottom of the Chromebook. Removing these allow you to separate the two halves.

  5. Dell Chromebook 3100 Teardown, removing the speakers: stap 5, afbeelding 1 van 1
    • The speakers are the easiest to remove. Simply grab the speakers and gently wiggle them free.

    • Keep in mind the wires are taped to the Chromebook.

  6. Dell Chromebook 3100 Teardown, removing the mouse pad: stap 6, afbeelding 1 van 2 Dell Chromebook 3100 Teardown, removing the mouse pad: stap 6, afbeelding 2 van 2
    • There are 2 types of screws for the mouse pad, The first 3 screws secure the mouse pad itself (these screws have a large flat head).

    • The other 3 screws secure the mouse pad.

    • Brace these screws, they do NOT have a large flat head.

    • Once you have removed the screws you need to disconnect the ribbon cable. You can do this by lifting up on the black tab then pull the cable.

  7. Dell Chromebook 3100 Teardown, removing the keyboard: stap 7, afbeelding 1 van 2 Dell Chromebook 3100 Teardown, removing the keyboard: stap 7, afbeelding 2 van 2
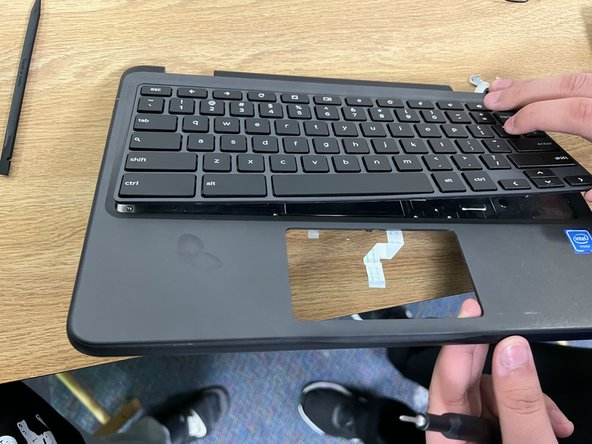
    • To remove the keyboard stick a screw driver through the 2 holes and push it to pop it out.

  8. Dell Chromebook 3100 Teardown, disassembling the display: stap 8, afbeelding 1 van 3 Dell Chromebook 3100 Teardown, disassembling the display: stap 8, afbeelding 2 van 3 Dell Chromebook 3100 Teardown, disassembling the display: stap 8, afbeelding 3 van 3
    • In order to reach the screw securing the display, you must first remove the sticker covering the screw.

    • Once you have removed the screws remove the display cover by peeling it off it is glued on.

    • Once you have removed the screws, remove the display cover by peeling it off.

    • The display cover is glued on.

  9. Dell Chromebook 3100 Teardown, Removing the display: stap 9, afbeelding 1 van 3 Dell Chromebook 3100 Teardown, Removing the display: stap 9, afbeelding 2 van 3 Dell Chromebook 3100 Teardown, Removing the display: stap 9, afbeelding 3 van 3
    • To remove the display unscrew the 4 screws then peel away the screen.

  10. Dell Chromebook 3100 Teardown, Removing the hinges: stap 10, afbeelding 1 van 1
    • To remove the hinges, unscrew 4 screws (2 on each side) then remove them.

  11. Dell Chromebook 3100 Teardown, removing the screen: stap 11, afbeelding 1 van 3 Dell Chromebook 3100 Teardown, removing the screen: stap 11, afbeelding 2 van 3 Dell Chromebook 3100 Teardown, removing the screen: stap 11, afbeelding 3 van 3
    • The screen is not screwed in. So to lift it up, all you need to do is peel it off.

    • When you lift the screen remove the connection attached to the screen.

Carlos Martinez

Lid sinds: 12/18/20

193 Reputatie

1 Handleiding geschreven

5 opmerkingen

thank you my speaker broke this helped me fix it with out getting in trouble

Noah Corda - Antwoord

the thing that had the thing were i talked about my speaker was kinda for you. ****(((((kinda)))))****

cant tell information -

which ribbon cables control which functionality?

Luke Fernandez - Antwoord

Can you show the connector colors for the battery to motherboard cable please

Deana - Antwoord

my speaker doesn't work its thing got disconnected at home when I had took the bottom of it out for fun but one of the screws was jammed so I twisted the case thingy and then yanked it and I saw the bottom and it was so cool! but I messed up some things and the speaker doesn't work and luckily I was able to put/screw the bottom back on but some of the screws would go in but won't secure/work and stuff. im just a kid i don't know how to fix it that well. maybe some I could fix but I need a bigger brain and head and I also need to learn more. btw im using/typing on this Chromebook. my teachers and maybe parents know that it is like this... they cared a little like probably %5.5 but they really didn't care. the sub cared 4.9% but teachers cared 0.6%. i dont know what else to say................

cant tell information - Antwoord

Voeg opmerking toe

Weergavestatistieken:

Afgelopen 24 uren: 1

Afgelopen 7 dagen: 3

Afgelopen 30 dagen: 23

Altijd: 3,328