Mijn probleem
My first iPhone was a 3GS, and I just couldn't see the point in getting rid of it when I bought my 4S. I ride a motorcycle, and I thought that the 3GS would be better to use for music than my aging 30GB iPod Photo for the simple reason that it uses a HDD and the iPhone 3GS is all solid state.
Recently, I've found that the iPhone has been dying only 80-90 minutes into my rides, which was pretty frustrating. You'd agree with me if you were subjected to my Helmet Karaoke Club. After the last ride, I looked at the 3GS a little more closely and noticed that when I tried powering it back on, the battery meter still showed 46%. Whaaaaa?! As if that weren't enough, it wouldn't power back on despite that 46% figure. It would power back on after charging above 50% and would only stay on if I just played music. Started any other app, such as a GPS app, and it was "Sayonara" again.
Thinking it might be a battery gauge calibration issue, I charged it enough to get the phone to power on, and then had it play music until the battery gauge ran down to 0%. Then I recharged it to 100% and tested it by running my GPS app with the music running. 46% came, and down she went again. After some time with my buddy, Google, it sounded like the battery might be shot, so I came to iFixit and ordered the battery repair kit complete with tools.
Mijn oplossing
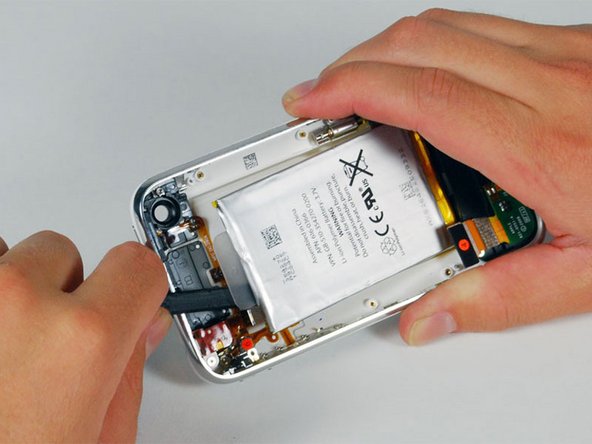
I read through the online battery replacement guide, took a deep breath, and started dismantling my iPhone. Even though I'm not using this as a cell phone any more, I still felt a little queasy as I exposed its silicon and metal innards. I followed each step precisely, checking my progress against the screenshots more than once. When I removed the logic board, I discovered what the problem was. The battery had puffed up, which is a dead giveaway that the battery was not going to be returning from its extended vacation any time soon. I'm actually quite lucky that it didn't fail catastrophically while attempting to charge it while testing. I swapped out the battery and started screwing down the logic board when disaster struck. A screw managed to shoot outside of the phone case and pulled a Houdini. I searched around the table, but found nothing. Fortunately, I saw a gleam on the carpet under the chair and found the little bast... rascal a few minutes later. Thank goodness for my headband-mounted LED lamp! After about an hour total, I had the battery replaced and the iPhone all buttoned up again. Then the moment of truth: Power ON!
Result: Dead battery gauge with the "Please plug me in" icon.
I plugged the phone into the wall charger for several minutes to give it at least a minimal charge to power up the phone. After those minutes passed, I hit the button again, and...
Dead battery gauge with the "Charging" lightning bolt icon. I cursed its lack of energy.
I took the phone apart again, checked all of the connections, verified that the battery contacts were clean, and put it all back together again. Back on the charger it went for several more minutes, and...
Nothing.
This time I gave it a couple of hours to charge just to make sure. I even tried a different cable and charger.
Still nothing. *sigh*
Back to the iFixit site I went to seek answers. I saw everything from wrong kind of battery to blown on-board fuses to dead power management ICs. I didn't like the sound of any of them, so I posted my situation in the Answers section as well as sent a copy to iFixit customer service. The next day I received a response from Ryan Lutz with iFixit saying it did, indeed, sound like I received a dead battery; apologizing for any inconvenience; and letting me know that he was shipping out a replacement immediately.
I received the replacement battery 3 days later, replaced it in what seemed like record time, and after getting the phone put back together, I hit the power button yet again.
IT LIVES! Yes, I was greeted by the glow of the white Apple logo, shortly followed by the familiar sight of my lock screen. It seems that the 3GS will live to fight another day!
Mijn advies
1) The best advice I can give is to read the iFixit guide, and then read it again. Not just the steps, but all the notes as well, even if you don't think they pertain to your situation.
2) Buy the iFixit toolset unless you already own a set of appropriate tools. It's worth the few extra bucks. Use the right tool for the job. That rule holds for everything you do.
3) Make sure your work area is clear of anything you don't need for your operation. Lay a white towel down and work on top of that. The nap of the towel will help reduce the tiny screws' tendency to hop around and off onto the floor when you drop one.
4) Keep a pair of tweezers handy. They were very useful for picking up as well as setting the tiny screws inside the phone.
5) Use a good lamp or a headband-mounted LED lamp for ample light. It will help with seeing stuff in the phone as you're poking around inside.
6) I had no problem prying the battery off of its adhesive, but I had one of those blue gel heating pads ready in case I needed to set the phone on it to loosen things up a bit.
7) Don't be afraid to ask the community or iFixit questions AND Don't assume that it can't be the replacement part.
8) Be confident. It really wasn't that hard.

0 opmerkingen