Replacing Optical Drive with HDD: 13" Macbook 3,1
Khorban -


Mijn probleem
I bought a new MacBook Pro. It shocked me through the case -- not a static discharge, but a proper shock. I decided it wasn't worth the money for something I didn't want to touch, so I returned it to apple and decided to extend the life of my 2008 Macbook (version 3,1) by another year or two to save some cash.
The optical drive would read, but not write. Since I barely used it anyway, I decided to put a 64gb SSD in the main HD slot for the OS and applications, and a 500gb platter in the optical slot for my media.
Mijn oplossing
Fairly straightforward. Before undertaking this yourself, check out my advice, too, especially if you are new to opening up your MacBook (like I was!). Nothing exploded, all worked well in the end by following ifixit's guide, but there were some steps that could use some clarification.
The repair probably took me about an hour, but I was being (overly?) cautious on a few steps -- I'm always paranoid about breaking connectors that I've never seen before. And wowsers, was the inside of that MacBook dusty! Definitely have some air-in-a-can availble to clean up while you're in there.
I installed the SSD, did a clean install of OS X 10.6 from a DVD, then removed the optical drive and replaced it with the platter drive. I didn't measure times, but booting seemed faster without the platter drive. Plenty snappy both ways, and wow does the SSD let big programs like Office open up quick! The 500b drive is for music, movies, etc.
I've read that the Mac boots more readily from the main HD, so that's where I put the SSD. The big drive is in the optical slot, and it can be ejected. The Finder symbol for the optical slot HD looks the same as the SSD -- it does not look like an external device.
Overally, a fun little project that was definitely worth it to me. Just be careful and you can eke a few more months or years of service out of your aging MacBook.
Mijn advies
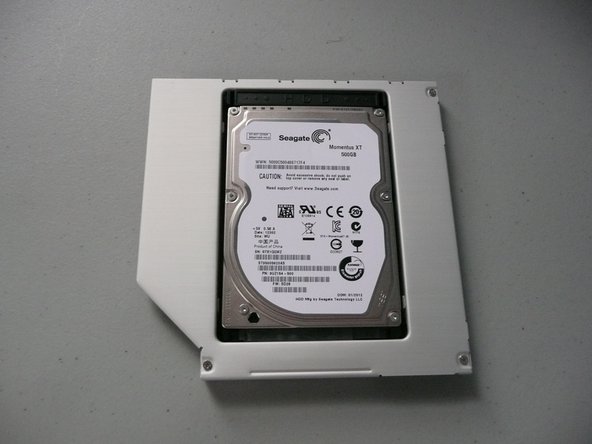
Placing the HD in the enclosure: I couldn't track down any actual directions for this. The video is terribly vague, and there doesn't seem to be any written documentation beyond replacing the optical drive. What I did: slot in the drive, pop the plastic spacer in behind it (words up), and use two screws in the bottom. It came with four screws total, leaving me with two spares and making me nervous, but I have no idea what else to do with them. See photo.
Definitely some advice to share, in case you run into any of my small frustrations with the project. I'll go by step numbers in the current guide.
Step 6 (removing screws from rear of battery compartment): I needed a #000 phillips, not a #0 as stated.
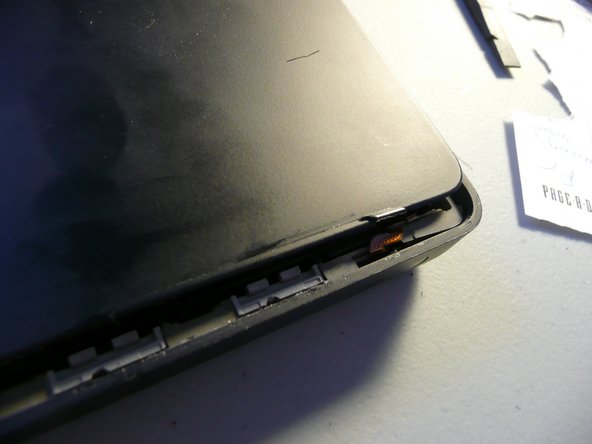
Step 11 (lifting the upper case): Be careful! The front edge of my upper case cracked/splintered right along the edge. A little epoxy seems to have fixed it up well enough, but it's a repair I wish I didn't have to make. See photo.
Step 18 (foil tape on optical drive): I had trouble getting it to re-stick when I put it back on the replacement, but smoothing it out with the spudger really helped it get a grip again.
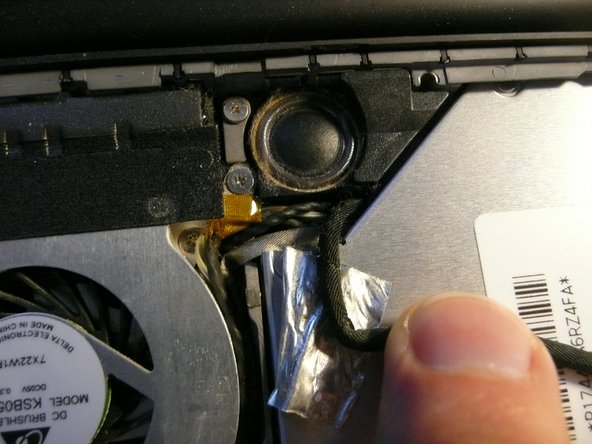
Step 20 (removing optical drive screw): First, there's not just the bluetooth cable: it's a rat's nest over this thing. It took me a few minutes to figure out what the picture was referring to, because I couldn't even see a screw at first. I used the pointy end of the spudger to hold everything to the side. Be extra careful when you remove the screw, cause if it gets lost below the cables, you'll be cursing. See photo (the screw's hiding under all that wire.)
Also in that step, replacing this screw is --why-- you leave the bracket loose in step 29 when you replace it. The hole in the bracket didn't line up for me when I replaced the drive, and I had to loosen the bracket to let the hole slide back into place. Still took some convincing with the spudger, but it --does-- slot back into place.
Step 30 (BT holder): Try to keep some of the glue on the underside of this. Mine really wanted to leave it on the old drive, but it won't re-stick on the new one without it. Also, replacing it on the new drive was a bit awkward -- it spans a gap.
0 opmerkingen