I dropped my iPad mini …on the driveway…cement driveway
Mijn probleem
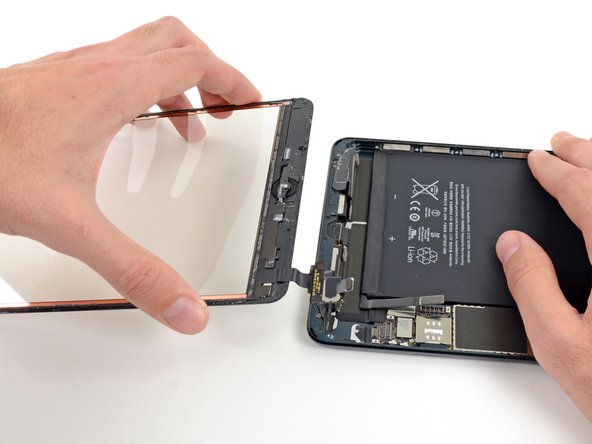
Broken digitizer glass.
Mijn oplossing
iFixit.com had the parts, the tools, the videos, the guides, and the experts. You could purchase their services or buy the products.
Some sites suggest using a hair dryer to heat the adhesive while iFixit offered the iOpener. Even after the repair I’m not sure how effectively I used the iOpener or how critical it was to the operation. However, I knew how sensitive electronics could be to temperature, static, vibration, ...and kinetic energy from being dropped. So having a device that went easy on the thermal characteristics seemed like a good choice.
I bought the iFixit Digitizer Kit. It came with almost everything I needed to do the job. Almost? Yes. Having watched several videos, I knew it didn’t come with nitrile gloves, micro fiber cloth, glass cleaning solution, air duster in a can, nor exacto blades. I did provide all of those things myself. I varied from iFixit directions because I saw other experts do the job and I had some intuition based on experience that those things would come in handy. They did.
I ordered the kit and it arrived two days later on a Wednesday. I don’t believe the package was dropped on the porch, but the package arrived with some minor dents in the box, a box that contained very thin and fragile glass. Fortunately, I found to my relief that iFixit was either really lucky or really good with their packaging. While the clear plastic tray had a corner chipped out, the digitizer itself was undamaged. All the other items on the invoice were there and undamaged too.
The actual time for the repair came in at 3 hours 40 minutes. Not too bad considering this was my first and I took time to take pictures (for posterity) and review videos for reference throughout the process.
I put everything out on the kitchen table--not a perfect place, but the best I had available. I would have rather had a fancy static-free mat work area. That would have been cost prohibitive for me.
The first challenge was to remove the damaged digitizer.
I removed the iPad from its not-so-protective-against-cement black cover. Planning to use the cover again, I dusted it with the canned air quite thoroughly. The last thing I needed would be to mess up a repair by closing a shard-laden cover on my new glass face.
While I was at it, I air-dusted the iPad itself. Then I proceeded with the iOpener and suction cup combo according to the iFixit guide. Well gee a suction cup doesn’t suck so well on cracked glass. Like others have said, tape doesn’t work so well either. I really don’t know if I needed more time with the iOpener or should have used the dreaded hair dryer. Either way I persevered. I finally got a corner up and things went faster.
Remember those nitrile gloves? I wish I had. My first mistake was to try to remove the glass without nitrile gloves. It only took a couple of times getting stuck (no blood) to make me put them on. Yes, I know they aren’t Kevlar, but when one is dealing with glass fragments the size of pollen, a simple nitrile glove provides more than adequate protection while keeping dexterity reasonable.
After I got the cracked digitizer off-except for the bottom wires--the challenge was to remove the shards that were still stuck with adhesive to the metal frame. I had to be careful not to scratch the LCD and still remove all of it. I used the exacto blades here. Use the right tool for the job. A spudger or plastic tool is not the right tool. The edges were too shattered to even hope that might work. When I finally got the thing off, the edges looked like a mountain landscape in shadow profile.
I scraped off enough so I could safely remove the LCD, and back plate, and connector shield. That finally got me to the point I could take that awful cracked glass off the logic board and get it away from me and my precious iPad. Somewhere in there I remembered to turn the thing off. However, taking the advice of one of the iFixit commenters, I did not disconnect the battery. If I shorted something, it was dead. If I damaged connectors it was dead. My fat fingers were not really designed for almost microscopic connectors and my prescription lenses weren’t going to aide in that process. I thought I was better off doing as few connectors as reasonable.
With the LCD and back plate removed, I was then able to safely concentrate on cleaning up the adhesive with its embedded shards of glass. I cleaned up the work area. A work area engenders a clean finished product. I used the anti-static cleaners and air duster to make sure everything was fairly pristine. That allowed me to begin reassembly. That in turn allowed me to make my second faux pas: I had all three connector shield screws and all 16 screws reinstalled only to realize I didn’t connect the new digitizer. I removed the screws and connected the digitizer. I used a bunched up lint free cloth to lean it against during re assembly. After the second time through the 19 screws, everything looked much better.
Here I want to pause to mention that the plastic tray that came with the iFixit kit came in very handy for separating the different kinds of little bitty screws. It’s not magnetic so the magnetic #00 screwdriver can easily pick them up. With little effort you can get one screw on the driver head for reassembly.
I made sure there were no finger prints, shards, adhesive or anything else that shouldn’t be inside. I reinstalled the LCD (4 screws). I put the magnets back on the frame in the hollows, not on the digitizer. It works better to match up the hollows that way. I prepared the digitizer by remove the plastic protectors on the adhesive. I ‘S’ curved the connector cable on the digitizer to fit in its little pocket using a suggestion from another commenter. I placed the digitizer lightly into place. After all, considering my track record with mistakes on this project along, I might be removing the digitizer again to fix yet another mistake.
I powered up. Wait for it....WOW! It worked! I pressed the digitizer more firmly into place. Honestly, considering how difficult it was to remove the broken digitizer, I don’t know how easy it would have been to get it back up without cracking the screen.
I removed the button on the old part to see how hard it would have been to use a cheaper part. It turns out that removing the button with tweezers wasn’t too difficult--if you like scratched buttons. I'm glad I didn't choose that option.
Mijn advies
Have nitrile gloves, micro fiber cloth, anti-static glass cleaning solution, air duster in a can, exacto blades (triangle or flat edge--not rounded).

0 opmerkingen