Replacing an iMac faulty HD, not so scary after all!


Mijn probleem
Lately, my son's iMac 24" (version 7,1, model 2134) began to behave oddly. After a little investigation, I found a S.M.A.R.T. notification saying the HD has to be replaced due to unrepairable errors... to great relief of my son, who was afraid that piling a vast quantity of games and other garbage "w/o protection" was the cause of a virus infection or a corrupted system.
Mijn oplossing
At first I was a little afraid of digging into the internals of that machine, which isn't as easy to rip as my Mac Pro. But I checked your guides and found one that matches my needs, and I decided go for it.
I have checked your site in Europe, but at last I decided to place an order at your US site, despite a little increase in costs of shipment, due to the convenience of getting the tools needed and the HD replacement at once.
The goods arrived quickly, and I was able to finish the replacement very easily following your step by step guide in just one and a half or two hours, including taking the photos of all the process (actually they took me more time than the actual job). You can check them all at https://www.dropbox.com/sh/3ar5tny9mb7wd...
In fact the only difficult and time consuming task in the whole "incident" was restoring from Time Machine and cleaning the garbage that was filling the old HD.
Mijn advies
The process you describe in your Guide "iMac Intel EMC 2134 and 2211 Hard Drive Replacement" is very clear, and drive me along the process so it end up very easily.
But if you ask me for any advice or comments, it comes to me 3:
- In the Step 11 of the guide you warns about the difficulty of removing and reconnecting the LCD cable to the power supply... Definitely it was difficult, but to me, it was way harder (requiring a dangerous amount of force) to detach the hard drive black bracket as you describe in Step 15. In my case I took an alternate procedure removing first the two T8 Torx screws securing the bracket, so you can slide it sideways out of their metal case support and so liberating the upper part of the HD.
You can see it in my first attached photo.
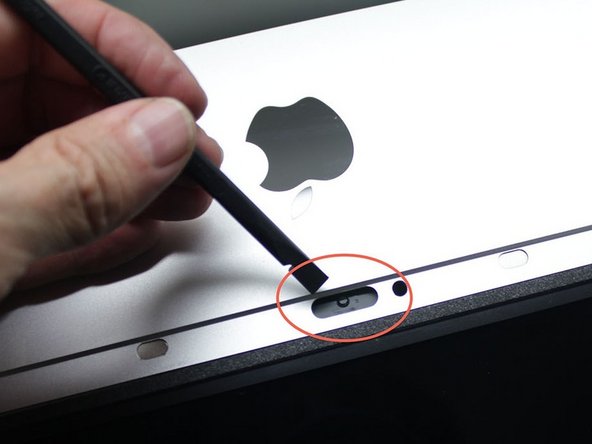
- Also, I meet a little annoyance when I was reinstalling the front aluminium bezel. It happens that the little luminosity sensor placed below the middle lower part of the screen was somewhat pushed out of place while placing the large bezel, and after realizing the issue I have to de-bend it and relocate with a spudger (photo 2). Maybe you can warn about it in your guide.
- Finally, I found missing a couple of the magnets of the bezel (photo 3): they have lost the adhesive which fixes them to the back of the bezel and ended up attached to the steel frame beneath. I have cleaned the old adhesive rests and replaced it with double sided thin tape trimmed to fit in their sockets. Umm... due to the little glueing surface, the smoothness of metallic parts and the (really) strong force of the magnets, I don't know if that shoddy work will resist if not maintained by the attraction of the metal strips in the back of the front glass panel. Any idea of a better suited adhesive?


0 opmerkingen