

You’re off to school, and maybe you’re leaving home for the first time. If you’re lucky, your parents have loaded you up with the tech you’ll need to get through it. But at some point, something’s going to go wrong, or break, or both. Even if you don’t crack your phone’s screen, your laptop battery will probably die at some point, and if you don’t know how to fix it, then you’re going to be cutting deep into your limited college budget.
The good news is, you’re already here reading about how to repair these things yourself. The even better news is that it’s way easier than you think.
You don’t really own your devices until you know how to fix them. If something starts going screwy, and you have a basic knowledge of how it all fits together, you have a much better chance of diagnosing the problem. Don’t worry, though. You won’t need to add yet another subject to your studies. Just the act of repairing will teach you most of what you need to know. And for the repairs we’re covering here, it will be pretty obvious when you need to make them.
Laptop Battery Replacement
All batteries die eventually, and when that happens to your phone, or laptop, then it usually means a trip to somewhere like the Apple Store or an independent repair shop. And that in turn leads to a hefty bill ($69 for iPhone 13 models if you use Apple’s own service), and—even worse—time spent waiting for the repair, without access to your device.

Your first stop should be iFixit’s repair guides, a huge library of step-by-step instructions, with photos, tips, and tool recommendations. You can search for your particular phone or computer model, and then check to see how involved the process is. Some computers only require unscrewing a few screws, and swapping in a replacement battery.
Others, like MacBooks, are harder to open, and have important parts either soldered or glued into place. Fortunately, even Apple’s (recent) computers have relatively easy-to-replace batteries, because it makes in-store repairs a lot quicker.
Battery replacement is a good starter project because you can usually plan ahead. You will notice that your battery isn’t holding a full charge like it used to, so you can order the replacement battery, and any tools you need to open up your device, ahead of time.
Our M1 MacBook Air battery guide, for example, is rated as a moderately easy repair. And right away you’ll discover the importance of specialist tools. Just to get the bottom case off, you’ll need a Pentalobe screwdriver, and two Torx screwdrivers. But fear not—these can be had in sets, where you get one handle with interchangeable tips. Order a basic, good-quality repair kit when you order the replacement battery.
You should also consider a MacBook Fix Kit. These contain the spare parts, plus all the tools needed to install them. They’re also quite affordable, even for phones. The iPhone 12 battery kits currently run at $45, just $5 more than the battery alone.
The trick to all successful repairs is patience, and taking things slow. Before you move to the next stage, take a look at the photos, and your own device, to see how they match up. Make sure you understand how something comes apart before you start poking at it.
Careful, patient progress will almost always end up in the quickest repair, because you won’t end up yanking on a forgotten cable and snapping its connector, for example.
Careful, patient progress will almost always end up in the quickest repair, because you won’t end up yanking on a forgotten cable and snapping its connector.
And before we move on, a quick tip for making your batteries last longer. The li-ion batteries used in most modern devices have a finite number of charge cycles. As the whole point of a battery is to be charged and discharged, there’s not much you can do about that, but you can still ease the stress.
Batteries hate heat, and they don’t like being totally full or empty. Avoid these as much as you can, and you’ll be good. For example, never charge the battery while hot. This means avoiding “wireless” Qi chargers, which waste a lot of energy as heat.
If you leave your laptop plugged in most of the time—connected to a monitor, for example—then your battery level will constantly hover around the 100% mark, which isn’t great for battery life. MacBooks even detect this behavior, and limit the level to 80% to keep the battery in better shape. For more control on the Mac, try Al Dente, an app that offers extra settings (I use Al Dente and recommend it). You can limit the maximum charge to any level, recalibrate the battery meter, and use a special “sailing mode,” which avoids constant charging and discharging to keep it at an exact percentage.
On Windows machines, some manufacturers have built-in tools to limit battery charging. You should check the support sites of the manufacturer (which can vary in usefulness), but there are a few pointers here.
Screen Replacement
The other most likely repair you’ll need to carry out is replacing the screen of a phone or iPad. Again, this is tricky thanks to so many parts being glued into place to save space and weight, but it’s still totally doable. If you have the modular Fairphone 3, then you’re golden. Just pop the back cover off, grab the (included) Phillips screwdriver, and plan on 5-10 minutes for the entire repair.
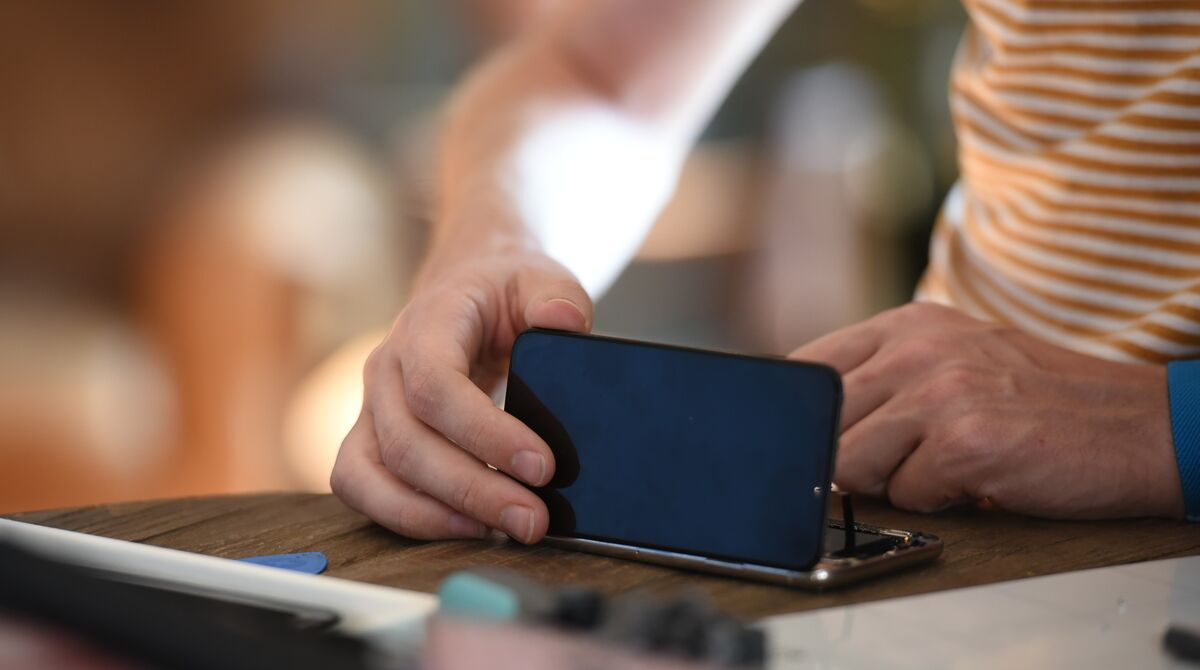
With an iPhone or iPad, things are a lot more involved, and you really do need the correct tools, and to budget 1-2 hours for the process. That’s still probably faster than taking it to a professional. And maybe even more importantly, it gives you another important benefit of DIY repair: it’s sure to keep your data secure.
Phones and other computers are packed with private data, and if you hand it off to a repairperson then you have no idea what they’re doing with it. If they require that you unlock your device, then you should erase it entirely before handing it over. This requires a full backup, plus hours to restore from that backup. With a DIY repair, you don’t have to worry about any of that.
There are also screen Fix Kits, for anything from the Google Pixel to the iPhone 12 Pro Max.
How To Fix (and Avoid) Liquid Damage
Another college classic is liquid damage, aka beer damage. Liquids are nasty because they can quickly spread inside a gadget, and short out anything they come into contact with. This can kill a device dead. The best advice for dealing with liquid is to avoid all liquids. Don’t keep drinks on the desk with your laptop, and so on. But when the inevitable does happen, you should try to cut off the power source as soon as possible. This was easier when phones and computers had removable batteries. On the other hand, many phones are waterproof these days.
If you do suspect liquid ingress, switch off power ASAP, and then consult liquid damage guides.
When I was in college, I spilled red wine on my Amiga computer (this was a while ago). I yanked the power and took it to the store. The store guy took one look, opened it with a (Phillips) screwdriver, removed the main circuit board, and took it to the bathroom to wash it. He told me to come back after the weekend and left the circuit board near a radiator.
There’s plenty wrong with this fix, but it got the job done, and the machine worked for years after. Tap water is not good for electronics, as there are all kinds of other things in there that can corrode or short circuits. Instead, use isopropyl alcohol, as shown in our iPhone liquid damage repair guide.

Liquid repair can be a slow and painstaking process, but as long as nothing gets damaged in the initial splash, and you’re patient enough to dry everything out properly before even attempting to power things on, then you should be good. One tip: No matter what your friends tell you otherwise, don’t bother with rice. It doesn’t work. If it was as good at pulling moisture from the air as people believe, then all rice would be a sodden mess before you even opened the box.
Reduce, Repair, Reuse, Recycle
Another essential aspect of repairing stuff is not a repair at all—well, not directly. When you do finally replace a phone, laptop, or any other piece of tech, don’t just toss it into a drawer and forget about it.
Perhaps you need to keep that laptop around as a backup, in case your new machine needs an emergency (DIY!) repair, in which case you should get the battery charge to somewhere in the middle of its capacity or a little above, shut it down, and store it.
For everything else, pass it on. You may be able to sell it, either to a fellow student, or an online marketplace (Back Market will give you cash for devices). Or—best of all—you could pass it on to somebody else. A family member is always a good bet, but anyone you know who needs it. Laptops can be donated to individuals, or to organizations. Just make sure to fully erase all your personal data first.
The idea is to get more use out of that device. The majority of energy used in the life of a computer is expended in its manufacture, and in shipping it to you. According to Apple’s own Product Environmental Reports, the MacBook Air M1’s lifecycle carbon emissions break down like this: 76% for production, 8% for transport, and just 15% from your usage. The longer you can keep a device in circulation, the fewer new devices will need to be built and shipped.
Eventually, when you can’t get any more use out of a device, take it into an e-waste recycling drop-off point. But the longer you can delay that, the better.
As we have seen, repair is the key to keeping your tech working longer and to making it available to pass on to the next user. It’s also way easier than you might expect, and for some folks it can even be fun.


2 opmerkingen
@mistercharlie - You Forgot hard drive repair,
University Destroy Macs...
For example:
I got a 2010 Mac Mini from the Mississippi university,
I know they need to take the hard drive out...
But they took the... RAM, Hard Drive connector, fan, hard drive mounting gear, bottom case, bottom case mounting, Airport antenna plate, and MANY OF THE SCREWS
I think they need to work on putting computers back together.
Ben Capehart - Antwoord
This guide is mostly irrelevant. If the university provides the computers to students, it's their job to repair them. If students bought the computers on their own, then replacing a battery or screen would most likely be out of their depth.
Mac - Antwoord