

Your laptop is probably dirty. My laptop is probably dirty. At this point in the 21st century, it’s just about inevitable that we all have a speck of dust or two (or three) living where our fingers hang out every day. The good news is keyboards are one of the most modular pieces of modern laptops (with some exceptions, obviously), and are therefore not too difficult to deep-clean should the need arise.
The first question you should ask yourself is how thorough you would like to be. This process can be quick if all you need is a wipe down, or it can be incredibly lengthy if you have a tendency to eat nachos while you type or like to nitpick when you clean. We’ll go all the way to the nitpicky steps in this guide, but feel free to stop wherever you feel satisfied.

What You Will Need
- A laptop
- Isopropyl (rubbing) alcohol, preferably 90% or higher
- A microfiber cloth
- Cotton swabs
- Compressed air (or a cleaner alternative)
What You Might Need
- Opening Picks or something else to pry keyboard keys off your laptop
- Q-tips

Step 1: Shut It Down
You may think you can get away with keeping your laptop on while you do this, and you may be right—but believe us, this process is much easier with your laptop shut off.
Step 2: Loose Debris
This is hands-down the easiest step of keyboard cleaning. If you are a busy person, or just don’t have much patience for cleaning, this is still something you should do every now and then to keep larger pieces of gunk from seeping into places you don’t want them.
Take your open laptop and hold it upside-down, so the keyboard is facing the ground. If you have a friend nearby, ask them to hold it for you—it’s easier to see what you’re doing when you don’t have to hold and clean. Run compressed air or a microfiber cloth back and forth across the upside-down keyboard to dislodge any loose debris that may be hanging out around or under your keys. If you notice something is still stuck under a certain key, try tilting the laptop to different angles to get it out. Most laptop keys have tiny edges on them that can trap debris, making it hard for larger pieces to escape out the cracks you see between the keys and the chassis of your laptop. If there’s something under there that you can’t quite get out with compressed air, it’s time for brute force tactics—skip to “Icky Stic-keys” below. Otherwise, it’s time for a wipe down!
Step 3: Grease & Grime
In our experience, this is the most common type of laptop filth. It’s easy to forget about how grimy your keyboard is until someone else points it out, or one of the keys gets stuckkkkkkkkkk. The solution is simple: a little isopropyl alcohol! Wet a microfiber cloth or a cotton swab with the alcohol, and start wiping. You may have to go over trouble spots a few times, but you should be able to get rid of most residue (and bacteria!) this way. After this step, your keyboard should look good-as-new!
Note: Isopropyl alcohol over 90% is generally free of impurities, so you don’t need to worry too much about getting it where it shouldn’t be, but it’s still a good idea to be careful! Whatever you use to wipe the keyboard should be damp, not dripping wet.

Step 4: Icky Stic-keys
Update, May 2020: Since first publishing this post, we’ve learned a lot more about MacBooks sold between 2015 and 2019 with “butterfly” keyboards. These problematic keyboards can malfunction in ways that make them seem “stuck” or to have grit underneath, but without any real means of fixing them. We recommend checking Apple’s list for its Keyboard Service Program to see if your MacBook qualifies for a free keyboard repair—once Apple’s stores and repair centers are open again. Prying off butterfly-style keycaps should be approached as a last resort.
If you’ve got a sticky key or large debris stuck under one of your keys, find something thin that you can pry with (we use our Opening Picks, but other soft plastic or wood implements can work—just avoid metal). Techniques for prying vary from keyboard to keyboard, but even thin keys can come off in one piece if you are careful. The exception here is spacebar keys, which can be extremely difficult to pry off without breaking. Proceed with caution! Once you have the sticky key removed, use a Q-tip with some alcohol on it to carefully wipe away sticky residue where the key was, as well as any residue on the key itself.
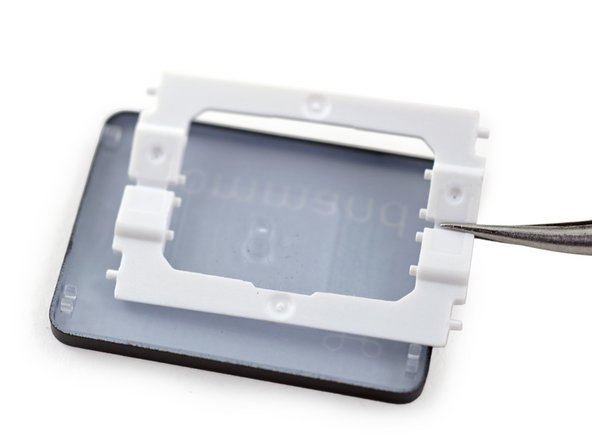
Underneath the key you’ll find the actuation hinge, (also known as a key retainer, or “that white plastic thing”). This hinge can also be a source of stickiness. If yours looks goopy, wipe it down with alcohol or soak it for a minute in some hot, soapy water—just make sure it’s dry before you put it back on the keyboard! If you do take out the hinge (or if it comes out with the key) make sure you take note of the way it is oriented in there—they can be a pain to put back if you don’t know how they are supposed to go in.
If you do happen to lose (or break) a key or a hinge during this process, don’t stress! It’s easy and fairly cheap to replace an individual key, or the whole assembly.
Step 5: Nitpick
When you popped your sticky key off, you may have noticed that it was like, really gross under there. Pet hair and small crumbs have a tendency to find their way under keys and go unnoticed for years. You may not care about this (remember, we did use compressed air earlier! No more dust!). Or, if you’re of the nit-picky population, it may slowly begin to eat away at you until you decide that something must be done. If you are ready to go all the way, set aside a couple hours and start prying those keys off, one by one. Make sure you keep your hinges and keys organized, and remember that compressed air and Q-tips are your friends!
We hope these tips help you feel empowered to exterminate the free-loading dust bunnies living in your laptop keyboard. If you got hung up somewhere along the way, you can try looking for a laptop-specific keyboard disassembly video online, or check out our iFixit guides that come with step-by-step photos and more precise instructions!
What fixes have you found for sticky, stuck, or crunchy laptop keys? Let us know in the comments, or tell us on our social channels: Twitter, Facebook, or Instagram.
Got questions for Ask iFixit? Ask away! Leave them in the comments, or send them on social media with the hashtag #AskiFixit.


16 opmerkingen
So, at the moment isopropyl alcohol is in critical short supply but you think it’s a better use to clean a sticky keyboard than as a medical necessity? Some of us need alcohol multiple times of day to sterilize insulin injection sites. Or to sanitize our hands or to create hand sanitizer because that is also in short supply. Get your priorities straight I-Fix-It.
Steven Wymor - Antwoord
Hand sanitizer is not in short supply. It was in early 2020. Then so many manufacturers came to the rescue, converting their distilleries, etc. Warehouses then filled with the stuff as people thought they’d make their fortunes. Nowadays you will find they are still trying to sell the surplus! in 2020 my supplier wanted $100 for 5 liters of 99.9% IPA. Now back to $30 as it was pre-Covid. No longer in critically short supply!!!
Lissajous -
What an idiotic comment. I know it's been 3 years but wow.
CapoFantasma97 -
This was written in 2018. Stop being a nit pick.
Doug - Antwoord
Since this was written almost two years ago, use common sense and recognize that everything doesn’t immediately (or ever) get updated to be relevant to modern times. While repair *should* be ageless, societal trends can adjust priorities, as you know.
Clearly (or maybe not so much,) anyone is free to read/use/accomplish a task regardless of societal pressure. If you can spare a Q-tip dipped in alcohol to avoid a costly trip to the repair shop/Apple Store, you now have the inspiration. If you aren’t comfortable with that, use that gram of isopropyl elsewhere.
“Medical necessity?” Stay home right now and repair your stuff rather than expose yourself, and others, to what’s out there. That’s my vote.
Be well!
technicalmac - Antwoord