Ga door naar hoofdinhoud

why! N240BU Hard Drive Replacement

Wat je nodig hebt

  1. why! N240BU Hard Drive Replacement, Battery: stap 1, afbeelding 1 van 2 why! N240BU Hard Drive Replacement, Battery: stap 1, afbeelding 2 van 2
    • Start by unlocking the right locking latch.

    • Then, by simultaneously unlocking the left latch, lift the battery out of its socket.

  2. why! N240BU Hard Drive Replacement, Access to main components: stap 2, afbeelding 1 van 2 why! N240BU Hard Drive Replacement, Access to main components: stap 2, afbeelding 2 van 2
    • Begin by spotting the dummy memory card.

    • Then, remove it and put it on your workplan.

  3. why! N240BU Hard Drive Replacement: stap 3, afbeelding 1 van 3 why! N240BU Hard Drive Replacement: stap 3, afbeelding 2 van 3 why! N240BU Hard Drive Replacement: stap 3, afbeelding 3 van 3
    • Locate the 15 screws that hold the bottom cover of the device in place.

    • Unscrew them and place them on your work surface.

    • Then, un-clip the bottom cover, starting with the side shown in the third picture.

  4. why! N240BU Hard Drive Replacement, Hard Drive (mass storage): stap 4, afbeelding 1 van 3 why! N240BU Hard Drive Replacement, Hard Drive (mass storage): stap 4, afbeelding 2 van 3 why! N240BU Hard Drive Replacement, Hard Drive (mass storage): stap 4, afbeelding 3 van 3
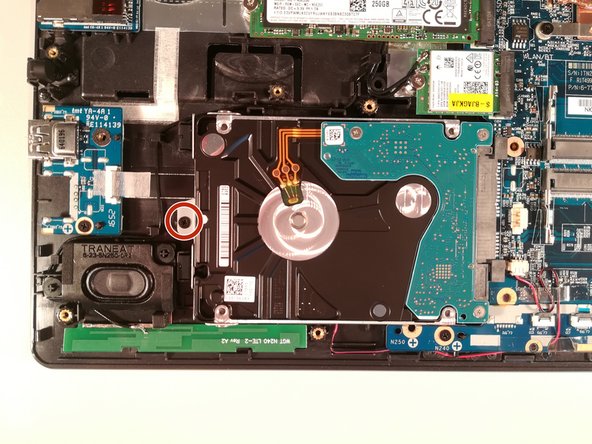
    • Remove the screw circled in red

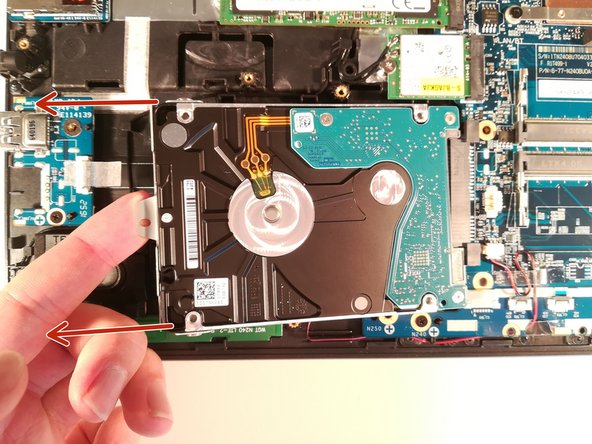
    • Lift up the hard drive

    • Remove the hard drive in the direction of the red arrows

Conclusie

To reassemble your device, follow these instructions in reverse order.

Één andere persoon heeft deze handleiding voltooid.

Met dank aan deze vertalers:

fr en

100%

Deze vertalers helpen ons de wereld te repareren! Wil je bijdragen?
Begin met vertalen ›

Felice Suglia

Lid sinds: 06/15/13

30.884 Reputatie

264 handleidingen geschreven

0 opmerkingen

Voeg opmerking toe

Weergavestatistieken:

Afgelopen 24 uren: 0

Afgelopen 7 dagen: 1

Afgelopen 30 dagen: 2

Altijd: 156