Ga door naar hoofdinhoud

Retrait de l'écran

Waarschuwing: Je bewerkt een vooraf vereiste handleiding. Alle wijzigingen die je hierin maakt, beïnvloeden alle 5 handleidingen die deze stap bevatten.

Stap 4
Screen Removal: stap 0, afbeelding 1 van 3 Screen Removal: stap 0, afbeelding 2 van 3 Screen Removal: stap 0, afbeelding 3 van 3
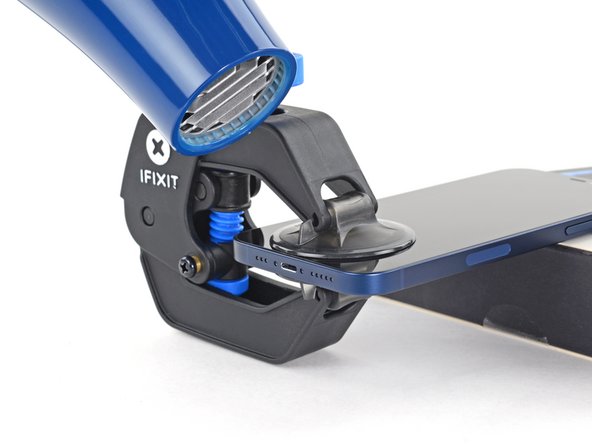
  • Support your iPhone on something sturdy such as a hardcover book so it rests hands-free and parallel to the ground; this makes it easier to work with in the following steps.

  • Use a hair dryer to heat along the bottom edge of the iPhone. The screen should feel slightly too hot to touch.

  • For complete instructions on how to use a hair dryer, check out this guide.

  • Wait one minute to give the adhesive a chance to release and present an opening gap.

  • Insert an opening pick under the screen's plastic bezel when the Anti-Clamp creates a large enough gap.

  • If the Anti-Clamp doesn't create a sufficient gap, apply more heat to the area and rotate the handle a quarter turn.

  • Don't crank more than a quarter turn at a time, and wait one minute between turns. Let the Anti-Clamp and time do the work for you.

  • Skip the next three steps.

Posez votre iPhone à plat sur un objet stable comme un livre à couverture rigide. Ainsi, il sera plus facile à manipuler au cours des étapes suivantes.

Avec un sèche-cheveux, chauffez le long du bord inférieur de l'iPhone. L'écran doit être légèrement trop chaud au toucher.

Pour des instructions complètes sur l'utilisation d'un sèche-cheveux, suivez ce tutoriel.

Attendez une minute pour laisser à l'adhésif le temps de céder et d'ouvrir un espace.

Insérez un médiator sous l'écran lorsque l'Anti-Clamp a créé un espace assez large.

Si l'Anti-Clamp n'a pas créé d'espace suffisant, appliquez davantage de chaleur à la zone et tournez la poignée d'un quart de tour.

Ne tournez pas de plus d'un quart de tour à la fois et attendez une minute entre les quarts de tour. Laissez à l'Anti-Clamp le temps de travailler pour vous.

Sautez les trois étapes suivantes.

Je bijdragen zijn gelicentieerd onder de open source Creative Commons-licentie.