Ga door naar hoofdinhoud

Retrait de la coque arrière du Samsung Galaxy S9

Waarschuwing: Je bewerkt een vooraf vereiste handleiding. Alle wijzigingen die je hierin maakt, beïnvloeden alle 12 handleidingen die deze stap bevatten.

Stap 3
Samsung Galaxy S9 Rear Glass Removal: stap 0, afbeelding 1 van 3 Samsung Galaxy S9 Rear Glass Removal: stap 0, afbeelding 2 van 3 Samsung Galaxy S9 Rear Glass Removal: stap 0, afbeelding 3 van 3
  • If the phone's rear glass is cracked, the suction cup may not stick. Try lifting it with strong tape, or superglue the suction cup in place and allow it to cure so you can proceed.

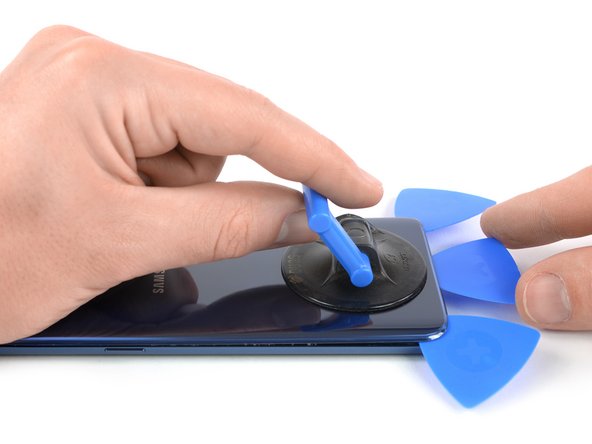
  • Press a suction cup onto the back cover.

  • Lift the back cover's bottom edge with your suction cup, opening a slight gap between the back cover and the frame.

  • This may require a significant amount of force, but you only need to open a very slight gap with the suction cup to insert your tool. If you have trouble, apply more heat to further soften the adhesive, and try again. The adhesive cools very fast, so you may need to heat it repeatedly.

  • Insert an opening pick in the gap you created and slide it to the bottom right corner.

  • Insert a second opening pick and slide it to the bottom left corner.

  • Insert a third opening pick to prevent the adhesive from resealing during the rest of the removal procedure.

Si la vitre arrière du téléphone est fissurée, la ventouse risque de ne pas adhérer. Essayez de la soulever avec du ruban adhésif robuste. Ou bien collez la ventouse à la vitre avec de la super glue et laissez sécher avant de continuer.

Posez une ventouse sur la coque arrière.

Soulevez le bord inférieur de la coque arrière avec votre ventouse pour ouvrir un léger espace entre la coque arrière et le châssis.

Vous devrez insister un peu, mais il suffit juste d'ouvrir un très léger espace avec la ventouse afin d'y insérer un médiator. Si vous avez de mal, faites chauffer une fois de plus, pour continuer à faire ramollir l'adhésif, puis recommencez. L'adhésif refroidit très vite, vous devrez donc peut-être vous y reprendre plusieurs fois.

Insérez un médiator dans l'espace et faites-le glisser vers le coin inférieur droit.

Introduisez un deuxième médiator et faites-le glisser vers le coin inférieur gauche.

Insérez un troisième médiator pour empêcher l'adhésif d'adhérer de nouveau pendant le reste de la procédure de retrait.

Je bijdragen zijn gelicentieerd onder de open source Creative Commons-licentie.