Ga door naar hoofdinhoud

iRobot Roomba 890 Charging Contacts Replacement

Wat je nodig hebt

  1. iRobot Roomba 890 Charging Contacts Replacement, Charging Contacts: stap 1, afbeelding 1 van 2 iRobot Roomba 890 Charging Contacts Replacement, Charging Contacts: stap 1, afbeelding 2 van 2
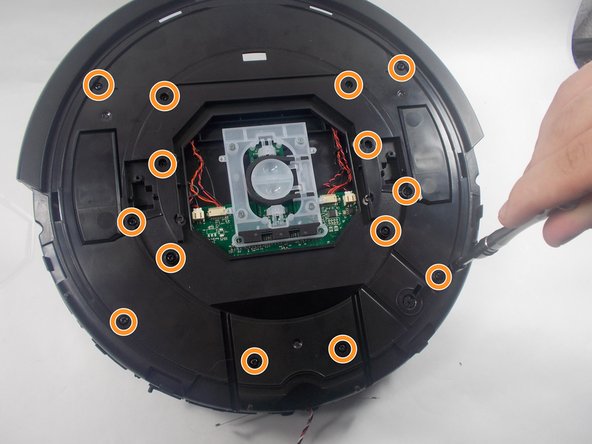
    • Use a Phillips #2 screwdriver to remove the 7.7 mm screw.

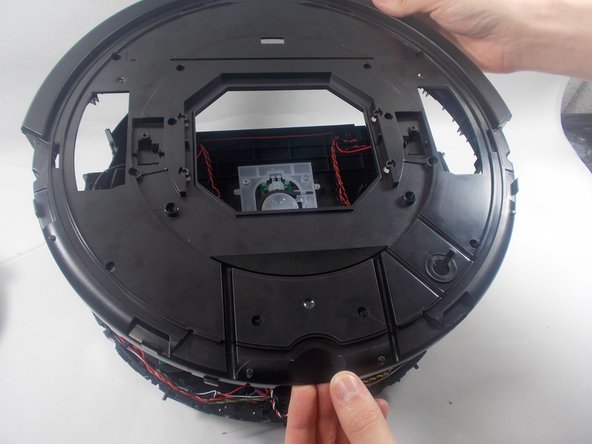
    • Remove the yellow brush head.

  2. iRobot Roomba 890 Charging Contacts Replacement: stap 2, afbeelding 1 van 1
    • Place the Roomba facedown, with its bottom facing you.

    • Use a Phillips #2 screwdriver to remove the two 11 mm screws.

  3. iRobot Roomba 890 Charging Contacts Replacement: stap 3, afbeelding 1 van 1
    • Remove the battery plate.

    • Remove the battery by pulling directly up on the grey pull tabs.

  4. iRobot Roomba 890 Charging Contacts Replacement: stap 4, afbeelding 1 van 2 iRobot Roomba 890 Charging Contacts Replacement: stap 4, afbeelding 2 van 2
    • Use a Phillips #2 screwdriver to remove the four 11 mm screws.

    • Remove the bottom plate of the Roomba.

  5. iRobot Roomba 890 Charging Contacts Replacement: stap 5, afbeelding 1 van 2 iRobot Roomba 890 Charging Contacts Replacement: stap 5, afbeelding 2 van 2
    • Turn Roomba face up.

    • Remove the dustbin by pressing the release button on the top side of the Roomba and pulling it straight out.

  6. iRobot Roomba 890 Charging Contacts Replacement: stap 6, afbeelding 1 van 2 iRobot Roomba 890 Charging Contacts Replacement: stap 6, afbeelding 2 van 2
    • Using the opening tool, remove retaining band.

    • Use the removal tool to remove the face plate as well.

    • Pry up slowly around the edges to prevent damage to the plastic components.

  7. iRobot Roomba 890 Charging Contacts Replacement: stap 7, afbeelding 1 van 3 iRobot Roomba 890 Charging Contacts Replacement: stap 7, afbeelding 2 van 3 iRobot Roomba 890 Charging Contacts Replacement: stap 7, afbeelding 3 van 3
    • Use a Phillips #1 screwdriver to remove the two 9.5 mm handle screws.

    • Use a Phillips #1 screwdriver to remove the fourteen 9.5 mm top plate screws.

    • Lift the top plate off.

  8. iRobot Roomba 890 Charging Contacts Replacement: stap 8, afbeelding 1 van 2 iRobot Roomba 890 Charging Contacts Replacement: stap 8, afbeelding 2 van 2
    • Locate the charging contact wire connection to the motherboard.

    • Release the connector.

    • Pull gently on the white plug, not the wires themselves.

  9. iRobot Roomba 890 Charging Contacts Replacement: stap 9, afbeelding 1 van 1
    • Use a Phillips #1 screwdriver to remove the four 9.3 mm bumper sensor screws.

  10. iRobot Roomba 890 Charging Contacts Replacement: stap 10, afbeelding 1 van 1
    • Use a Phillips #1 screwdriver to remove the two 9.3 mm screws holding the charging contact backings in place.

    • Remove the charging contact backings.

  11. iRobot Roomba 890 Charging Contacts Replacement: stap 11, afbeelding 1 van 1
    • Use the iFixit opening tool to gently pry down on the charging contact, on the side closest to the cliff sensor.

    • With the charging contact dislodged, pull it through the Roomba housing.

Conclusie

To reassemble your device, follow these instructions in reverse order.

2 andere personen hebben deze handleiding voltooid.

Devin Steiblin

Lid sinds: 03/28/22

442 Reputatie

2 handleidingen geschreven

Team

UMass Dartmouth, Team 1-3, Petersen Spring 2022 Lid van UMass Dartmouth, Team 1-3, Petersen Spring 2022

UMASSD-PETERSEN-S22S1G3

3 Leden

7 handleidingen geschreven

0 opmerkingen

Voeg opmerking toe

Weergavestatistieken:

Afgelopen 24 uren: 6

Afgelopen 7 dagen: 30

Afgelopen 30 dagen: 115

Altijd: 3,778