Deze versie kan foutieve bewerkingen bevatten. Schakel over naar de recentste gecontroleerde momentopname.
Wat je nodig hebt
-
Deze stap is niet vertaald. Help het te vertalen
-
With the heat gun set on "low", begin heating the lower portion of the Touch near the home button.
-
-
Deze stap is niet vertaald. Help het te vertalen
-
Insert the edge of an iPod opening tool between the front glass panel and the plastic bezel near the home button.
-
Pry the bottom edge of the front panel upward, being careful not to bend the glass excessively.
-
-
Deze stap is niet vertaald. Help het te vertalen
-
When there is enough room to grab the bottom edge of the front panel, lift it away from the body of the Touch to peel up the adhesive along its left and right edges.
-
-
Deze stap is niet vertaald. Help het te vertalen
-
Carefully pull the top of the front panel assembly away from the adhesive holding it to the Touch, minding the short digitizer cable connecting the two components.
-
-
Deze stap is niet vertaald. Help het te vertalen
-
Remove the following eight Phillips #00 screws:
-
One 3.5 mm Phillips screw
-
Two 3.0 mm Phillips screws
-
One 2.3 mm Phillips screw
-
One 2.4 mm Phillips screw
-
Three 2.0 mm Phillips screws
-
-
-
Deze stap is niet vertaald. Help het te vertalen
-
Use the edge of an iPod opening tool to pry the thin steel cover up from the rear-facing camera.
-
Remove the steel cover from the iPod.
-
-
Deze stap is niet vertaald. Help het te vertalen
-
Insert the edge of an opening tool under the steel mid plate near the bottom left corner of the Touch.
-
Slowly pry upward to separate the plate from the adhesive securing it to the plastic inner case.
-
If the plate is still attached to the logic board, re-warm the area to loosen the adhesive, then slowly separate the plate from the logic board using the opening tool.
-
There is a thin, fragile ribbon cable underneath the plate. As you pry the plate up, be very careful not to rip the cable.
-
-
Deze stap is niet vertaald. Help het te vertalen
-
Slightly tilt the steel mid plane to dislodge it from the rear case.
-
Lift the steel mid plane up off the rear case and peel off the piece of copper tape stuck to the rear-facing camera.
-
-
Deze stap is niet vertaald. Help het te vertalen
-
Remove the following three screws near the top edge of the logic board:
-
One 2.0 mm Phillips screw
-
Two 2.3 mm Phillips screws
-
-
Deze stap is niet vertaald. Help het te vertalen
-
Use the edge of an iPod opening tool to gently pry, but not remove, the rear-facing camera away from the rear case.
-
-
Deze stap is niet vertaald. Help het te vertalen
-
Use an iPod opening tool to slightly lift the edge of the logic board next to the battery enough to grab it with your other hand.
-
Be very careful not to lift too much as the volume control ribbon cable is still connected and will tear very easily.
-
While gently lifting the logic board with one hand, use an iPod opening tool to lift the logic board near the copper tape at the logic board's top edge.
-
The logic board will be lifted adequately when the last display assembly connector has cleared the top edge of the rear case.
-
-
Deze stap is niet vertaald. Help het te vertalen
-
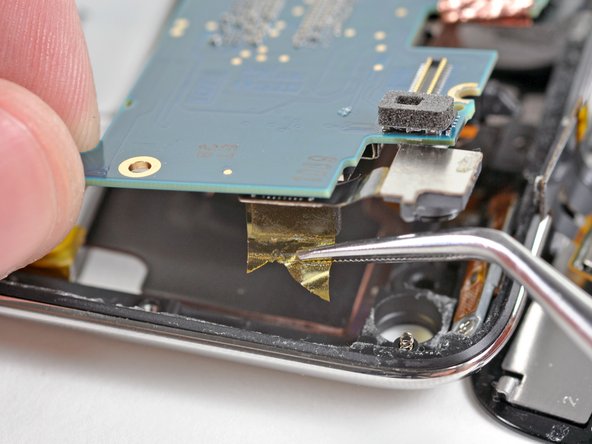
Use an iPod opening tool to peel the edge of the yellow kapton tape that covers the rear-facing camera and the logic board.
-
Continue peeling the tape from the bottom of the rear-facing camera connector.
-
Use a pair of tweezers to grasp and remove the tape from the top of the rear-facing camera connector.
-
-
Deze stap is niet vertaald. Help het te vertalen
-
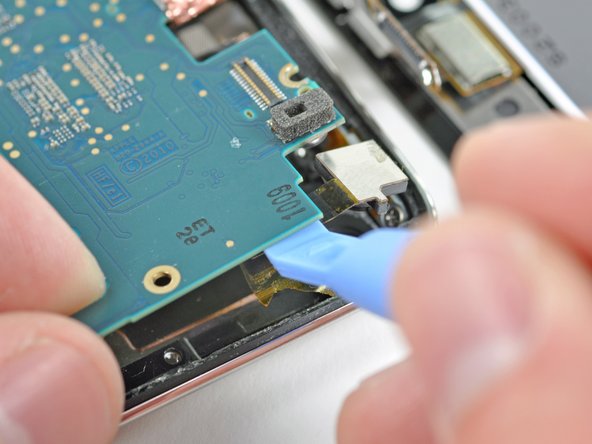
Use the edge of an iPod opening tool to pry the rear-facing camera connector away from its socket on the logic board.
-
Remove the rear-facing camera from the Touch.
-


Annuleren: ik heb deze handleiding niet afgemaakt.
32 andere personen hebben deze handleiding voltooid.
