Inleiding
Als het scherm van je iPhone XS Max gebarsten is, niet meer reageert op aanraking of geen beeld toont terwijl je telefoon wel is ingeschakeld, kun je deze handleiding gebruiken om je iPhone nieuw leven in te blazen met een nieuw scherm, ook bekend als schermmodule.
De gecombineerde oorstukspeaker + sensormodule die aan de achterkant van het scherm bevestigd zijn is in de fabriek op unieke wijze aan je iPhone gekoppeld. Dit houdt in dat je deze in z'n geheel van je oude naar je nieuwe scherm moet verplaatsen bij elke schermvervanging. Deze module bevat de infraroodschijnwerper, welke onderdeel is van de biometrische Face ID-beveiligingsfunctie. Als deze beschadigd is of vervangen wordt, zal de Face ID-functie niet meer werken. Zorg er dus voor dat je geen van deze onderdelen beschadigt tijdens deze procedure. Indien deze wel beschadigd raken, zal enkel Apple de Face ID-functie kunnen herstellen.
Let op: de True Tone-functie is uitgeschakeld na een schermvervanging, zelfs als je gebruikt maakt van een origineel Apple-scherm.
Wat je nodig hebt
Video overzicht
-
-
Schakel je iPhone uit voordat je begint met het uit elkaar halen van je telefoon.
-
Verwijder de twee 6.9 mm lange pentalobe schroeven aan de onderkant van de iPhone.
-
Het openen van het iPhone-scherm zal de waterdichte sluiting van de telefoon aantasten. Zorg dat je vervangende sluitingen klaar hebt liggen voordat je verdergaat of zorg ervoor dat je blootstelling aan water vermijdt als je geen vervangende sluitingen installeert.
-
-
-
Plaats op 3 mm van de punt van je plectrum een markering met een stift.
Got to step 2 and realized the fix kit doesn't include an opening pick! Looks like a guitar pick, and I have those lying around. Is that expected? Looks like the pick is used in many steps below. There's a little blue crowbar that isn't mentioned in the instructions. Perhaps that replaces the opening pick?
Hi! I can't see which guide you were using when writing this comment. Can you reply here with which guide and fix kit you used?
I see you posted this in Meta. I hope it's resolved soon! In the meantime, a guitar pick may work well enough for your repair.
what fix kit?
My fix kit didn't include an opening pick either
My AliExpress refurbished screen came with a pick that has a coin-like circle that pops out, so no modification was necessary
-
-
-
Plak een aantal lagen tape op het scherm van de iPhone tot het gehele scherm bedekt is.
-
Als het je in de volgende stappen niet lukt om de zuignap op het scherm te bevestigen, kun je ervoor kiezen om een stuk duct tape in een handvatvorm op het scherm te plakken. Hiermee kun je dan het scherm omhoog tillen om een opening te creëren.
-
-
-
Trek de blauwe hendel naar achteren zodat de anti-klem vrij kan bewegen. (Op deze manier deactiveer je de openingsstand van de anti-klem.)
-
Schuif de armen over de linker- of rechterzijde van je iPhone.
-
Plaats de zuignappen dichtbij de onderkant van de telefoon—één op de voorkant en één aan de achterkant.
-
Druk beide zuignappen aan, om zuigkracht uit te oefenen op de gewenste plek.
-
-
-
Trek het blauwe handvat naar voren om de armen van de anti-klem te vergrendelen.
-
Draai het handvat 360 graden met de klok mee of tot de zuignappen uit beginnen te rekken.
-
Zorg dat de zuignappen op één lijn met elkaar zitten voordat je begint met het openen van het toestel. Als je ziet dat de zuignappen niet meer op één lijn zitten, maak je ze los en breng je ze weer op de juiste positie aan.
-
-
-
Verwarm een iOpener en plaats deze tussen de armen van de anti-klem op je telefoon.
-
Vouw de iOpener zodat deze op de onderkant van de iPhone komt te liggen.
-
Geef de lijm een minuutje de tijd om los te komen zodat de anti-klem een opening kan creëren.
-
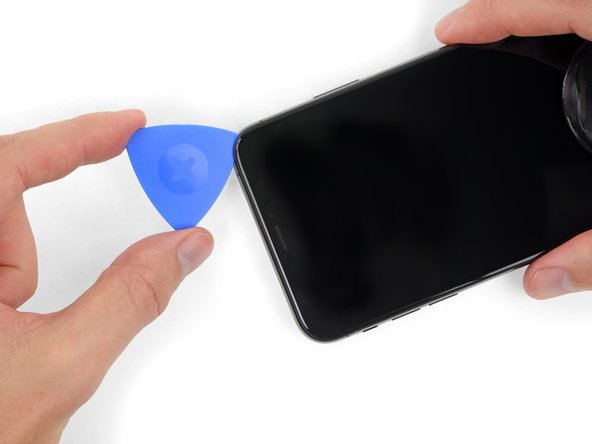
Steek een plectrum in de opening onder het scherm en de plastic rand, en niet onder het scherm zelf.
-
Sla de volgende drie stappen over.
-
-
-
Gebruik een föhn of een warmtepistool, of prepareer een iOpener en leg deze op de onderkant van de iPhone gedurende ongeveer een minuut om zo de lijm die eronder zit te verzachten.
besteht da die Gefahr das sich das Displayglas vom lcd löst?
Besteht da die Gefahr das sich der Kleber vom Displayglas löst?
-
-
-
Trek de zuignap omhoog met een stevige, constante kracht om zo een kleine opening tussen het voorste paneel en de achterste behuizing te creëren.
-
Steek een openingsplectrum in de opening onder de plastic rand van het scherm, niet onder het scherm.
-
-
-
-
Verwijder vier Y000 schroeven die het beschermplaatje op het logic board bevestigen, met de volgende lengtes:
-
Twee 1.1 mm schroeven
-
Eén 1.5 mm schroef
-
Eén 3.7 mm schroef
-
-
-
Gebruik een spudger of een schone vingernagel om de batterijaansluiting uit het contact op het logic board omhoog te duwen.
-
Zorg dat je de aansluiting wegbuigt van het logic board om zo te voorkomen dat deze tijdens de reparatie per ongeluk contact maakt met het contact en zo de telefoon mogelijk aanzet.
-
-
-
Verwijder de drie Y000-schroeven die het plaatje op de schermaansluiting bevestigen:
-
Twee 1.5 mm schroeven
-
Eén 1.1 mm schroef
I am replacing the screen for the 2nd time - the first repair was done by someone else, and the first 2 screws are 1.5mm and the last screw is 1.1mm… If I put the screw back in am I risking Long Screw Damage?
Thanks for all your comments! I'll amend this step.
Hi, I just changed the screen on my XS Max and for this bracket I used 2 x 1.1 mm and 1 x 1.5 mm.
Starting from left to right:
- left 1.1 mm (I tried with 1.5 mm like in the above picture but I felt that it didn't wanted to go deeper so I didn't forced and I tried it in the middle and it fit perfectly)
- middle 1.5 mm
- right 1.1 mm
For the two brackets I had 7 screws, I aligned them on the desk by length and I had 2 x 1.5 mm, 4 x 1.1 mm and 1 x 3.7 mm.
Good luck and I hope it will help someone!
-
-
-
Til de kabel voorzichtig omhoog totdat deze loskomt van de lijm eronder.
-
-
-
Verwijder de drie Y000 schroeven die de speaker-/sensormodule bevestigen:
-
Eén 1.4 mm schroef
-
Twee 1.5 mm schroeven
Ciao @max94949 Quale lunghezza stai cercando? Il passo menziona che si tratta di una vite Y000 da 1,4 mm e di due vite Y000 da 1,5 mm.
-
-
-
Steek een spudger voorzichtig onder de bovenkant van de speakermodule om deze vervolgens rustig te naar onderen te kantelen—weg van de bovenkant van het scherm.
If you are using a refurbished display, check for dirt in the earpiece speaker cutout.
If you have poor quality or low sound after changing the display, use a cotton bud and isopropyl alcohol to clean the earpiece cutout.
-
-
-
Gebruik een föhn of een warmtepistool of prepareer een iOpener en leg deze aan de voorkant op de bovenkant van het scherm gedurende één tot twee minuten om zo de lijm die de sensoren bevestigt te verzachten.
-
-
-
Schuif de zijkant van een openingsplectrum voorzichtig onder de flexkabel die onder de microfoon ligt.
-
Kantel je plectrum dan rustig om de microfoon los te krijgen. Zorg ervoor dat je de flexkabel niet afklemt of beschadigt.
-
Indien nodig kun je de punt van een spudger gebruiken om de microfoon uit de inkeping in het voorste paneel te krijgen.
-
-
-
Gebruik een pincet om de omgevingslichtsensor heen en weer te wiebelen om deze zo uit z'n inkeping in het scherm te kunnen tillen.
This was the most difficult part for me so i erred on the side of caution. I reheated the display in the oven at 85 degrees celsius. Like in the third picture in the next step, i got a razor into the slot below, to get the diffuser a little loose before wiggling the sensor out. I didn't understand the wiggling until i simply rocked it like a boat would side to side like to the top of the display to the bottom on the display, and voila, all came out easy and in one piece with the diffuser still attached.
-
-
-
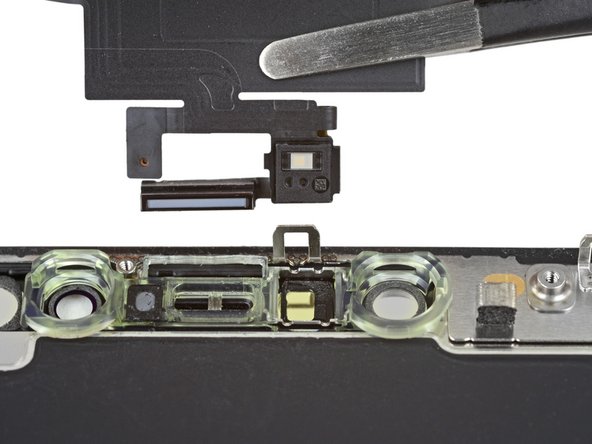
Als het je gelukt is de gehele omgevingslichtsensor te verwijderen, zoals op de foto getoond wordt, ga je verder met de volgende stappen.
-
Als de witte verdeelstrip is losgekomen, maar nog wel in het scherm zit, zoals je kunt zien op de tweede foto, zul je deze er voorzichtig uit moeten heffen langs de bovenkant van de telefoon met behulp van een dun mesje of een wriktool. Het opnieuw gebruiken van warmte kan deze stap vergemakkelijken.
I have accidentally damaged flood illuminator will it affect the face id also or if I just replace the Earpiece Speaker and Sensor Assembly it will get fixed.
-
-
-
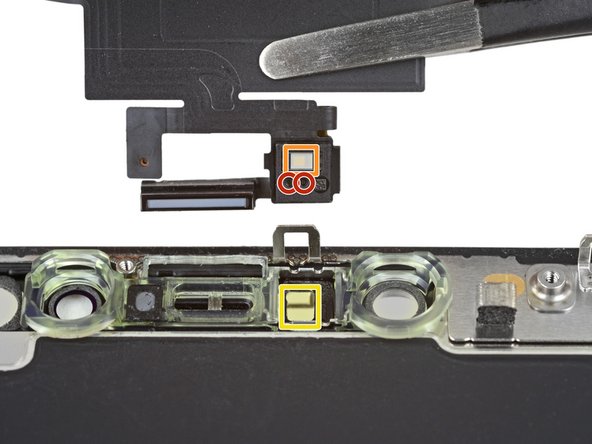
Verwijder de oorstukspeaker en voorste sensormodule.
-
Nabijheidssensor
-
Infraroodlichtschijnwerper
-
De module moet zo zijn gepositioneerd dat deze onderdelen niet in de weg worden gezeten door lijm.
Do you have to remove the earpiece speaker and front sensor assembly. If you are taking a screen from another Xs max with it already attached?
The front sensor assembly is part of Face ID, so you must transfer the original assembly to the replacement screen in order to maintain Face ID functionality.
No, you just take the whole unit. Warm it up and remove the glued sensors like described. Handle it carefully, the speaker cable is quite thin. If damaged, you might loose your face-ID functionality.
Does the screen need a reprogamation onto the new screen?
if the pentalope screws are rusted and the driver can’t fit in it to remove them is there any other way to remove them to replace screen?
-


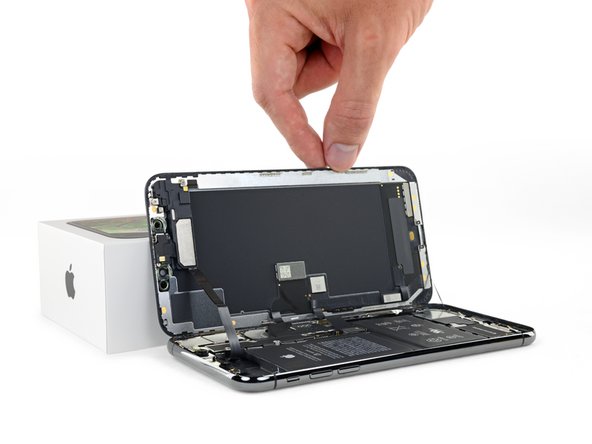


Vergelijk je nieuwe onderdeel met het originele onderdeel om te zien of je nog extra onderdelen mee over moet zetten of om te zien of je beschermfolie moet verwijderen voordat je je nieuwe onderdeel kunt plaatsen.
Om je toestel weer in elkaar te zetten, volg je deze instructies in omgekeerde volgorde.
Breng je e-afval naar een door R2 of e-Stewards gecertificeerd recycle-station.
Ging je reparatie niet zoals gepland? Check dan ons Antwoordenforum voor hulp bij het oplossen van je probleem.
Annuleren: ik heb deze handleiding niet afgemaakt.
175 andere personen hebben deze handleiding voltooid.
Met dank aan deze vertalers:
100%

Thomas Keulemans helpt ons de wereld te herstellen! Wil je bijdragen?
Begin met vertalen ›


37 opmerkingen
Nice guide. I could be wrong but for the first time in a while, changing a display on an Apple phone looks like it’s not anymore difficult than previous models.
John K
the-screen-savers.com
If you remove the screen but then apply the same screen back on the phone, will True Tone still be disabled?
@onslivion Nope! It'll continue to work fine, so long as you didn’t damage anything.
Hi i broke the Flex cable of the Part.
what i can do now.
is their some Parts for sale?
I just switched the screens from 2 phones and both are unresponsive, if put them back to its original logic board the work again, any idea why they dont work? both are original.
Why is True Tone disabled afterwards? Even with an Original Screen how is that possible?
That's normal. There's a chip in the screen that has info that is specific to the original logic board so unless you have a special machine to read/write to that chip, truetone will not work.
This was perfect. It definitely helped me replace the screen on a friend IPhone XS Max!
Every authoritative source (such as Apple Support, Wikipedia) that I read about the iPhone XS Max display states that it has an OLED display - not an AMOLED display, and not an LCD display (such as on the XR model). Yet the parts associated with this guide are LCD (website quirk?) and the written text for XS Max mention AMOLED. Isn’t this important to get right when replacing? The model I have is A1921.
Hi Mark,
The iPhone XS Max uses an AMOLED display. Active Matrix OLED (AMOLED) is a subcategory of the general OLED tech—AMOLED displays contain circuitry which allows them to switch each OLED pixel on or off. Compared to Passive Matrix OLED, AMOLED displays have a higher refresh rate and are more energy efficient . However AMOLED displays are complex, difficult to source, and very expensive to replace (think $200-400 for the part!) Hardware manufacturers sought to resolve this problem by producing LCD replacement screens. These screens are made to be completely compatible with the iPhone XS Max, but are significantly cheaper to replace. They do look slightly different compared to the original screen. Check this link out for a more in-depth review of the differences.
Where is the INSTALL GUIDE this is just removal? And don’t tell me it’s the reverse. I have a small gasket that’s not mentioned in this and it doesn’t explain how to remove the main old gasket or install the new gasket
Where is the installation guide? This is just a removal guide. Don’t tell me that it’s the opposite of removal to install because I have a small gasket that is not mentioned in the YouTube video or on this site in my package
I would like to echo this comment. It is extremely disappointing to see a guide this comprehensive and detailed stop short of reassembly. Especially because some parts need to be transferred from the original display to the replacement one.
Completed the Repair with the more Expensive alternative - the OLED display.
The guide is very comprehensive and covered all the points including looking out for bits left behind!
- I noticed a tiny piece of conductive foam on the old display which i moved to the new one.
The OLED display is top quality, but a little darker due to losing the “True Tone” no doubt.
The Adhesive kit is very good, but separating the two films was a little difficult and messed up the alignment slightly, however I managed to recover!
One more addition I had to make after undertaking this repair.
I had noted that after swapping the display the earpiece was very quiet. I thought that I had missed a gasket, misaligned the earpiece speaker or not plugged in the leads correctly.
Nope. Much simpler than that. CLEAN THE EAR PIECE CUTOUT! *Eeeewwww* After putting up with this for about 4 weeks, I happened to get out the Cotton Buds. A quick wipe revealed someone elses EAR GUNK was clogging up the ear piece cutout !
Disgusted, I got out the Isopropyl and cleaned it (carefully) about 10 times, the audio is now crystal clear.
@ifixit - Please ensure your “Refurbished displays” have a clean earhole. It was pretty gross that it was clogged to the point that I could not HEAR!
Great guide, completely worked for me!
This guide worked perfectly for my iPhone Max XS screen replacement. This is only my second “project” from iFixit (the first was a replacement display screen for my Canon 6D) and both times, miraculously, everything worked. I’m really not sure if it is my skills or the details in the guides (it’s definitely the latter and a tiny bit of the former). The replacement parts are reasonably priced and the toolkits are VERY GOOD in quality.
For this iPhone screen fix, I used a previously purchased toolkit and “borrowed” suction handles (yes, definitely makes a difference and better than the tape alternative—I tried both) from a bathroom rack.
It took me about 3 hours to get this done. I rushed on step one and stripped the first pentalobe screw. Luckily, one stripped pentalobe screw is still OK. I managed to pull it apart by wiggling the screen around (without too much force). I used a hair dryer to heat the frame/adhesive.
Follow the instructions closely and don’t lose the tiny screws. A magnetic screwdriver helped.
I have accidentally damaged flood illuminator will it affect the face id also or if I just replace the Earpiece Speaker and Sensor Assembly it will get fixed.
Step 1: Remove pentalobe screws…is very careful to NOT STRIP THE SCREW…tools provided/metal is not hard enough and is unable to take out the screw in Step 1 and am now currently going out to buy better pentalobe screw driver. THANKS. Why don’t you just provide better tools and increase the cost……………………………………………
for me at least once you get use to repairing this it can take around 30 min too an hour but i also repair all devices even phones for living so i do have experience with repairing these
Changing just the glass screen on my iphone xs max and the black part behind the screen is cracked what do I do ?
Executed this repair almost flawlessly. The FaceID flex cable is very fragile and glued down very well. I advise you be careful when removing is as not much pressure at all can cause it to break (Speaking from experience). Other than that the guide was very easy to follow.
This was an incredible guide! With the video, it was the perfect guide and I managed to complete the fix in less than 2 hours.
Can water damaged iphone be restored by replacing screen?
Hey Team iFixit, vielen dank für diese ausführliche Anleitung. Einfach richtig lesen dann macht man auch keine Fehler haha
Last month I ordered and received a new screen/digitizer for my iPhone XS max. Installation was easy and the phone was back on-line in half ah hour. Not for long unfortunately. A week after the replacement, the digitizer became irresponsive. I had to let the battery die and subsequently reboot my phone.
It fixed the problem for one day. Then the digitizer froze up again. I decided I was going to open the phone to check the ribbon cables for faulty connection. Alas, when opening the iPhone,one of the cables between the screen and the main board tore.
I resorted to re-installing my old cracked screen that now has been working flawlessly for one week.
Is there a fix for the broken ribbon cable, or can I return the screen for credit or repair?
Hey, I'm thinking on fixing up my Iphone Xsmax screen will the Face Id still function after replacement
Hello oguntayo tosin, as mentioned in the introduction, for Face ID to work you have to transfer the earpiece speaker + sensor assembly as they are paired to your individual iPhone.
I cant put the display on the iPhone and I dont know why.It just doesn't fit right and rises about 2mm higher than it should.What can I do?
Hello Robin, did you already go through the recommended troubleshooting steps? It sounds like it could be a bracket or elements of the earpiece speaker and front sensor assembly that are not seated correctly or that there is some issue with the clips holding the display. You could also try checking whether your replacement part deviates from the original screen as discussed here. Hope this helps!
If purchasing the OLED option from here, would I be able to use a programmer to enable back True Tone?
There's a couple extra chips near the bottom of the original screen that aren't on the replacement. Are they surplus to requirement?
after re assembly the screen is loose I attempted to open it and re sitting but still loose!!! why???
PLEASE HELP! I have an IPhone XS Max with a cracked screen. It has loads of irreplaceable information on it. I can’t afford to buy a screen right now but I have a brand new screen for a IPhone 6 Plus, I don’t want to install it onto the XS but I was wondering if it could be hooked up long enough to type the passcode and trust a computer so I can download the phone’s contents? Pretty much I just need to know if the cables for the display are compatible.
This is the only thing I could think of that might possibly work and not cost me a bunch of money. I was recently attacked, robbed and assaulted. The IPhone XS Max was recording during the assault but couldn’t back up because I didn’t have any Icloud storage available. If anyone has any other suggestions please help me out. P.s. I have went to the police and they couldn’t care less, I live in a small town and my abuser is a prominent member of the community so I am on my own.