Ga door naar hoofdinhoud

Deze handleiding heeft recentere wijzigingen. Schakel over naar de nieuwste niet-geverifieerde versie.

iPhone 8 Logic Board Replacement

Wat je nodig hebt

  1. iPhone 8 Logic Board Replacement, Remove the pentalobe screws: stap 1, afbeelding 1 van 1
    • Before you begin, discharge your iPhone battery below 25%. A charged lithium-ion battery can catch fire and/or explode if accidentally punctured.

    • Power off your iPhone before beginning disassembly.

    • Remove the two 3.5 mm pentalobe screws on the bottom edge of the iPhone.

    • Opening the iPhone's display will compromise its waterproof seals. Have replacement seals ready before you proceed past this step, or take care to avoid liquid exposure if you reassemble your iPhone without replacing the seals.

  2. iPhone 8 Logic Board Replacement, Anti-Clamp instructions: stap 2, afbeelding 1 van 3 iPhone 8 Logic Board Replacement, Anti-Clamp instructions: stap 2, afbeelding 2 van 3 iPhone 8 Logic Board Replacement, Anti-Clamp instructions: stap 2, afbeelding 3 van 3
    Gereedschap gebruikt in deze stap:
    Anti-Clamp
    $24.95
    Koop
    • The next three steps demonstrate the Anti-Clamp, a tool we designed to make the opening procedure easier. If you aren't using the Anti-Clamp, skip down three steps for an alternate method.

    • For complete instructions on how to use the Anti-Clamp, check out this guide.

    • Pull the blue handle backwards to unlock the Anti-Clamp's arms.

    • Slide the arms over either the left or right edge of your iPhone.

    • Position the suction cups near the bottom edge of the iPhone just above the home button—one on the front, and one on the back.

    • Squeeze the cups together to apply suction to the desired area.

    • If you find that the surface of your iPhone is too slippery for the Anti-Clamp to hold onto, you can use tape to create a grippier surface.

  3. iPhone 8 Logic Board Replacement: stap 3, afbeelding 1 van 3 iPhone 8 Logic Board Replacement: stap 3, afbeelding 2 van 3 iPhone 8 Logic Board Replacement: stap 3, afbeelding 3 van 3
    • Pull the blue handle forwards to lock the arms.

    • Turn the handle clockwise 360 degrees or until the cups start to stretch.

    • Make sure the suction cups remain aligned with each other. If they begin to slip out of alignment, loosen the suction cups slightly and realign the arms.

  4. iPhone 8 Logic Board Replacement: stap 4, afbeelding 1 van 2 iPhone 8 Logic Board Replacement: stap 4, afbeelding 2 van 2
    • Heat an iOpener and thread it through the arms of the Anti-Clamp.

    • You can also use a hair dryer, heat gun, or hot plate—but extreme heat can damage the display and/or internal battery, so proceed with care.

    • Fold the iOpener so it lays on the bottom edge of the iPhone.

    • Wait one minute to give the adhesive a chance to release and present an opening gap.

    • Insert an opening pick into the gap.

    • If the Anti-Clamp doesn't create a sufficient gap, apply more heat to the area and rotate the handle a quarter turn.

    • Don't crank more than a quarter turn at a time, and wait one minute between turns. Let the Anti-Clamp and time do the work for you.

    • Skip the next three steps.

  5. iPhone 8 Logic Board Replacement, Heat the display: stap 5, afbeelding 1 van 1
    • The next three steps show how to separate the screen using a suction cup.

    • Heating the lower edge of the iPhone will help soften the adhesive securing the display, making it easier to open.

    • Use a hairdryer or prepare an iOpener and apply it to the lower edge of the phone for about 90 seconds in order to soften up the adhesive underneath.

  6. iPhone 8 Logic Board Replacement, Separate the display: stap 6, afbeelding 1 van 2 iPhone 8 Logic Board Replacement, Separate the display: stap 6, afbeelding 2 van 2
    • Apply a suction cup to the lower half of the front panel, just above the home button.

    • Be sure the suction cup does not overlap with the home button, as this will prevent a seal from forming between the suction cup and front glass.

  7. iPhone 8 Logic Board Replacement: stap 7, afbeelding 1 van 3 iPhone 8 Logic Board Replacement: stap 7, afbeelding 2 van 3 iPhone 8 Logic Board Replacement: stap 7, afbeelding 3 van 3
    • Pull up on the suction cup with firm, constant pressure to create a slight gap between the screen and the frame.

    • Insert an opening pick into the gap.

    • The watertight adhesive holding the screen in place is very strong; creating this initial gap takes a significant amount of force. If you're having a hard time opening a gap, apply more heat, and gently rock the screen up and down to weaken the adhesive until you create enough of a gap to insert your tool.

  8. iPhone 8 Logic Board Replacement: stap 8, afbeelding 1 van 3 iPhone 8 Logic Board Replacement: stap 8, afbeelding 2 van 3 iPhone 8 Logic Board Replacement: stap 8, afbeelding 3 van 3
    • Slide the opening pick up the left edge of the phone starting at the lower edge and moving towards the volume control buttons and silent switch, breaking up the adhesive holding the display in place.

    • Stop near the top left corner of the display.

    • Do not try to pry the top edge of the display away from the rear case, as it is held in place by plastic clips that may break.

  9. iPhone 8 Logic Board Replacement, Screen information: stap 9, afbeelding 1 van 1
    • There are delicate cables along the right edge of your iPhone. Don't insert your pick here, as you may damage the cables.

  10. iPhone 8 Logic Board Replacement: stap 10, afbeelding 1 van 3 iPhone 8 Logic Board Replacement: stap 10, afbeelding 2 van 3 iPhone 8 Logic Board Replacement: stap 10, afbeelding 3 van 3
    • Re-insert your tool at the lower right corner of the iPhone, and slide it around the corner and up the right side of the phone to separate the adhesive.

    • Don't insert your pick more than 3 mm, as you may damage the display cables.

  11. iPhone 8 Logic Board Replacement: stap 11, afbeelding 1 van 2 iPhone 8 Logic Board Replacement: stap 11, afbeelding 2 van 2
    • Gently pull up on the suction cup to lift up the bottom edge of the display.

    • Do not raise the display more than 15º or you'll risk straining or tearing the ribbon cables connecting the display.

    • Pull on the small nub on the suction cup to remove it from the front panel.

  12. iPhone 8 Logic Board Replacement: stap 12, afbeelding 1 van 3 iPhone 8 Logic Board Replacement: stap 12, afbeelding 2 van 3 iPhone 8 Logic Board Replacement: stap 12, afbeelding 3 van 3
    • Slide an opening pick underneath the display around the top left corner and along the top edge of the phone to loosen the last of the adhesive.

  13. iPhone 8 Logic Board Replacement: stap 13, afbeelding 1 van 2 iPhone 8 Logic Board Replacement: stap 13, afbeelding 2 van 2
    • Slide the display assembly slightly down (away from the top edge of the phone) to disengage the clips holding it to the rear case.

  14. iPhone 8 Logic Board Replacement: stap 14, afbeelding 1 van 3 iPhone 8 Logic Board Replacement: stap 14, afbeelding 2 van 3 iPhone 8 Logic Board Replacement: stap 14, afbeelding 3 van 3
    • Open the iPhone by swinging the display up from the left side, like the back cover of a book.

    • Don't try to fully separate the display yet, as several fragile ribbon cables still connect it to the iPhone's logic board.

    • Lean the display against something to keep it propped up while you're working on the phone.

  15. iPhone 8 Logic Board Replacement, Disconnect the battery: stap 15, afbeelding 1 van 2 iPhone 8 Logic Board Replacement, Disconnect the battery: stap 15, afbeelding 2 van 2
    Gereedschap gebruikt in deze stap:
    Magnetic Project Mat
    $19.95
    Koop
    • Remove four Phillips screws securing the lower display cable bracket to the logic board, of the following lengths:

    • Two 1.3 mm screws

    • Two 2.8 mm screws

    • Throughout this guide, keep careful track of your screws so that each one goes back where it came from during reassembly. Installing a screw in the wrong place can cause permanent damage.

    • Remove the bracket.

  16. iPhone 8 Logic Board Replacement: stap 16, afbeelding 1 van 2 iPhone 8 Logic Board Replacement: stap 16, afbeelding 2 van 2
    • Use the point of a spudger to pry the battery connector out of its socket in the logic board.

    • Bend the battery connector cable slightly away from the logic board to prevent it from accidentally making contact with the socket and providing power to the phone during your repair.

  17. iPhone 8 Logic Board Replacement, Disconnect the display and digitizer: stap 17, afbeelding 1 van 2 iPhone 8 Logic Board Replacement, Disconnect the display and digitizer: stap 17, afbeelding 2 van 2
    • Use the point of a spudger to pry the lower display connector out of its socket.

    • To re-attach press connectors like this one, press down on one side until it clicks into place, then repeat on the other side. Do not press down on the middle. If the connector is even slightly misaligned, the connector can bend, causing permanent damage.

  18. iPhone 8 Logic Board Replacement: stap 18, afbeelding 1 van 2 iPhone 8 Logic Board Replacement: stap 18, afbeelding 2 van 2
    • Use the point of a spudger to disconnect the second lower display cable.

  19. iPhone 8 Logic Board Replacement: stap 19, afbeelding 1 van 2 iPhone 8 Logic Board Replacement: stap 19, afbeelding 2 van 2
    • Remove the three 1.3 mm Phillips screws securing the bracket over the front panel sensor assembly connector.

    • Remove the bracket.

  20. iPhone 8 Logic Board Replacement: stap 20, afbeelding 1 van 2 iPhone 8 Logic Board Replacement: stap 20, afbeelding 2 van 2
    • Use the point of a spudger to disconnect the front panel sensor assembly connector.

  21. iPhone 8 Logic Board Replacement, Remove the display assembly: stap 21, afbeelding 1 van 1
  22. iPhone 8 Logic Board Replacement, Remove the SIM card: stap 22, afbeelding 1 van 2 iPhone 8 Logic Board Replacement, Remove the SIM card: stap 22, afbeelding 2 van 2
    • Insert a SIM card eject tool, bit, or a straightened paperclip into the small hole in the SIM card tray.

    • Press to eject the tray.

    • This may require a significant amount of force. However, ensure the eject tool is properly aligned beforehand as to not damage the eject mechanism inside the phone.

  23. iPhone 8 Logic Board Replacement: stap 23, afbeelding 1 van 2 iPhone 8 Logic Board Replacement: stap 23, afbeelding 2 van 2
    • Remove the SIM card tray from the iPhone.

    • The SIM card will fall out of the tray easily.

    • When reinserting the SIM card, ensure that it is in the proper orientation relative to the tray.

    • A thin rubber gasket around the SIM card tray provides water and dust protection. If this gasket is damaged or missing, replace the gasket or the entire SIM card tray to protect your iPhone's internal components.

  24. iPhone 8 Logic Board Replacement, Disconnect the logic board: stap 24, afbeelding 1 van 2 iPhone 8 Logic Board Replacement, Disconnect the logic board: stap 24, afbeelding 2 van 2
    • Use the flat end of a spudger to disconnect the camera cable connector by prying it straight up from its socket.

  25. iPhone 8 Logic Board Replacement: stap 25, afbeelding 1 van 1
    Gereedschap gebruikt in deze stap:
    Standoff Screwdriver for iPhones
    $5.49
    Koop
    • Remove the two screws securing the rear-facing camera bracket:

    • One 3.0 mm standoff screw

    • One 3.1 mm Phillips screw

    • Standoff screws are best removed using a standoff screwdriver or bit.

    • In a pinch, a small flathead screwdriver will do the job—but use extra caution to ensure it doesn't slip and damage surrounding components.

  26. iPhone 8 Logic Board Replacement: stap 26, afbeelding 1 van 1
    • Remove the rear-facing camera bracket.

  27. iPhone 8 Logic Board Replacement: stap 27, afbeelding 1 van 2 iPhone 8 Logic Board Replacement: stap 27, afbeelding 2 van 2
    • Use the point of a spudger to disconnect the flash connector from its socket by prying it straight up.

  28. iPhone 8 Logic Board Replacement: stap 28, afbeelding 1 van 1
    • Remove the two screws securing the upper cable bracket:

    • One 2.9 mm Phillips screw

    • One 1.3 mm Phillips screw

  29. iPhone 8 Logic Board Replacement: stap 29, afbeelding 1 van 1
    • Remove the upper cable bracket.

  30. iPhone 8 Logic Board Replacement: stap 30, afbeelding 1 van 2 iPhone 8 Logic Board Replacement: stap 30, afbeelding 2 van 2
    • Use the flat end of a spudger to pry the upper cable connector up from its socket.

  31. iPhone 8 Logic Board Replacement, Remove the top left antenna component: stap 31, afbeelding 1 van 1
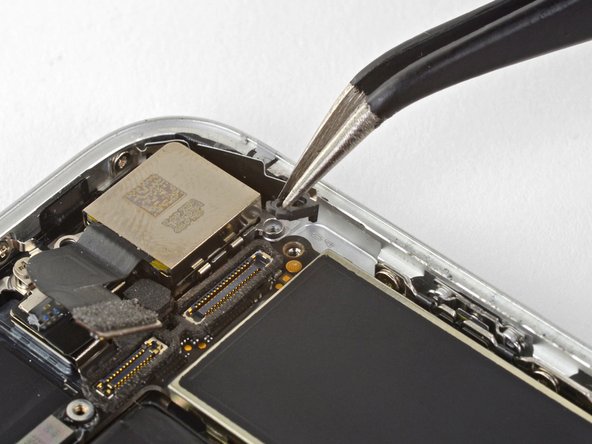
    • Remove the three Phillips 1.3 mm screws securing the top left antenna component.

  32. iPhone 8 Logic Board Replacement: stap 32, afbeelding 1 van 1
    • Remove the 1.4 mm Phillips screw securing the antenna component to the top of edge of the case.

  33. iPhone 8 Logic Board Replacement: stap 33, afbeelding 1 van 1
    • Remove the antenna component.

  34. iPhone 8 Logic Board Replacement, Remove the top left grounding clip: stap 34, afbeelding 1 van 1
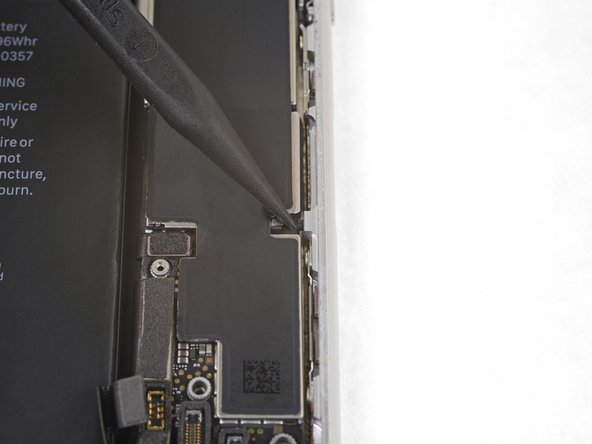
    • Remove the two Phillips screws securing the grounding clip at the top left edge of the logic board:

    • One 1.5 mm Phillips screw

    • One 2.6 mm Phillips screw

  35. iPhone 8 Logic Board Replacement: stap 35, afbeelding 1 van 1
    • Remove the grounding clip.

  36. iPhone 8 Logic Board Replacement, Unscrew the logic board: stap 36, afbeelding 1 van 1
    • Remove the three screws securing the motherboard:

    • One 1.8 mm Phillips screw

    • One 2.5 mm standoff screw

    • One 2.2 mm standoff screw

  37. iPhone 8 Logic Board Replacement: stap 37, afbeelding 1 van 2 iPhone 8 Logic Board Replacement: stap 37, afbeelding 2 van 2
    • Use tweezers to gently bend the logic board grounding bracket out of the way.

  38. iPhone 8 Logic Board Replacement: stap 38, afbeelding 1 van 2 iPhone 8 Logic Board Replacement: stap 38, afbeelding 2 van 2
    • Use the point of a spudger to move the SIM card eject plunger out of the logic board's way.

  39. iPhone 8 Logic Board Replacement, Logic Board: stap 39, afbeelding 1 van 2 iPhone 8 Logic Board Replacement, Logic Board: stap 39, afbeelding 2 van 2
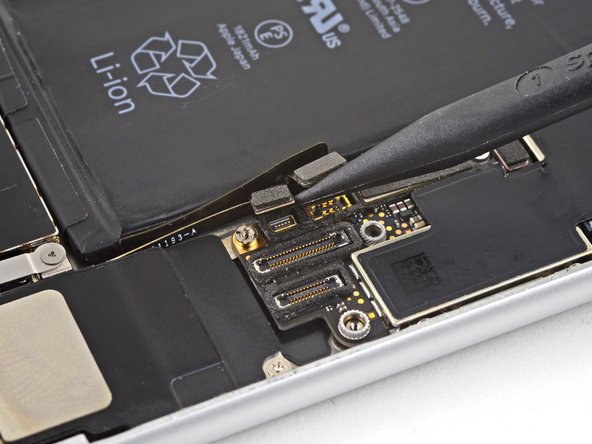
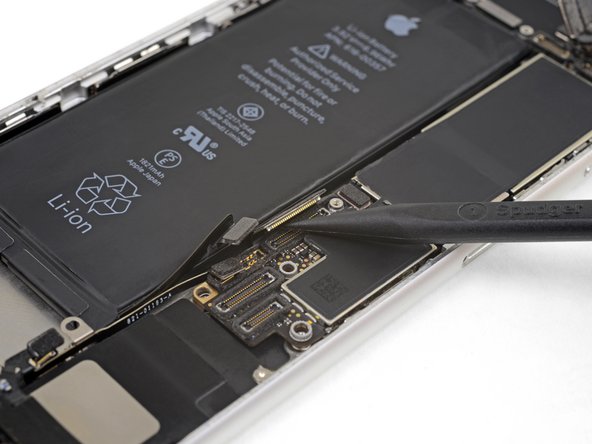
    • Use the point of a spudger to pry up and disconnect the Wi-Fi diversity antenna cable.

  40. iPhone 8 Logic Board Replacement: stap 40, afbeelding 1 van 2 iPhone 8 Logic Board Replacement: stap 40, afbeelding 2 van 2
    • Use the point of a spudger to pry up and disconnect the Lightning cable connector.

  41. iPhone 8 Logic Board Replacement: stap 41, afbeelding 1 van 1
    • Use the point of a spudger to pry up and disconnect the wireless charging coil connector.

  42. iPhone 8 Logic Board Replacement: stap 42, afbeelding 1 van 2 iPhone 8 Logic Board Replacement: stap 42, afbeelding 2 van 2
    • Use the flat end of a spudger to gently lift the battery connector end of the logic board up.

    • Be careful not to pull against any cables. If you feel resistance, check that all cables, connectors, and components are clear of the board.

  43. iPhone 8 Logic Board Replacement: stap 43, afbeelding 1 van 3 iPhone 8 Logic Board Replacement: stap 43, afbeelding 2 van 3 iPhone 8 Logic Board Replacement: stap 43, afbeelding 3 van 3
    • Grasping it by the edges, lift the logic board near the battery connector and remove it.

    • Be careful not to snag the logic board on any cables.

Conclusie

To reassemble your device, follow the above steps in reverse order.

Take your e-waste to an R2 or e-Stewards certified recycler.

Repair didn’t go as planned? Check out our Answers community for troubleshooting help.

87 andere personen hebben deze handleiding voltooid.

Arthur Shi

Lid sinds: 01/03/18

249.876 Reputatie

503 handleidingen geschreven

Team

iFixit Lid van iFixit

Staff

135 Leden

16.734 handleidingen geschreven

20 opmerkingen

Hello evryone. Do I need a new touch ID that fits the motherboard or can I use my old touch ID?

The motherboards that are for sale, sell with touch ID and without. That`s why I am asking.

Sebastian Bojek - Antwoord

Hi Sebastian,

Yes, the Touch ID is paired with the motherboard. In order to keep Touch ID functionality, you have to use the fingerprint sensor that comes with the replacement.

Arthur Shi -

can i use this process two switch a logic board from a working i phone to one that is icloud locked?

Kenneth Zapata - Antwoord

That’s why I’m here

Kol Rukaj -

Hi Kenneth,

The phone’s “identity” is based off of the logic board, so switching a logic board will remove the iCloud lock—if the replacement logic board is not locked. Note that the Touch ID hardware is paired each logic board.

Arthur Shi -

Voeg opmerking toe

Weergavestatistieken:

Afgelopen 24 uren: 37

Afgelopen 7 dagen: 226

Afgelopen 30 dagen: 1,138

Altijd: 143,099