Deze vertaling geeft mogelijk niet de meest recente updates van de bronhandleiding weer. Help ons met het updaten van de vertaling of bekijk de bronhandleiding.
Inleiding
Gebruik deze handleiding om je iPhone 7 Plus nieuw leven in te blazen met een nieuwe batterij. Neem, als je batterij gezwollen is, de juiste voorzorgsmaatregelen.
Deze handleiding toont je hoe je de volledige schermmodule verwijdert; dit is bedoeld om schade aan de schermkabels te voorkomen. Als je je comfortabel genoeg voelt om de batterij te verwijderen zonder de schermkabels daarbij te veel te belasten, kun je de stappen voor het verwijderen van de schermmodule overslaan.
Kalibreer, voor een optimale performance, je nieuw geplaatste batterij: laad deze op tot 100% en blijf deze opladen voor minstens twee uur langer. Gebruik je telefoon vervolgens totdat de batterij volledig leeg is en je telefoon daarom uitvalt. Laad je telefoon, tot slot, weer helemaal op naar 100%.
Wat je nodig hebt
Video overzicht
-
-
Schakel je iPhone uit voordat je met de demontage begint.
-
Verwijder de twee 3.4 mm pentalobe schroeven aan de onderkant van de iPhone.
-
-
-
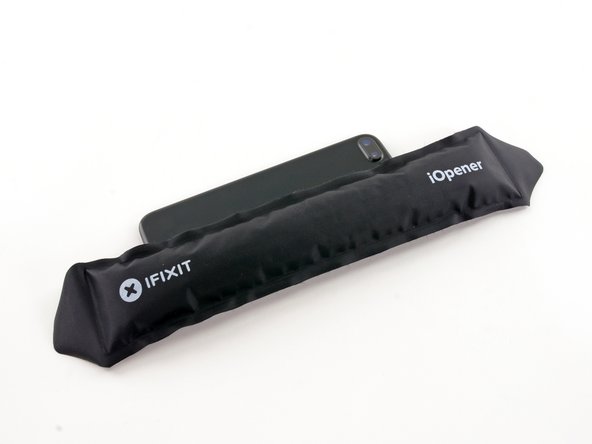
Gebruik een föhn of een warmtepistool, of prepareer een iOpener en leg deze op de onderkant van de iPhone gedurende ongeveer een minuut om zo de lijm die eronder zit te verzachten.
How long should I use a hairdryer for?
I used it until it was hot to the touch but not too hot where you burn yourself.
gczarny -
Hey, I just took apart my first iPhone 7 plus today, and it was easier for me to use guitar picks and a magic glass tool. I did tear the home flex on the screen—now I know to be more careful of that on disassembly—-~Katrina of iPad Rehab Microsoldering
Get a T-shirt add heat to a lil corner of it, with either a hair straighter or an Iron , touch the T-shirt if it’s seems hot but doesn’t burn u hold that lil hot piece of T-shirt against the edge ur trying to pry open , if it’s still not opening add a I’ll more heat,
I took a hot water bottle and layed it on the display of the iPhone for a minute, because I did not have an iOpener. That worked for me perfect.
How can I get all this tools
-
-
-
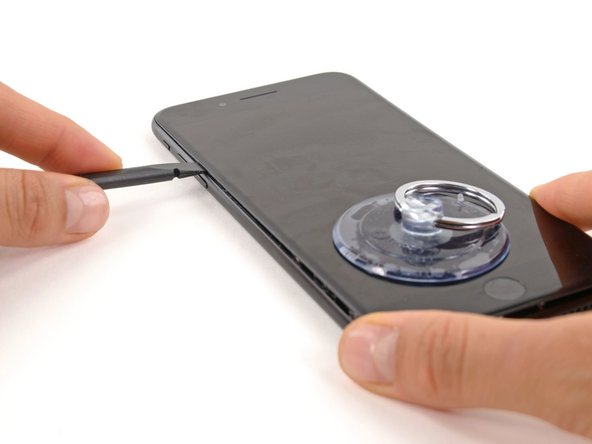
Druk een zuignap op de onderste helft van het voorste paneel, net boven de thuisknop.
Hi! My suction cup doesn’t work. It won’t strongly suck on my screen. Does anyone have any advice?
Heat it up just a little with a hair dryer make sure it’s flat , let it coo a bit now try it??
The suction cup you provide sucks. In that it doesn’t hold. Luckily I had a set of heavy duty suction cups from when I worked on my iMac.
-
-
-
Trek de zuignap omhoog met een stevige, constante kracht om zo een kleine opening tussen het voorste paneel en de achterste behuizing te creëren.
-
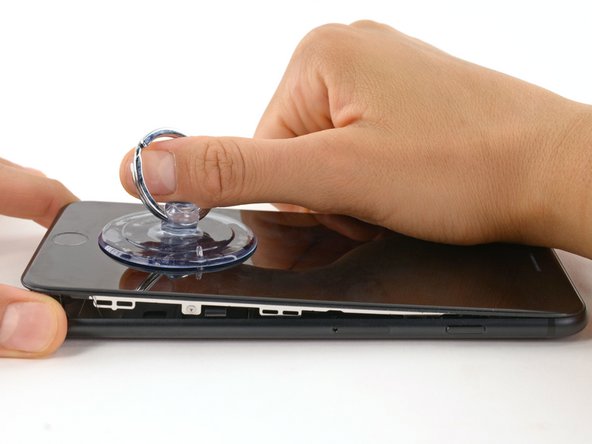
Steek het platte einde van een spudger in de opening.
-
Draai je spudger lichtjes omhoog terwijl je aan de zuignap trekt, om de opening tussen het scherm en de achterste behuizing iets te vergroten.
Be very careful not to pull up with too much force. My screen just shattered while I was pulling up with my suction cup. (There were no previous cracks or chips or anything).
I’m stuck on this part. I’ve heated the bottom up and attached the suction cup right above the home button, but I can’t pull it apart. I feel like I’m going to break the glass display. Tips?
Someone mentioned above, using strong tape helps .
My first 7 Plus opening. I pulled up the screen just enough to insert a thin guitar pick at the bottom of the phone to break the adhesive. I didn’t even create a gap as such. I then ran the pick along the sides to continue to detach the adhesive, just like iFixIt show in Step 10 for the top of the phone.
My screen already had a crack at the bottom, near the home button, so I was nervous about pulling too hard on the screen. It had a screen protector fitted so maybe that helped keep it all together.
iFixIt’s use of a spudger at the bottom of the phone looked hazardous to me, especially with my damaged screen.
This must be a joke. I’ve been trying for days to pull open the iphone like this. Doesn’t work. I bent the ring on the suction cup trying to pull it off, but nothing happens, no gap, not remote possibility of a pick or spudger getting in there.
Ended up using a blowdryer and a razor blade. Bottom got scratched up, but there was no way that fat plastic spudger was going to fit. I got the razor under the corner, from there worked to middle and twisted with repeatedly adding heat. Lots of heat.
Be aware that there is a small connector, under the home button.
I found that the edge of the spudger was too thick, so I sanded it down to almost a knife edge. This made it much easier to insert into the gap.
Use the Opener and a razor blade to cut through the adhesive. It takes about 45 seconds to heat up the Opener in a 1000 watt microwave. Be careful not to damage the thin display ribbon cables on the right side iphone. After you use the razor blade to cut the adhesive on the two sides and bottom you should be able to use the spudger to remove the display screen.
-
-
-
Steek het platte einde van de spudger aan de onderkant van de iPhone tussen het voorste paneel en de achterste behuizing .
-
Schuif je spudger langs de linkerkant van de telefoon omhoog, beginnend bij de onderkant en in de richting van de volumeknoppen en de stilteknop, en snijd onderweg alle lijm door die het scherm op z'n plek houdt.
-
-
-
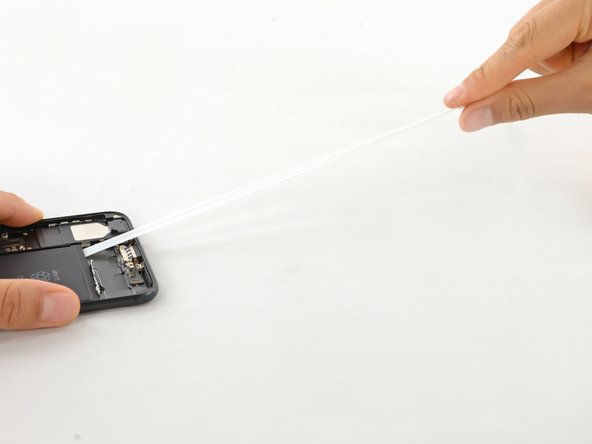
Schuif een openingsplectrum onder het scherm en langs de bovenkant van de telefoon om de laatste lijm door te snijden.
I couldn't find the pick in the tool set, so made my own. Then I found the original in the battery box. %#*@.
Same thing for me
-
-
-
Trek de schermmodule lichtjes weg van de bovenkant van de telefoon om deze los te krijgen uit de plastic klemmen die de module aan de achterste behuizing bevestigen.
-
Open de iPhone door het scherm open te slaan vanaf de linkerkant, net zoals je de achterkant van een boek zou openslaan.
So if I broke the cable that connects the display to the logic board. What replacement part would I need to order now?
Probably the screen
-
-
-
-
Verwijder de volgende vier tri-point Y000 schroeven die het plaatje op de onderste schermkabel aan het logic board bevestigen:
-
Drie 1.2 mm schroeven
-
Eén 2.6 mm schroef
Is it really safe to lay the device fully open like a book? The cable leading to the LCD gets stretched across the sharp edge of the aluminum edge of the back cover.
Generally I'd say no, it's not safe. In reality I've seen a bit of variance in the cable length, and sometimes it'll be fine—but mostly I'd be prepared to prop the display up or hold it in place at a slight angle so it doesn't put too much stress on the cables. On prior iPhones it was easy to rubberband the display to a box or a can of soda, and something like that would probably work well here too. Use your own judgment.
You could stick the suction cup back on, near the right side of the phone, with the blue hook oriented in such a way that it becomes a stand for the screen. That way it won’t open much more than 90 degrees, and leaves both your hands free.
Mark -
The tri wing screws are so hard to remove. What's the trick?
I cannot remove one of the corner screws in this step and i have used the tweezers and the y000 tri tip and i am afraid that it is stripping it. is there a work around for this step?
@katmonday1 No workaround unfortunately. Make sure the driver tip is in good condition and fits the screw correctly. Seat it in the screw, hold the driver perfectly vertical, press down hard (and maintain it), and turn. It’ll come out. If it’s really stripped you’ll have to get more aggressive—try one or more of the techniques in this guide or get some help. Good luck!
A tip to remember which screw is which as the differences are pretty tiny: I used different colored sharpie fine-points and made a mark on the top of the screws before removing. I thought about having strips of tape that I stuck similar sizes to, but the coloring seemed to work more easily. I only did this for step 11 and it saved me down the road when trying to differentiate the 1.2 and the 1.3mm screws!
STOP! Before you remove Any screws, be sure to create several bins to hold the various sizes in… or mark them like Trey suggested. I failed to pay attention because I thought they were all the same… they are not. It is very hard to figure out the sizes if you remove them all and store them in a single location.
i had a piece of paper with the steps numbered that involved screws. I had double sided tape on the paper and the number of screws and thier position marked. This was so helpful in removing and then finding and installing the tiniest screws on earth. And i have TINY hands. I can’t imagine someone with large paws being able to accomplish any of this.
there is one screw thats 1.2 mm but its bigger than the others and will fit in no hole of the entire phone. i got it out bot now i have no idea where it has to go i tried every hole. can somebody help me?
what do i do if one of the screws dont want to come off
-
-
-
Verwijder het plaatje op de onderste schermkabel.
I am confused, please help. LOL the bracket, the very first one being removed. I see it has three screws the same size and one a different size? I've been trying to fix my daughter's phone and ordered a 0.6 mm Tri Wing screwdriver for iPhone 7 plus /Apple watch. It seems to fit the screws and it seems to be turning them although I can't see that well but they're not coming out. However when I used it on a smaller bracket with two screws they came right out so I'm thinking I don't have the right screwdriver I am at my Wit's End!! I have been working on this phone or attempting to for a while now. I cannot find a list anywhere of the exact size screwdrivers needed to Take apart an iPhone 7 plus. Any help would be greatly appreciated.
If your tri-wing screwdriver worked for other tri-point screws in the phone, then it should work for the screws you are struggling with! If it feels like the screws are spinning but not coming out, try to use tweezers to pull them out. I often struggle with tri-point screws, and need to apply some downward pressure to remove them. This can be risky though, as you do not want to strip the screw or damage components underneath the bracket. If you continue to struggle, you can give this driver and this bit a try.
Also be aware that the battery connector might stick to the bottom of the steel bracket. This part had me a bit puzzled at first. lol
Just gently pry the connector off the steel bracket to release it and be sure the connector isn’t allowed to accidentally reconnect to the board.
-
-
-
Gebruik de punt van een spudger om de batterijaansluiting uit het contact op het logic board omhoog te duwen.
on reassembly, make sure that the connector cable is back in place, along side the battery, and not up, or on top in any way.
I slipped a small piece of paper under the flap.
After this step it is worth jumping to step 36 and disconnecting the lighting connector assembly (indicated with the orange rectangle) and connecting the new cable to test it out. After attaching the new lightning connector assembly, reattach the battery, and try plugging it in to see if the new assembly works correctly. If it does, then power down the phone, disconnect the battery, and disconnect the new lightning connector assembly. Then continue. If it doesn’t work, this check will save you a couple of hours of work.
-
-
-
Gebruik het platte einde van een spudger of je nagel om de twee onderste schermaansluitingen los te koppelen door deze in een rechte beweging uit het contact op het logic board omhoog te duwen.
What can happen if the battery is not disconnected before the two lower display connectors?
Hello, by my expierence and what i have learned iphone repair videos you can ‘blow up’ capacitors which one in logic board, screen is sensetive with voltages and etc….
When I removed the lower display cable bracket in step 12, the top connector stuck to the bracket and became disconnected.
My replacement screen wouldn't sit in the display connector properly, (wouldn't clip in both sides at same time) so I made sure it sat on one and it was lined up and got a thin piece of dense sponge and placed that over the connector, then proceeded to install the connector shield and screen works perfectly fine without a hitch. Very good tutorial just earnt me £25 lol
have the same issue, sometimes it doesn’t sit on the left side, other time not on the other, the difference is iphone not starting at all or looping with apple logo reboot…
ibisiki -
-
-
-
Verwijder de drie tri-point Y000 schroeven die het plaatje bovenop de aansluiting van de sensormodule in het voorste paneel bevestigen:
-
Eén 1.3 mm schroef
-
Twee 1.0 mm schroeven
-
Verwijder het plaatje.
Posted a comment above on the first step. The screwdriver that I ordered Works taking out these two screens shown in the picture. However it does not work on the first bracket that needs to be removed. It seems that all screw sizes are somewhat different but I'm not finding a list showing different screwdriver sizes needed. Does this make sense? Could anybody please give me some advice on this thank you much.
What happens if you break “tear in half” the black tape stuff?
Unfortunately if you tear the black cable you will need to replace it !!!
Chris West the screwdriver that probably came with the kit was pentalobe to get the first two screws out to open the case. you need a .6mm Y tip driver for internal. its deceptively Phillips looking but is not it only has three blades in a Y, not 4 in a +
I called the y tip a triangle tip until I read these comments. Thanks for the correction
Hello is it if I put wrong screw can damage the board?
Care should be taken while removing the last 1.0mm screw, on the far right in the picture. This screw is screwed into another screw (or standoff) beneath the bracket. This standoff may come unscrewed and upon removing the bracket you may find the screw and standoff are still attached to the bracket. Do not lose this part if you decide to separate them , the standoff is not a normal phillips, and may require a special driver to reinstall. I used the phillips to start it back in, and relied on the screw to tighten it upon reassembly.
I know this is late bit a trick I use to put the standoffs in (had to do 2 cause someone lost the screws I was replacing) is to take the screw that goes in it srew them together loosely to give it a fake phillips head then gently screw both into the spot the standoff goes in. you can then take the phillips out (may need to put a spudger between the screw and standoff to keep the standoff down then use a tiny flathead to gently tighten the standoff down. its a few steps but makes life easier if you need to replace it quickly.
I was able to remove the first 1.0 mm three tri-point Y000 screw from the bracket but I cannot for the life of me get the other 1.0 mm screw undone or the one 1.3 mm screw undone. Any tips?
I tried pressing down a bit harder and I even put the first screw back in to see if it helped me loosen the other two but it did not work.
My screwdriver was doing the job up until this point, and I’m worried I’ll strip the screw if I keep trying.
Would appreciate any advice!
Dear IFixit: First, I want You to know I love your repair guides. I consider You to be the absolute best repair manuals available. But, hopefully as your friend I am going to point out once the bracked is removed a 2.0 mm Standoff screw should appear. It’s 1 of 2 screws holding the Antena Flex Cable in place. Rob
-
-
-
Koppel de aansluiting van de sensormodule in het voorste paneel los van het contact op het logic board.
Make sure that the orientation of the cable when you attach is correct! See the picture for the correct orientation. If it gets installed 180 degrees out(i.e., the ribbon goes up instead of down, then the earphone, front camera, and Home button will be inoperative. Ask me how I know!?! Worked great when installed correctly!
Thanks Kevin. I would be stuck if I hadn't read your comment!?! Great input.
That's save my life!thanks god!
neg -
-
-
-
Verwijder de schermmodule.
When removing the old adhesive from the edges, duct tape can be useful. Simply use small strips of duct tape and your spudger to press the tape’s adhesive side carefully into the edges of the phone’s display and slowly peel the duct tape away from the display. The duct tape should pick up the remaining adhesive and carry it away from the edges. use the tip of the spudger to gently scrape away any remaining dirt or film from the crease around the edge and repeat the action with a new strip of tape to pick up any dirt, adhesive or grime from the surface. This should save considerable time.
Thank you for including a link to the iPhone Display Adhesive Replacement guide, this was very helpful!
is it really necessary to remove the display? the screen connectors are delicate and I fear re-assembly errors. I changed the battery and did not remove any screen connectors. no problems.
Due to the fact that THIS is the repair guide for replacing the DISPLAY it IS necessary to remove the display connectors. There is another guide for changing the battery -- you might want to follow that one.
Hannes -
I did not remove the display and ended up ripping one of the lower display cable ribbons when I turned the phone to remove one of the connectors. Be careful. I had to get a new display and move the Touch ID button.
I think that moving the replacement of the seal lower in the chain of events would be more beneficial. I'm replacing the battery, and stretching the adhesive tabs that held the battery in at a low angle kept sticking themselves to the newly-installed adhesive seal.
In the end, I wound up having to just remove the section of the seal along the bottom of the case :-/
If I'd been looking at the bigger picture, I'd have wanted to put the seal on right before reattaching the screen cables.
This guide does not show you the removal process for the top camera assembly. My screen looks like the one pictured but my replacement doesn't have the top connector or any of the front facing camera components and since the ribbon for the connectors looks like its coming out from underneath the display I can't see how to swap it over to the new display.
-
-
-
Verwijder de volgende twee Phillips schroeven die de barometrische ventilatieopening aan de achterste behuizing bevestigen:
-
Eén 2.9 mm lange schroef
-
Eén 2.1 mm lange schroef
I skipped this step and go straight to step 25. I skipped it because I couldn’t get the screws to come off. But skipping those step did not prevent me or has any detrimental effects on performing step 25.
I agree, I don’t see any reason to remove the Taptic engine to remove the battery…It seems like more of a chance of screwing something else up…keep it simple…
If you’re replacing the battery, removing the Taptic Engine gives you a much better chance of removing the battery adhesive strips successfully. To keep them from snagging and breaking, you want to pull them from as low an angle as possible. With the Taptic Engine in the way, you have to pull them at almost 90 degrees, or risk snagging them on the Taptic Engine.
i can’t get the 2.1 screw 2 come out pls help anyone
I agree with Jamie Liao above. Skips steps 18-24 as described. Before proceeding with step 25, I heated a microwavable hot/cold compress (used to treat muscle strains). I set the iPhone back casing on the heated compress before pulling out the adhesive strips.
Again, there is no need to do steps 18 through 24.
i didn’t remove this and had major issues pulling the adhesive strips out. I literally couldn’t grasp them and then when i did, they broke! UGH! I was able to complete the installation but i must have done something wrong because my phone still isnt working. It just ‘flashes’ the apple logo. Won’t do anything else. Should have just taken it in for repair. Now i have to buy a new phone anyway.
-
-
-
Duw de barometrische ventilatieopening voorzichtig in de richting van de trilmotor om de lijm die het aan de onderkant van de iPhone bevestigt, los te krijgen.
Adhesive may require a tiny amount of tugging of the barometric vent to free it…
-
-
-
Gebruik het platte einde van een spudger om de trilmotoraansluiting los te koppelen van het contact op het logic board.
-
-
-
Peuter de drie kleefstrips aan de onderkant van de batterij los.
In your step 24 going on to step 25 you recommend peeling all three battery adhesive tabs up, and then pulling them out.
I STRONGLY RECOMMEND peeling ONE tab up at a time, and then pulling it out immediately in one action.
This prevents the pulled up, but as yet not pulled out, tabs contracting back, lost underneath the battery.
I also reccomend pulling the outer tabs first leaving the centre one until last as it's easier to hold on to a battery straight, than one which is additionally trying to rotate
Followed Peter’s advice, and the battery came out no issues. Pull up one at a time (leaving the other adhesive strips in place), and pull the adhesive strip straight out, parallel to the table you’re working on. Instead of continuing to pull one long piece (like the photo in Step 25), I’d pull some, bunch in up in my fingers,then keep pulling. This allowed for more control over the phone and this step in general.
Just as a precaution: to guide where I’d put the battery back into place (I took it out while replacing the lightning connector), I marked with a metallic sharpie the outline of where the battery was, to help me make sure I put it back exactly where the original had been.
-
-
-
Trek een van de kleefstrips langzaam weg van de batterij, in de richting van de onderkant van de iPhone.
-
Trek met een gelijkmatige kracht en houd constante druk op de kleefstrip totdat deze losschiet tussen de batterij en de achterste behuizing. Trek de kleefstrip, voor de beste resultaten, in een hoek van 60º of minder.
I broke 2 out of three of the adhesive strips doing it this way. On my third attempt I would pull a little bit of the adhesive strip out with one hand. And with the other hand use a finger to press down lightly on the adhesive strip as I was pulling it out. This pushes the strip down from the battery and frees the adhesive from it. You can feel the adhesive strip give way as you do. I did this very incrementally for what seemed like forever. I then used my tweezers to retrieve the first two adhesive strips out from under the battery ( They did not recoil too far) and repeated the same tactic as I did with the third adhesive strip. It was not too difficult to finish the job after that.
-
-
-
Herhaal de vorige stap voor de tweede en de derde kleefstrip.
-
Als je alle kleefstrips met succes hebt weten te verwijderen, kun je de volgende stap overslaan.
-
Anders, als een van de kleefstrips is afgebroken onder de batterij en niet opnieuw kan worden vastgepakt, ga je verder met de volgende stap.
Step 26 is when it’s time to remind ourselves we’re having fun! That tape material sure does stretch a lot so be mindful of your work station. I almost knocked a drink off the table. Thanks
-
-
-
Na ongeveer een minuut kun je de batterij op voorzichtige wijze omhoog tillen.
i messed up and broke the strips. I had to carefully use a blow dryer on the back of the phone to heat the strips to the point of removal. VERY careful not to let the phone get too hot. I was nervous all the time that the battery which was a bit swollen, was going to explode.
-
-
-
Verwijder de batterij.
-
Bevestig je nieuwe batterij, koppel deze weer los van het contact op het logic board en ga verder met het in elkaar zetten van je toestel.
When it came time to adhere the new battery in place, I realized there was a little space on all sides of the battery. I wasn’t sure how to position it, so I just centered it. But when I went to reattach the connector back to the logic board, it wasn’t aligned. I had to remove part of the strips and was able to salvage enough adhesive to reposition it. It was frustrating and I think giving people a heads up in future would be helpful. Maybe this is noted somewhere, but if it is, I missed it.
I’m super pleased with the process otherwise. And with a new battery, it’s like I have a new phone!
If you bought the glue strip for the display, you have to place it before you reconnect the display to assemble the iPhone to the back shell. Be careful while removing the plastic protection, the glue will stick at the protection foil.
These glue strips gave me issues. I ended up putting them on backwards and therefore the little edges that needed to be tucked under on the bottom were opposite and i had to tear them off on both the top and bottom because they ‘hung-over’. I have a bad hangover from hanging over this iphone for 3 hours trying to find tiny screws and not break my back or have an old bulging battery explode in my face. Not worth it.
And the phone still doesn’t work
I ran through this, and on reassembly the home button didn’t function properly. I found a link that said if you used alcohol to clean the edges in preparation for the new seal, that the alcohol will affect the home button. Drying it out gently with a light blast of compressed or warm air should resolve this. For me it didn’t. Next link I found warned that if the home button screw was too tight try backing it out and retightening it just to the point of resistance. Doing that restored the home button functionality.
One other tip: reinstall the haptic generator before installing the battery to ensure the correct battery placement.
Great instructions! Thanks iFixIt!
-


Vergelijk je nieuwe onderdeel met het originele onderdeel om te zien of je nog meer onderdelen van je oude naar je nieuwe onderdeel over moet zetten of om te zien of je beschermfolie moet verwijderen voordat je je nieuwe onderdeel kunt bevestigen.
Om je toestel weer in elkaar te zetten, volg je deze instructies in omgekeerde volgorde.
Breng je e-afval naar een R2 of e-Stewards gecertificeerde recycler.
Ging je reparatie niet zoals gepland? Check dan onze pagina over probleemoplossing of stel je vraag op ons antwoordenforum voor hulp bij het oplossen van je probleem.
Annuleren: ik heb deze handleiding niet afgemaakt.
406 andere personen hebben deze handleiding voltooid.
Met dank aan deze vertalers:
77%

Thomas Keulemans helpt ons de wereld te herstellen! Wil je bijdragen?
Begin met vertalen ›

51 opmerkingen
can the battery from iPhone 7plus fit in the 6s plus? looks to me like is the same type of connector and same dimensions so it would be an easy way to gain 150 extra mah by using the iphone 7 plus battery
Alex
No, because the size are diferents
Of course you can! WHY NOT?
How can I attach the screen back to the body after replacing the old battery,do i need any adhesive to attach the screen to the body?
Not necessarily.
No you don’t need adhesive, but you should probably use it. I ended up not doing so as I still need to replace the screen at another time.
Calen B. -
Do I need any adhesive to attach the screen back to the body after replacing the old battery with a new one?
The display is held in with screws and clips, so everything will work fine if you reassemble the phone without replacing the adhesive. That said, your phone won't be as waterproof as it used to be. We do have replacement adhesive available for you, but we're still working on putting together a clear guide on how to install it properly. (Stay tuned!)
no, you can use the same, unless you dont use the hairdryer/iOpener, then you will have to use a special adhesive
Yep. It’s not worth the risk. Just take the device to an Apple Store and pay the $80. That way you not only have a water resistant device, you also have a 90 day warranty on the battery AND the work performed on it. So if the phone’s water resistance fails because of the adhesive, Apple will replace the device without any additional cost.
the glue around the body must be put before reassembling the connectors of the display unit or after ?
Sooo…in Step 24, DO NOT use the metal-tipped tweezers to “jam” under the Battery and try to pry up on it. You WILL risk puncturing the battery and catching the iPhone on fire.
I’ve replaced the battery. But it won’t turn back on? I can’t force restart it because my fingerprint button doesn’t work? Can you help?
Mine did the same thing, what do I do?
Excelente guia he completado el trabajo, muy util para no aprender hechando a perder los equipos, los soguientes seran pan comido, saludos muchas gracias
Is the battery Apple genuine
when you open up the phone you might think that you don’t need to remove the Taptic Engine for the battery change. But when the adhesive breaks and you will need more space to pull the remaining adhesive out.
Don’t skip the steps.
on ios 13.4 after replacing the battery the phone is indicating recharging but the % never goes up try with and older apple original same thing reinstalled my battery that i wanted to replaced and it recharge % goes up
Procedure rating is difficult. Very capable person here. I used to replace cracked screens on the 3 and 3S all the time when I was a lower end SE at my old software dev employer. (I had replaced everything on the 3s, home button, camera, battery, screen, etc.) Granted it's a different phone today, but I'm cautious, careful, and patient. Off the bat I cracked the screen because the instructions said to "twist the spudger to widen the opening". Tuck me. Crack spread out from the home button to ear piece. I used a Dyson hair dryer for 45 seconds to heat up phone base. After the crack I taped the screen w box packing tape to keep glass from going all over. Removal was fine after that. Didnt need additional heat, but it doesn't matter. Separated the phone and didn't bother replacing the battery now that I need a $75 screen. Using work phone as only phone for now.
so i replaced the battery, speaker and front camera/proximity sensor and now my phone is acting crazy. It randomly shuts down, no vibration, no sound, no wifi, and cant hear anyone when i call. What did i do? I work at a computer repair shop so this is kind of embarrassing….
Great guide I felt so accomplished after replacing my battery
I used 2 iFixit kits to replace batteries in an iPhone 7 Plus and an iPhone X this week. Both jobs went smoothly, thanks to these online guides. The batteries showed 100% capacity with 0 cycles in coconutBattery Plus readouts. The batteries even were recognized by iOS as “Apple” batteries in the Settings/Battery app. This is a huge change as previous iFixit batteries I have installed were not recognized by iOS. Both iFixit kits contained all the exact tools needed, plus perimeter gaskets to reseal the screen to the body. The iPhone X kit even contained a new speaker gasket. Wow! iFixit is the best resource for Apple do-it-yourselfers. Thank you!
hi guys i just wanted to ask whether u need 2 have the battery below 25% or can i start before?
Replaced the battery and the rear camera module in 30 minutes, great guide and replacement parts. Thank you iFixit
Replacement successful. Didn’t attach adhesive yet. But i replaced the battery. Tip. Removing screws is easy but putting back in is a pain. If the screw is not fitting on the end of your screwdriver. Your using the wrong screwdriver. Realizing this makes it way easier
Guide is really clear, took a little bit of time to clean the gunk from the adhesive from the phone to get the phone back together, but the ifixit battery fell in place perfectly and I’m happy overall with how the phone got back together.
Thank you! Like a glove! Correction: STEP 15 - Need Phillips screw driver
Shouldn't we use the adhesive on the battery while reassembling?
I replaced my battery and now my phone is stuck in Reboot loop. What’s the issue?
Worked Perfectly!!! Thank you guys so much, $30 for a new battery AND tools, cannot beat that!
I need some help, please. The battery on my iPhone 7 plus swelled (not original ) so I bought a replacement and I changed it, at first it wasn’t charging even though it was showing as it was, the percentage still the same, then it started to do some funny things like draining the battery, going from 83 to 20 in a minute, and then it was impossible to use as it was restarting all the time. I thought something wasn’t connected properly or maybe I damaged something when I replaced it, I tried many times but it was doing the same. I put back the old swelled battery and it was fine, so I realised the battery was faulty, so Ive got a new replacement and its doing the same…. the only difference that I can see between the new replacements and swelled one is the APN number being 616-00249 and the old one 616-00250 but i’m not sure if that has anything to do with this problem…
We are the Best Interior Designer in Noida specializing in exclusive, cost-effective and luxurious interior design, detailing and space planning in Noida.
I broke the glass at Step 9. Used the spudger instead of the opening pick. Glass broke when I preyed on the top right hand corner. Fortunately the glass had a screen protector on. So, no shards. Be careful! Maybe a WARNING should be added to Step 9.
Hmm after replacement of the battery the phone powers up nicely; but now the home button doesn’t work. For the rest the phone is fully functioning again. (calling, silent/ring/vibrate all works, but the homebutton does not ‘tick’ nor activates anything. Any suggestions?
Thanks for making me look Soooooo smart !!!
In your step 24 going on to step25 you recommend peeling all three battery adhesive tabs up, and then pulling them out
I STRONGLY RECOMMEND peeling ONE tab up at a time, and then pulling it out immediately in one action
This prevents the pulled up, but as yet not pulled out, tabs contracting back, lost underneath the battery.
I also reccomend pulling the outer tabs first leaving the centre one until last as it's easier to hold on to a battery straight, than one which is additionally trying to rotate
I did every thing you explained on removing the iphone battery. However, I never found any strips to remove the battery and also it looks like its literally glued to the phone. I didnt want to remove it because I dont want to damage the phone but please can you tell me where to go from here with out me damaging the phone
Another well laid-out guide. No complaints! Thanks iFixit
Just finished and the phone turned on when I put it on the charger so that is a good start. I didn't know what the blue card in the battery box was (it's the adhesive) so I didn't use it.
My iphone 7plus has a model # MN4V2VC/A . Bought in 2017 in Canada. Are all batteries compatible? Some model #'s start with A
The recommendation of discharging the battery is completely unnecessary. Even a 25% charged battery can explode. Completely ridiculous suggestion.
pargoff - Antwoord
The risk of thermal runaway on these batteries decreases with the battery's SOC (state of charge). Below 50% charge the risk is fairly low, and at 25% charge the risk of a thermal event is near zero. If I recall correctly, the same suggestion appears in Apple's official (non-public) service manuals for the iPhone.
Jeff Suovanen -
@jeffsu Yes, that is correct. Apple does require all certified staff to discharge the battery below 25%. This is an industry standard for all LiION batteries. If you don’t want to do this, just make sure to not puncture the battery and disconnect it first thing.
iHelpU.Tech - Antwoord
Hang on a second here, doesn’t the Ifixit part I ordered come with the seals? The display assembly? It doesn’t. Now I have to wait another week?!
Vanessa Pinter - Antwoord
How do you turn off if the screen isn’t responding to touch?
adam - Antwoord
The replacement battery came with the seal—but how do you put it on???
lkollar - Antwoord
Instructions for replacing the seal are here: Vervanging van de kleefstrips van een iPhone-scherm
bester - Antwoord
I just found the instructions on how to install the seals AFTER I was completed and had to figure it out. Maybe, just maybe you should link this somewhere on the guild instead of buried in a comment. Just a thought.
Charles Meitin - Antwoord
Step 1 is: Read through all the steps and comments or the method prior to starting on this Step 1. There's a lot of much needed information and experience that you can learn from which will reduce the chance of struggling, wasting time or even breaking your device.
My favourites are:
Use a hot water bottle.
Label all screws you remove with their size and location on a piece of paper with double sided sticky tape.
Test the lightning assembly at step 13
There is a Standoff driver bit in the box, don't use a screwdriver.
etc...
Neil Eriksen - Antwoord
A tip for looking out for all those little screws. I used an ice block tray, for all the little screws etc. I numbered each with the step number, as in the instructions, but not all steps have bits to look out for. Where two different size screws are used I had a tray for each size and marked step a and step b. For this I coloured each tray sticker with the colour of the screw as shown in the instructions. All this worked a treat with no confusion or using the wrong part.
Herb
Herb Adler - Antwoord
The screw size for those with a screw set is P2.
Gareth Flandro - Antwoord