Inleiding
Folge den Schritten in dieser Anleitung, um die rückseitige iSight Kamera auszutauschen.
Wat je nodig hebt
Video overzicht
-
-
Schalte dein iPhone aus, bevor du mit der Demontage beginnst.
-
Entferne die zwei 3,4 mm Pentalobe Schrauben, die sich auf beiden Seiten des Lightning-Anschlusses befinden.
-
-
-
Wenn du keine Anti-Clamp hast, dann verwende einen Saugheber. Die nächsten drei Schritte zeigen dir, wie das geht.
-
Erwärme die Unterkante des iPhones leicht mit einem iOpener oder einem Fön für etwa eine Minute.
-
-
-
-
Greife das Display vorsichtig und öffne das iPhone, indem du das Display an den Befestigungen am oberen Ende drehst, um das iPhone zu öffnen.
-
Öffne das Display zu ungefähr 90° und lehne es gegen etwas, um es während du arbeitest gestützt zu halten.
-
Füge ein Gummiband hinzu, um das Display sicher an seinem Platz zu halten, während du arbeitest. Das beugt Schäden an den Displaykabeln vor.
-
-
-
Entferne zwei Kreuzschlitz-Schrauben, mit denen die Abdeckung des Akuanschlusses am Logic Board fixiert sind. Sie haben folgende Längen:
-
Eine 2,9 mm Schraube
-
Eine 2,3 mm Schraube
-
-
-
Entferne die folgenden Kreuzschlitz-Schrauben:
-
Drei 1,3 mm Schrauben
-
Eine 1,6 mm Schraube
-
Eine 3,0 mm Schraube
-
-
-
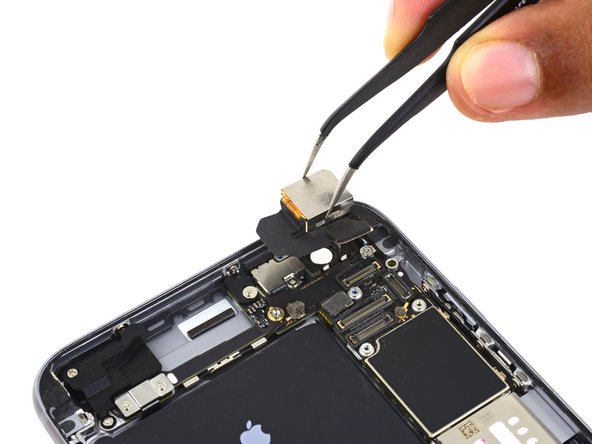
Löse alle Klebestreifen, die die Schrauben der Halterung der iSight Kamera verdecken.
-


Arbeite die Schritte in umgekehrter Reihenfolge ab, um dein Gerät wieder zusammenzubauen.
Arbeite die Schritte in umgekehrter Reihenfolge ab, um dein Gerät wieder zusammenzubauen.
Annuleren: ik heb deze handleiding niet afgemaakt.
127 andere personen hebben deze handleiding voltooid.
Met dank aan deze vertalers:
100%


Deze vertalers helpen ons de wereld te repareren! Wil je bijdragen?
Begin met vertalen ›

35 opmerkingen
really useful.
Great instructional video which saw me through the entire disassembly of my phone, and then clear and concise enough steps on the page to help me put it back together after installing the new camera. Thank you!!!!
I completed this repair at the same time as replacing my battery and headphone/lightening jack assembly. The problem I was experiencing with my camera was jittery video and unusable photos. The stabilization gimbal had died, though I am not sure that is the right word for it. It's more like it had an overdose. Anytime I would come to use the camera you could hear a tiny clicking noise as the lens armature shot itself about within its tolerances. Photos were out of focus and jittery, even when taken with the phone completely stable and untouched. I could most of the time just manage to make it take photos to deposit checks by holding the phone horizontally and in very bright sunlight, sometimes tapping the phone until the clicking noise stopped. Videos would hunt for focus and look as though I was actively shaking the camera, no matter what. Sometimes it was worse than others. Replacing this assembly completely fixed all issues.
Michael, you might have been interested to know that the focusing problems you experienced are chronic in the iPhone 6 Plus and Apple has created a repair program. You might have found this page useful if your serial number was eligible. https://www.apple.com/support/iphone6plu...
Micheal, I am having that same problem as well! Good to know that replacing it fixes it!
Talon, the repair program Apple has is only for the 6 plus not the 6s plus.