Ga door naar hoofdinhoud

iPhone 6s Display Replacement

Gearchiveerde handleiding
Deze handleiding wordt enkel nog bijgehouden voor historische doeleinden. Gebruik de laatste versie van deze gids om uw reparatie uit te voeren.

Wat je nodig hebt

  1. iPhone 6s Display Replacement, Battery Connection: stap 1, afbeelding 1 van 1
    • Power off your iPhone before beginning disassembly.

    • Remove the two 3.4 mm Pentalobe screws surrounding the Lightning connector.

  2. iPhone 6s Display Replacement: stap 2, afbeelding 1 van 1
    Gereedschap gebruikt in deze stap:
    iSclack
    $24.99
    Koop
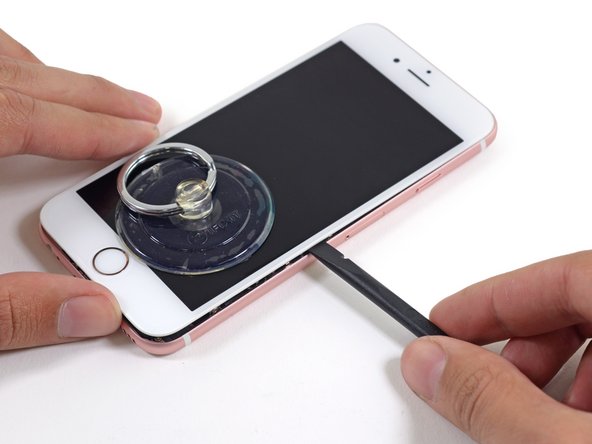
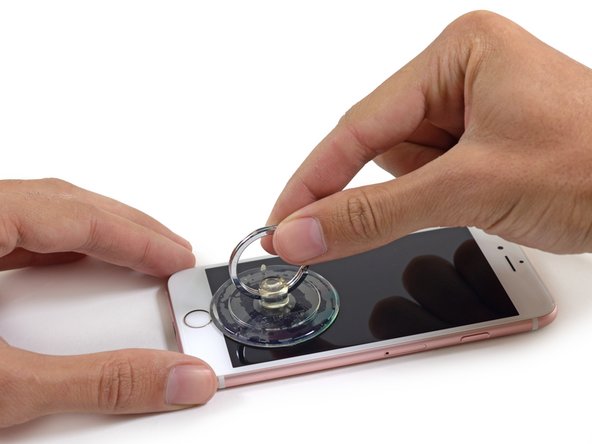
    • If you don't have an iSclack, use a single suction cup to lift the front panel:

    • Press a suction cup onto the screen, just above the home button.

    • Be sure the cup is pressed securely onto the screen to get a tight seal.

  3. iPhone 6s Display Replacement: stap 3, afbeelding 1 van 3 iPhone 6s Display Replacement: stap 3, afbeelding 2 van 3 iPhone 6s Display Replacement: stap 3, afbeelding 3 van 3
    • There is a notch on the underside of the display just above the headphone jack that is the safest place to begin prying the phone open.

    • Pull up on the suction cup to slightly separate the front panel assembly from the rear case.

    • Take your time and apply firm, constant force. The display assembly is a much tighter fit than most devices and is held down with adhesive.

    • Once a small gap has been opened, insert the flat end of a spudger above the headphone jack.

  4. iPhone 6s Display Replacement: stap 4, afbeelding 1 van 2 iPhone 6s Display Replacement: stap 4, afbeelding 2 van 2
    • Twist the spudger to open the gap more and break it free from the adhesive.

    • Keep pulling up on the suction cup while twisting the spudger.

  5. iPhone 6s Display Replacement: stap 5, afbeelding 1 van 2 iPhone 6s Display Replacement: stap 5, afbeelding 2 van 2
    • Use the edge of a spudger to slice through the adhesive on either side of the phone.

  6. iPhone 6s Display Replacement: stap 6, afbeelding 1 van 2 iPhone 6s Display Replacement: stap 6, afbeelding 2 van 2
    • Use the edge of a spudger to slice through the adhesive on either side of the phone.

  7. iPhone 6s Display Replacement: stap 7, afbeelding 1 van 3 iPhone 6s Display Replacement: stap 7, afbeelding 2 van 3 iPhone 6s Display Replacement: stap 7, afbeelding 3 van 3
    • Use the suction cup to open the display, breaking the last of the adhesive.

    • Don't open the display more than 90 degrees, as it is still connected at the top by three cables that may break if stretched.

  8. iPhone 6s Display Replacement: stap 8, afbeelding 1 van 1
    • Lean the display against something to keep it propped up while you're working on the phone.

    THESE INSTRUCTION / GUIDE IS NOT COMPLETE. I broke my phone and ended up with $250 in repairs at the local cell phone store at this step. You need to detach the display completely instead of prop it up against a box. It is very likely your cables will tear at this step if you don’t completely detach the display

    Christopher Kuhar - Antwoord

  9. iPhone 6s Display Replacement: stap 9, afbeelding 1 van 1
    • Remove the following screws from the battery connector bracket:

    • One 3.0 mm Phillips #00 screw

    • One 2.3 mm Phillips #00 screw

  10. iPhone 6s Display Replacement: stap 10, afbeelding 1 van 1
    • Remove the metal battery connector bracket from the iPhone.

  11. iPhone 6s Display Replacement: stap 11, afbeelding 1 van 3 iPhone 6s Display Replacement: stap 11, afbeelding 2 van 3 iPhone 6s Display Replacement: stap 11, afbeelding 3 van 3
    • Use the flat end of a spudger to disconnect the battery connector from the logic board.

    • Push the connector to the side to ensure it doesn't accidentally make contact and power on the phone while you're working on it.

  12. iPhone 6s Display Replacement, Display: stap 12, afbeelding 1 van 1
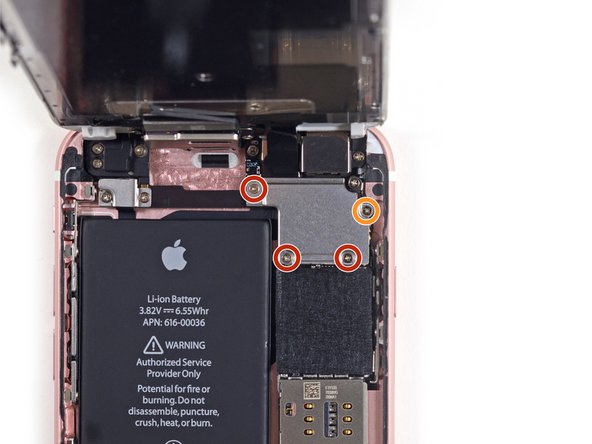
    • While holding the front panel open at about a 90º angle, remove the following screws securing the front panel assembly cable bracket:

    • Three 1.3 mm Phillips #00 screws

    • One 3.0 mm Phillips #00 screw

    • Don't lose track of this screw! It's very important that the one 3.0 mm screw goes in the top-right corner of the plate. Anywhere else may cause damage to the logic board.

  13. iPhone 6s Display Replacement: stap 13, afbeelding 1 van 1
    • Remove the front panel assembly cable bracket from the logic board.

  14. iPhone 6s Display Replacement: stap 14, afbeelding 1 van 3 iPhone 6s Display Replacement: stap 14, afbeelding 2 van 3 iPhone 6s Display Replacement: stap 14, afbeelding 3 van 3
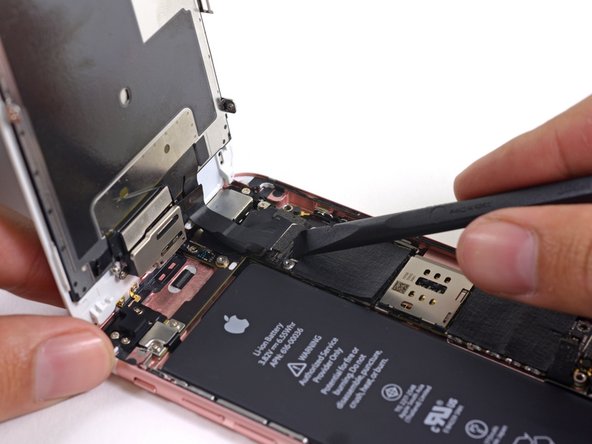
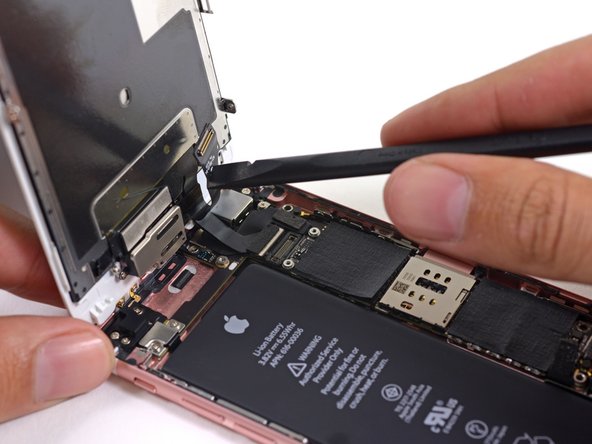
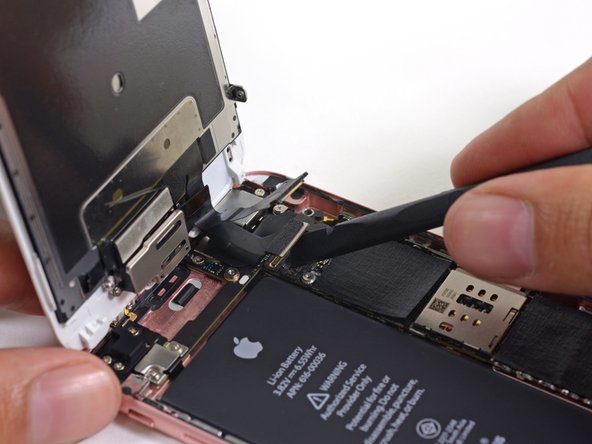
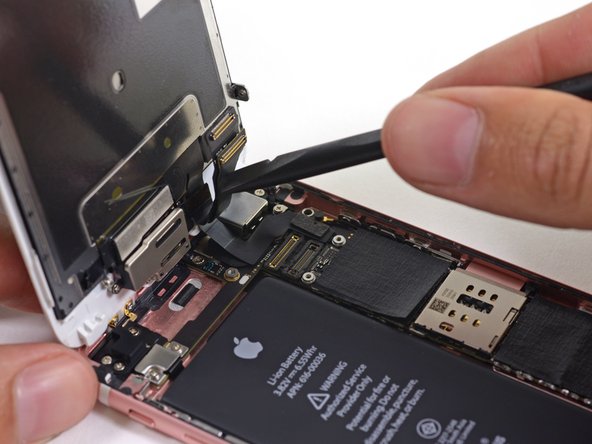
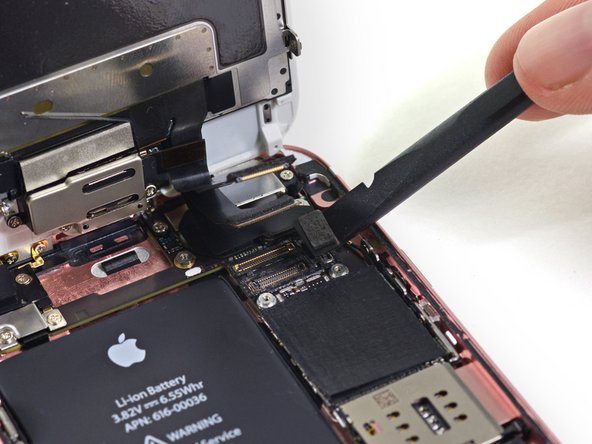
    • In the next three steps, take care to pry up only on the cable connectors, and not on their sockets on the logic board.

    • Use the flat end of a spudger to disconnect the front-facing camera and sensor cable connector.

  15. iPhone 6s Display Replacement: stap 15, afbeelding 1 van 3 iPhone 6s Display Replacement: stap 15, afbeelding 2 van 3 iPhone 6s Display Replacement: stap 15, afbeelding 3 van 3
    • Use the flat end of a spudger to disconnect the display data cable connector.

    • When reassembling your phone, the display data cable may pop off its connector. This can result in white lines or a blank screen when powering your phone back on. If that happens, simply reconnect the cable and power cycle your phone. The best way to power cycle your phone is to disconnect and reconnect the battery connector.

    If you have connected the new digitizer and LCD screen and powered the phone back on to verify everything is working and if the Apple Logo starts blinking and does not bring you to the Login screen, then you need to also replace the iFixit front facing camera cable/assembly with the original one from the cracked screen.

    Phil Zenger - Antwoord

  16. iPhone 6s Display Replacement: stap 16, afbeelding 1 van 2 iPhone 6s Display Replacement: stap 16, afbeelding 2 van 2
    • Finally, use the flat end of a spudger to disconnect the digitizer cable connector.

  17. iPhone 6s Display Replacement: stap 17, afbeelding 1 van 2 iPhone 6s Display Replacement: stap 17, afbeelding 2 van 2
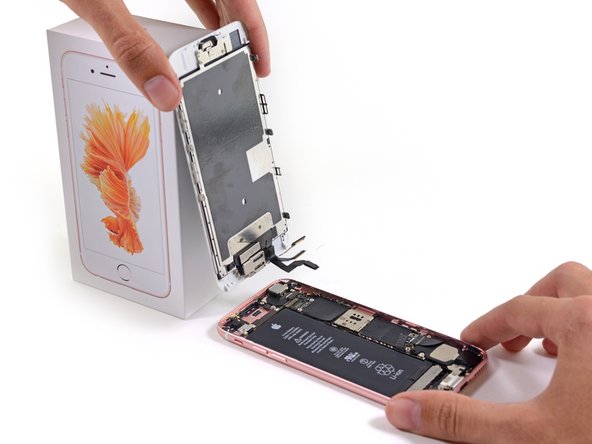
    • Remove the display assembly from the rear case.

    So if I wanted to replace my iPhone 6s display, could I just get another iPhone 6s display and switch them, but also use the same original home button?

    Luke - Antwoord

Conclusie

To reassemble your device, follow these instructions in reverse order.

153 andere personen hebben deze handleiding voltooid.

Sam Goldheart

Lid sinds: 10/18/12

465.647 Reputatie

538 handleidingen geschreven

Team

iFixit Lid van iFixit

Staff

135 Leden

16.732 handleidingen geschreven

21 opmerkingen

while technically correct, this guide is not complete in the sense that a new tech cannot follow it step-by-step to successfully complete a screen replacement. You should include the steps necessary to move the parts over from the old screen. Yes you can buy screen replacements with small parts but most repair operations don't do that as it isn't that hard to move them and much less expensive.

There are many small parts involved in moving from one screen to another. There are also a few steps that require prying a flex from the frame that is taped down. Having the additional steps in this guide that point out exactly where each small parts go and how to successfully pull the flex off without tearing it would be a huge improvement to this guide (and all the other screen replacement guides as they all have the same gap)

thanks - this is a great site and my techs use it for training every day.

Marty Morrow - Antwoord

The demo ends before it does what is stated in the heading (Display Replacement.) This demo is for Front Panel Assembly Replacement.

PJL500 -

As stated in the intro, this is just the full front panel assembly guide. We'll be posting more thorough screen replacement guides in the future. Stay tuned ;)

Sam Goldheart -

When will you be selling the 6S replacement screen. I only see on for the 6 and it says not compatible with the 6S.

Additionally is it possible to replace just the glass and not all the other parts?

dougross - Antwoord

That is what i am curious about as well!!!

just cracked the glass in the bottom left corner of my 6s Plus.

brink28 -

You do know that without replacing the adhesive the 6s' force touch can stop working entirely.

Plus you do not need to disconnect the battery if the iPhone is off. There is a component next to the battery connector that if damaged during the disconnection of the battery you could kill your iPhone.

Brayden Weller - Antwoord

Hi Brayden,

So I assume you're saying you can replace Just the Glass as long as you use the adhesive to glue down the replacement glass, does this mean you can use an iPhone 6 glass? Your feedback will be greatly appreciated,

Sincerely,

Jason.

Jason -

Hey Jason

If you damaged the display glass, you would need to find a way of moving over the 3D Touch sensor to the new display.

Even if you manage to replace the display without damaging the 3D Touch sensor then you will have to replace the Adhesive that holds the display panel to the main body of the iPhone. Otherwise you could have a non-functioning 3D touch.

Regards

Brayden

Brayden Weller -

So I did a complete teardown of the 6s motherboard to do a water treatment but what I can't figure out is what the screw below the back camera and above the lcd plate does. My co-worker took the phone apart and in the pictures it looks like its a wifi ground or something but I cannot find anything that attaches there any one know what it is?

Repair Guys - Antwoord

Should heating around lcd edge (bottom part first) only make suction then slowly heat the edge again be careful when suck the screen, don't hurry and don't use too much force.

Attapon Thaphaengphan - Antwoord

Thank you for the demo. cheers! i will perform a build up from to iphone 6s soon this will help me i will record a video and share it.

Abraham Felix - Antwoord

There is an adhesive between each flex cable connector and the logic board socket. When we disconnected the flex cables for the LCD and Touch screen, the logic board sockets pulled away from the logic board. We have repaired hundreds of phones and never saw anything like this. Be careful the phone became a brick.

tomgeorge - Antwoord

Guide complet et très bien écrit merci pour le travail fourni et aussi la traduction en français

Toff - Antwoord

Dear do-it-yourself fellows. The guide is incomplete as it misses the dismantling of the fingerprint sensor (a link maybe?) and more important: the adhesive is not shown on all of the pictures. During disassembly the forces are much higher than on other iPhones.

It is of interest during assembly where to put the adhesive best: on the display or on the frame. Even more important: if you buy a new screen the adhesive is not part of the delivered screen in most cases. So you loose some of its waterproof abilities.

u204863 - Antwoord

Hi there! This is an old version of the guide! Check out [the newer version here|iPhone 6s Vervanging van het scherm] , or maybe check the display replacement guide that removes all the peripherals. As for the adhesive, replacement will be necessary to preserve the waterproofing, you can check out What Adhesive or Glue is used to adhere Glass to Frame? for talk about what kind of adhesive to use!

Sam Goldheart -

It's a good tutorial but now my phone is broken..

thug - Antwoord

How to replace front panel <u>only</u>

mohammedrishadvk - Antwoord

Thanks for the tutorial!!! I was lucky and got an extra iPhone 6s plus so I will just do a replacement of the screen with the same working phone that is not cracked....

Eli Red Eagle - Antwoord

If I scratch the LCD plate and it now has a tear in the black coating, could that affect my screen display? the screen and connectors are ok, just that back panel that screws onto the screen has a tear

ale96b - Antwoord

So if I wanted to replace my iPhone 6s display, could I just get another iPhone 6s display and switch them, but also use the same original home button?

Luke - Antwoord

Exactly, if you want to use Touch ID you have to use the original Home Button

Zaim -

Voeg opmerking toe

Weergavestatistieken:

Afgelopen 24 uren: 1

Afgelopen 7 dagen: 2

Afgelopen 30 dagen: 5

Altijd: 185,373