Ga door naar hoofdinhoud

iPhone 5c Logic Board Replacement

Alleen vereisten
Deze handleiding is alleen bedoeld als vereiste voor andere handleidingen. Het staat niet op zichzelf.

Wat je nodig hebt

  1. iPhone 5c Logic Board Replacement, Logic Board: stap 1, afbeelding 1 van 2 iPhone 5c Logic Board Replacement, Logic Board: stap 1, afbeelding 2 van 2
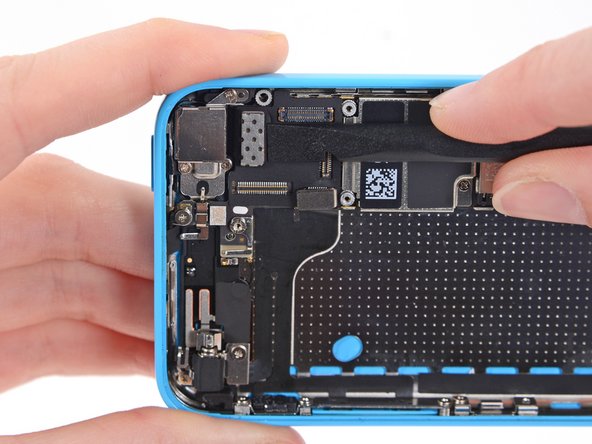
    • Use the flat end of a spudger to disconnect the audio control cable connector from its socket on the logic board.

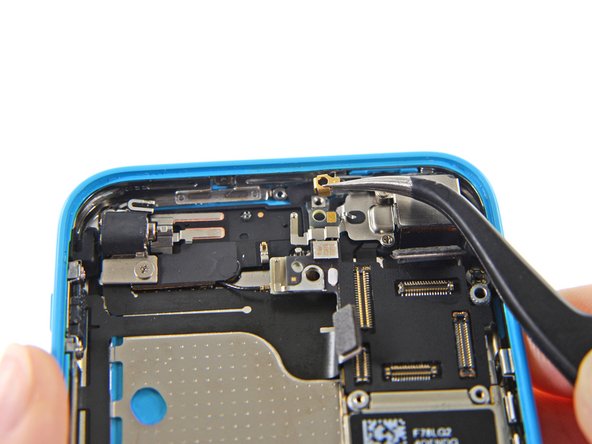
    • Disconnect the rear facing camera cable connector from its socket on the logic board.

  2. iPhone 5c Logic Board Replacement: stap 2, afbeelding 1 van 1
    • A small piece of tape may obscure the logic board grounding clip. If so, use a pair of tweezers to remove the tape.

  3. iPhone 5c Logic Board Replacement: stap 3, afbeelding 1 van 2 iPhone 5c Logic Board Replacement: stap 3, afbeelding 2 van 2
    • Remove the following screws securing the logic board grounding clip to the rear case:

    • 1.2 mm Phillips #000 in the top side-wall

    • 2.5 mm Phillips #000

  4. iPhone 5c Logic Board Replacement: stap 4, afbeelding 1 van 1
    • Use tweezers to remove the logic board grounding clip.

  5. iPhone 5c Logic Board Replacement: stap 5, afbeelding 1 van 1
    Gereedschap gebruikt in deze stap:
    Standoff Screwdriver for iPhones
    $5.49
    Koop
    • Remove the following screws securing the logic board to the rear case:

    • Two 2.3 mm Phillips screws

    • Three 2.7 mm standoff screws

    • Standoff screws are best removed using a standoff screwdriver or bit.

    • In a pinch, a small flathead screwdriver will do the job—but use extra caution to ensure it doesn't slip and damage surrounding components.

  6. iPhone 5c Logic Board Replacement: stap 6, afbeelding 1 van 3 iPhone 5c Logic Board Replacement: stap 6, afbeelding 2 van 3 iPhone 5c Logic Board Replacement: stap 6, afbeelding 3 van 3
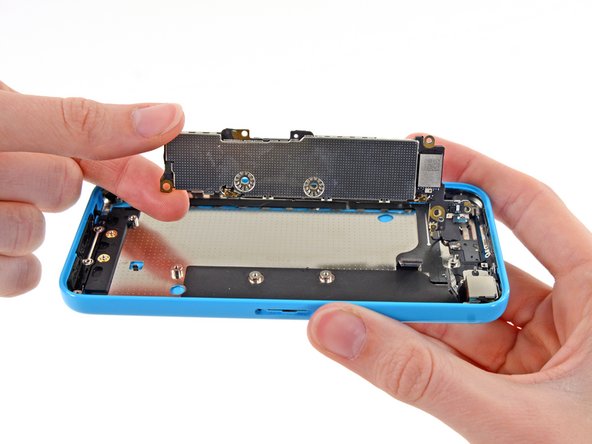
    • Holding the phone level, lift the bottom end of the logic board up enough to grasp it with your fingers.

    • Pull the logic board away from the rear-facing camera just enough to expose the gold contact cap under the top end of the board.

    • Remove the gold-colored contact cap from the threaded post in the rear case, and set it aside.

  7. iPhone 5c Logic Board Replacement: stap 7, afbeelding 1 van 2 iPhone 5c Logic Board Replacement: stap 7, afbeelding 2 van 2
    • Flip the logic board up toward the volume control buttons to expose the antenna connector.

    • Do not try to remove the logic board from the rear case yet, as it is still connected by an antenna cable on the back.

  8. iPhone 5c Logic Board Replacement: stap 8, afbeelding 1 van 1
    • Disconnect the antenna connector from the back of the logic board.

  9. iPhone 5c Logic Board Replacement: stap 9, afbeelding 1 van 1
    • Remove the logic board from the rear case.

Conclusie

To reassemble your device, follow these instructions in reverse order.

Andrew Optimus Goldheart

Lid sinds: 10/17/09

502.755 Reputatie

407 handleidingen geschreven

Team

iFixit Lid van iFixit

Staff

135 Leden

16.757 handleidingen geschreven

0 opmerkingen

Voeg opmerking toe

Weergavestatistieken:

Afgelopen 24 uren: 0

Afgelopen 7 dagen: 0

Afgelopen 30 dagen: 0

Altijd: 224