Deze versie kan foutieve bewerkingen bevatten. Schakel over naar de recentste gecontroleerde momentopname.
Wat je nodig hebt
-
Deze stap is niet vertaald. Help het te vertalen
-
Power off your iPhone before beginning disassembly.
-
Your iPhone 4 rear cover may have either two #000 Phillips screws or Apple's 5-Point "Pentalobe" screws (second image). Check which screws you have, and ensure you also have the correct screwdriver in order to remove them.
-
Remove the two 3.6 mm Pentalobe or Phillips #000 screws next to the dock connector.
-
-
Deze stap is niet vertaald. Help het te vertalen
-
Push the rear panel toward the top edge of the iPhone.
-
-
Deze stap is niet vertaald. Help het te vertalen
-
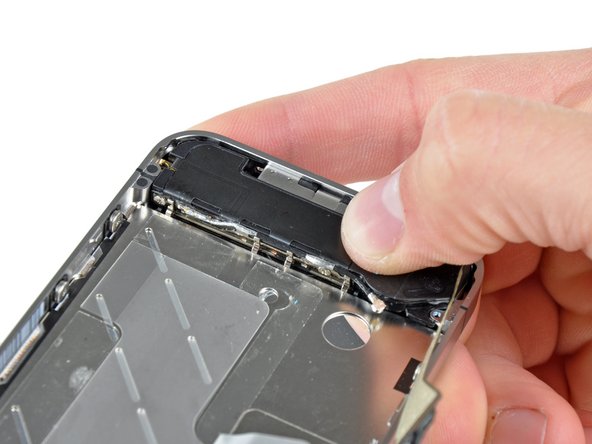
Pinch the rear panel with your fingers and lift it away from the iPhone. Alternatively, use a Small Suction Cup .
-
-
Deze stap is niet vertaald. Help het te vertalen
-
Remove the single 2.5 mm Phillips screw securing the battery connector to the logic board.
-
-
Deze stap is niet vertaald. Help het te vertalen
-
Use a plastic opening tool to gently pry the battery connector up from its socket on the logic board.
-
Remove the metal clip covering the antenna connector.
-
-
Deze stap is niet vertaald. Help het te vertalen
-
Use the clear plastic pull tab to gently lift the battery out of the iPhone.
-
If there's any alcohol solution remaining in the phone, carefully wipe it off or allow it to air dry before installing your new battery.
-
Before reconnecting the battery connector, be sure the contact clip (shown in red) is properly positioned next to the battery connector.
-
-
Deze stap is niet vertaald. Help het te vertalen
-
Use a SIM card eject tool or a paperclip to eject the SIM card and its holder.
-
Remove the SIM card and its holder.
-
-
Deze stap is niet vertaald. Help het te vertalen
-
Remove the following two screws:
-
One 1.2 mm Phillips
-
One 1.6 mm Phillips
-
Remove the thin steel dock connector cable cover from the iPhone.
-
-
Deze stap is niet vertaald. Help het te vertalen
-
Use an iPod opening tool to gently pry the dock cable connector up off the logic board from both short ends of the connector.
-
-
Deze stap is niet vertaald. Help het te vertalen
-
Carefully peel the dock ribbon cable off the logic board and the lower speaker enclosure.
-
-
-
Deze stap is niet vertaald. Help het te vertalen
-
Use a plastic opening tool to pry the lower antenna connector up off its socket on the logic board.
-
-
Deze stap is niet vertaald. Help het te vertalen
-
Remove the 1.9 mm Phillips screw securing the bottom of the logic board to the inner case.
-
-
Deze stap is niet vertaald. Help het te vertalen
-
Remove the following five screws securing the Wi-Fi antenna to the logic board:
-
One 2.3 mm Phillips
-
Two 1.6 mm Phillips
-
One 1.4 mm Phillips
-
One 4.8 mm Phillips
-
-
Deze stap is niet vertaald. Help het te vertalen
-
Use an iPod opening tool to slightly lift the top edge of the Wi-Fi antenna away from the logic board.
-
Use the tip of a spudger to pull the Wi-Fi retaining clips away from the inner frame.
-
Remove the Wi-Fi antenna from the iPhone. Make sure you don't lose the metal clips on the top of the cover where the 4.8mm screw attaches or the 4.8mm screw. That's the primary reason for abnormal Wi-Fi performance after the reassembly.
-
-
Deze stap is niet vertaald. Help het te vertalen
-
Use an iPod opening tool to carefully lift the rear camera connector up off its socket on the logic board.
-
Remove the rear camera.
-
-
Deze stap is niet vertaald. Help het te vertalen
-
Remove the small circular white sticker (warranty sticker and water indicator) covering the screw near the battery pull tab.
-
Remove the 2.4 mm Phillips screw that was hidden underneath the sticker.
-
-
Deze stap is niet vertaald. Help het te vertalen
-
Use the edge of a plastic opening tool to gently pry the following connectors up and out of their sockets on the logic board:
-
Digitizer cable (pry from bottom)
-
LCD cable (pry from bottom)
-
Headphone jack/volume button cable (pry from top)
-
Top Microphone/sleep button cable (pry from top)
-
Front camera cable (pry from top)
-
-
Deze stap is niet vertaald. Help het te vertalen
-
Remove the 4.8 mm standoff screw near the headphone jack.
-
Without this part, the motherboard could damage the ribbon cables around it.
-
-
Deze stap is niet vertaald. Help het te vertalen
-
Carefully remove the logic board from the iPhone, minding any cables that may get caught.
-
-
Deze stap is niet vertaald. Help het te vertalen
-
Remove the single 2.4 mm Phillips screw securing the speaker enclosure to the side of the inner frame.
-
-
Deze stap is niet vertaald. Help het te vertalen
-
Remove the following two screws securing the vibrator to the inner frame:
-
One 6 mm Phillips
-
One 1.4 mm Phillips
-
Remove the vibrator from the iPhone.
-
-
Deze stap is niet vertaald. Help het te vertalen
-
Remove the 1.5 mm Phillips screw securing the front panel near the headphone jack.
-
-
Deze stap is niet vertaald. Help het te vertalen
-
Remove the three large-headed 1.5 mm Phillips screws along the volume button side of the iPhone.
-
-
Deze stap is niet vertaald. Help het te vertalen
-
Remove the 1.5 mm Phillips screw near the lower microphone.
-
-
Deze stap is niet vertaald. Help het te vertalen
-
Remove the 1.5 mm Phillips screw near the dock connector ribbon cable.
-
-
Deze stap is niet vertaald. Help het te vertalen
-
Remove the three large-headed 1.5 mm Phillips screws along the SIM card side of the iPhone.
-
Remove the small-headed 1.5 mm Phillips screw near the rear camera (previously removed).
-
-
Deze stap is niet vertaald. Help het te vertalen
-
Carefully insert the edge of an iPod opening tool between the rubber bezel around the front glass panel and the steel inner frame.
-
Carefully pry the upper edge of the front panel assembly away from the steel inner frame.
-
-
Deze stap is niet vertaald. Help het te vertalen
-
Slowly and gently lift the top edge of the front panel assembly away from the steel inner frame.
-
Continue to rotate the front panel assembly away from the steel inner frame until it slowly begins to peel off the adhesive applied below the home button area.
-
It may be easiest to insert a spudger at the top and work it around the edges, spreading gently as you go.
-
Carefully pull the lower edge of the front panel assembly away from the steel inner frame.
-
-
Deze stap is niet vertaald. Help het te vertalen
-
De-route the digitizer and LCD cables through the steel inner frame, and remove the display from the iPhone.
-
When the front panel has been correctly installed, both the LCD and digitizer cables should be immediately next to one another and should be the same length, as shown in the second photo.
-
During reassembly, do not touch the metallic area at the base of the LCD data cable, as this can cause problems with the LCD. If you do touch it accidentally, clean it gently with an alcohol wipe before continuing.
-


Annuleren: ik heb deze handleiding niet afgemaakt.
951 andere personen hebben deze handleiding voltooid.
Bijgevoegde documenten

26 opmerkingen
To replace broken glass you must purchase the glass/digitizer/lCD/frame together because the glass is sealed to the LCD. Do not fall for the cheap glass and digitizer replacements with no LCD.
I was able to replace the LCD panel and digitizer as separate units, but they were separate to start with. That being said, it's definitely more challenging. it's pretty easy to get the two attached to each other, just takes 2 drops (1/10th of one ml) of clear oil. i used a 1/2cc syringe to spread a thin line down the center. came out absolutely perfect. without the oil it's horrible. No contrast and just moiré galore.
The added difficulty comes from getting the two parts to behave while assembling, since they aren't glued, they slip and slide around, and air can get in on the edges and no more dark black.
i tried first with water; terrible results, it interfered with the capacitive touch; ouch. So, i got some practice today re-assembling the phone. the guide was priceless—this is one of the most complex teardowns of ever. i used 12 compartments of an 18-comartment bin.