Deze versie kan foutieve bewerkingen bevatten. Schakel over naar de recentste gecontroleerde momentopname.
Wat je nodig hebt
-
Deze stap is niet vertaald. Help het te vertalen
-
If your display glass is cracked, keep further breakage contained and prevent bodily harm during your repair by taping the glass.
-
Lay overlapping strips of clear packing tape over the iPhone's display until the whole face is covered.
-
-
Deze stap is niet vertaald. Help het te vertalen
-
Remove the two Phillips #00 screws from the dock-connector end of the iPhone.
-
-
Deze stap is niet vertaald. Help het te vertalen
-
Remove the metal handle from the suction cup. It's easier and safer to grip the suction cup's base instead of the metal handle.
-
Use a small suction cup near the Home button to gently pull up the bottom portion of the iPhone's display assembly.
-
-
Deze stap is niet vertaald. Help het te vertalen
-
Rotate the display assembly up until it is at an angle of approximately 45 degrees.
-
-
Deze stap is niet vertaald. Help het te vertalen
-
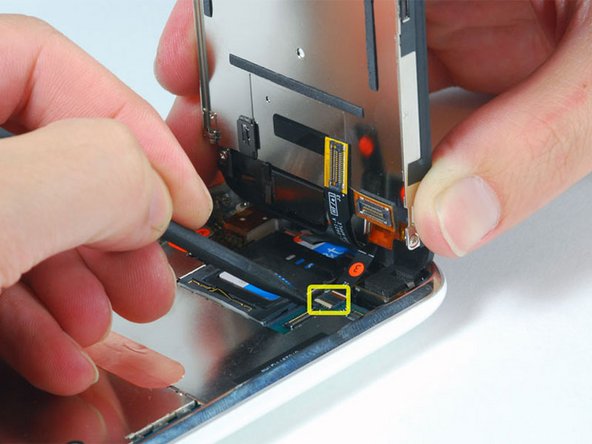
Continue to hold the display assembly with one hand, and use your other hand and a spudger to disconnect the black ribbon cable labeled "1."
I also went the route of skipping steps 4-16. If you do this, be careful with the front panel since you have just enough room to turn it while it's connected to give you access to the vibrator assembly. The angled tweezers (Part # IF145-020-5) were a lifesaver for replacing the two tiny screws to the vibrator assembly. Also, you might have an issue vibrate not working after you replace the front panel. I fixed this by pushing on the vibrator assembly a splunger while giving each screw another slight turn. It's barely noticeable, but doing that should allow the vibrator to work without hitting the front panel assembly.
-
-
Deze stap is niet vertaald. Help het te vertalen
-
Rotate the display assembly up until it is roughly vertical. This will allow easier access for disconnecting the remaining cables.
-
Use a spudger to disconnect the black ribbon cable labeled "2."
-
-
-
Deze stap is niet vertaald. Help het te vertalen
-
Use a spudger to flip up the white plastic hinged flap holding the remaining ribbon cable in place. The white tab will rotate up 90 degrees, releasing the ribbon cable.
-
Slide the black ribbon cable out of its connector, and remove the display assembly from the iPhone.
can i buy a replacement plastic tab for holding ribbon as mine jumped out when installing new parts if so is there a parts no or price
Following this guide, while trying to "flip up the white plastic tab", it broke (it is the BLACK one that should be flipped) and now I have a 600 EUR paperweight.
On my 3G, there is both a white & black plastic tab; it is the BLACK one that needs to be flipped up 90 degrees...
Normally iFixIt is awesome with the details, but this oversight left me sad, annoyed, and without an iPhone :( :( :(
Citaat van casemon:
Following this guide, while trying to "flip up the white plastic tab", it broke (it is the BLACK one that should be flipped) and now I have a 600 EUR paperweight.
On my 3G, there is both a white & black plastic tab; it is the BLACK one that needs to be flipped up 90 degrees...
Normally iFixIt is awesome with the details, but this oversight left me sad, annoyed, and without an iPhone :( :( :(
That's not right, just put my iPhone in parts and on the 3G it's definitly a white plastic which should be flipped!!
Guide worked like a charm!
Thx for this guys!
bg
Citaat van M R:
That's not right, just put my iPhone in parts and on the 3G it's definitly a white plastic which should be flipped!!
Guide worked like a charm!
Thx for this guys!
bg
Perhaps I wasn't clear; some have white and some have black; consider yourself one of the lucky ones! This oversight can be costly otherwise.
-
-
Deze stap is niet vertaald. Help het te vertalen
-
Insert your SIM eject tool or a paper clip into the hole next to the headphone jack.
-
Press down on the tool until the SIM card tray pops out.
-
Grasp the SIM card tray and slide it out of the iPhone.
I was able to skip steps 7 - 11, then I removed the 5 screws holding the logic board in. This allows enough space that when the screws holding the vibrator in are removed, the vibrator can be carefully tilted up and out and the new vibrator can be tilted in since the contacts are springs. This works great and saves a lot of time and less removal of phone parts. Have a nice set of electronic tweezers to help in grasping parts.
-
-
Deze stap is niet vertaald. Help het te vertalen
-
Use a spudger to disconnect the ribbon cable labeled "4."
-
-
Deze stap is niet vertaald. Help het te vertalen
-
Use a spudger to disconnect the ribbon cable labeled "5."
-
-
Deze stap is niet vertaald. Help het te vertalen
-
Use a spudger to disconnect the ribbon cable labeled "6."
-
If you have an iPhone 3GS, refer to picture 2 and use a spudger to disconnect the ribbon cable labeled "7."
-
-
Deze stap is niet vertaald. Help het te vertalen
-
Carefully peel up the small sticker labeled "Do not remove."
-
-
Deze stap is niet vertaald. Help het te vertalen
-
Remove the following 8 screws:
-
Five 2.3 mm Phillips #00 screws with partial threads securing the logic board to the rear panel.
-
Two 2.3 mm Phillips #00 screws with full threads securing the logic board and camera.
-
One 2.9 mm Phillips #00 screw from beneath the "Do not remove" sticker.
-
-
Deze stap is niet vertaald. Help het te vertalen
-
Use a spudger to gently remove the camera retaining clip, (formerly secured by the removed screw) and gently pry the camera up and out of its housing in the rear panel. The camera cannot be removed entirely yet because it's connected to the bottom of the logic board.
-
-
Deze stap is niet vertaald. Help het te vertalen
-
Use a spudger to gently pry up the end of the logic board closest to the dock connector.
-
-
Deze stap is niet vertaald. Help het te vertalen
-
Slide the logic board towards the dock connector and out of the iPhone.
-
-
Deze stap is niet vertaald. Help het te vertalen
-
Remove the two Phillips #00 screws securing the vibrator to the rear panel.
-
These screws are smaller diameter than all the others. Make sure you don't mix them up with the other screws. On reassembly, only these two screws will fit.
-
-
Deze stap is niet vertaald. Help het te vertalen
-
Lift the vibrator up and out of the iPhone.
Replacing the motor, I have just done two phones. One makes a rattly vibrate noise, which I think a bit reminscent to my iPhone 3G when new. The second I used a small dollop of neutral cure silicone between the case and motor (staying away from the rotating mass). The annoying vibration noise is not present on the phone with the silicone, so I will redo the first.
Interestingly, the two phones had different motors. Both iPhone 3G 16GB - one black and one white bought at the same time. One had the motor with coil spring contacts, the other had the bent metal contacts. I decided to replace with the coil spring contacts having read a possible issue with vibration affecting the bent metal contact.
Try changing the screws around, I had this same issue and I`d just put the screws the wrong way around. As soon as I changed them back around, the vibrate motor worked perfectly and sounded normal again. If they are the wrong way around, the vibrator will work intermittently and make the entire phone vibrate.
Luke -
-


Annuleren: ik heb deze handleiding niet afgemaakt.
79 andere personen hebben deze handleiding voltooid.

2 opmerkingen
Es wäre sehr gut wenn Sie die Anleitungen auch in deutsch angeben könnten.
M.Marchewicz
Warum nur in englisch ???