Inleiding
Use this guide to replace the front panel assembly.
Wat je nodig hebt
-
-
If your display glass is cracked, keep further breakage contained and prevent bodily harm during your repair by taping the glass.
-
Lay overlapping strips of clear packing tape over the iPad's display until the whole face is covered.
-
Do your best to follow the rest of the guide as described. However, once the glass is broken, it will likely continue to crack as you work, and you may need to use a metal prying tool to scoop the glass out.
-
-
-
Handling it by the tab, place the heated iOpener on the side of the iPad to the left of the home button assembly.
-
Let the iOpener sit for about five minutes to soften the adhesive beneath the glass.
-
-
-
Carefully place a suction cup halfway up the heated side.
-
Be sure the cup is completely flat on the screen to get a tight seal.
-
While holding the iPad down with one hand, pull up on the suction cup to slightly separate the front panel glass from from the rear case.
This step is totally pointless if you have a shattered screen. The suction cup is rendered useless. Any tips on what to do if you can't get any suction due to a shattered screen?
just pick out the glass shards if it is cracked that bad you are better off scrapping the digitizer
-
-
-
While holding the glass up with the suction cup, slide the point of an opening pick into the gap between the glass and body of the iPad.
-
Pull the suction cup's plastic nub to release the vacuum seal and remove the suction cup from the display assembly.
thanks jfaulks1 (I did not copy and paste lol)
-
-
-
Take the first pick you inserted and slide it up toward the top corner of the iPad.
-
If you can see the tip of the opening pick through the front glass, don't panic—just pull the pick out a little bit. Most likely, everything will be fine, but try to avoid this as it may deposit adhesive on the front of the LCD that is difficult to clean off.
-
-
-
Slide the opening pick around the top left corner of the iPad to separate the adhesive.
Gezz this is though! Cracked the glass while replacing it.
:( sad (rip glass lol)
-
-
-
Insert the previous pick deeper into the iPad and slide it away from the camera toward the corner.
Shattered my screen pretty bad here, making it so that whenever I continued to move the pick the glass separated and I couldn’t continue moving it. Be VERY gentle moving the pick; almost no force is required.
-
-
-
-
Slide the lower left pick to the lower left corner to cut the adhesive on that corner.
-
Leave the pick at the corner. Do not pry any farther, and do not remove the pick from the iPad.
-
Antennas
-
Home button cavity
-
Digitizer cable
-
The following steps will direct you where to pry to avoid damage to these components. Only apply heat and pry where directed.
-
-
-
Lift slowly and gently to further detach the adhesive along the lower edge.
Really, add a few more pics and a few more picks, see how long and difficult you can make this guide. 26 steps to get the top screen off is ridiculous.
-
-
-
Once all of the adhesive has been separated, open the front glass like a page in a book and rest it on your workspace.
I recommend wearing latex gloves or be sure not to put too many finger prints on the front or back of this front glass when lifting it or completing the remainder of the steps. I made this mistake and upon installing the new LCD and putting the iPad back together I realized that I left a few finger prints on the inside of the front glass. After re-securing the adhesive strips putting the iPad back together there are now unremovable fingerprints visible when the LCD is turned off. Just a recommendation on the gloves or be sure to wipe both sides of the front glass clean before putting all back together.
-
-
-
The front-facing camera housing may stick to the front panel; peel up the housing and place it back over the camera to protect it.
-
Rock the camera housing up on one edge to free it from the adhesive and remove it from the front panel.
-
Return the front-facing camera housing to its recess in the rear case.
-
-
-
Use tweezers to peel up and remove the rectangular piece of foam tape covering the top right LCD screw.
-
Remove the triangular tape covering the lower right LCD screw.
-
-
-
Remove the four 3.9 mm Phillips #000 screws securing the LCD to the rear case.
In my case the 4 screws are not the same. One is 4mm, and 3 of 3.5mm, or better 2 x 3.5mm and one 3.45mm. I put the longest one at the left edge at left of the LCD flat cable.
mitja
Hi Mitja. I just checked the measurements with an electronic digital caliper. I got 3.9 mm for all four screws. Are you sure it was the same model? Thanks.
ipad mini wifi no screws are longer
-
-
-
Insert the tip of a spudger between the LCD frame and the tape on the top of the LCD.
-
Slide the spudger along the space between the LCD frame and tape, separating the tape from the LCD frame.
I finished a successful replacement of my screen following these instructions. Thanks.
Step 36 (remove tape from LCD perimeter), however, seems unnecessary. I ended up spending a lot of time separating the tape from the LCD frame only to discover it was not necessary for steps 37-44 and actually made things really difficult for step 45-46 (removing the tape near the speakers). Finally, steps 45-46 can be skipped since it is much easier to remove this tape once you flip the LCD over (Step 55).
-
-
-
Insert a guitar pick into the gap between the LCD and rear case, near the top of the left side of the LCD.
-
Bend the pick slightly away from the iPad, just enough to spread the gap between the LCD and rear case.
I found a very simple method for removing the LCD from the metal shield. Slightly lift one of the top corners and insert a 1' piece of fishing line. Insert the line under the other top corner placing the length between the LCD and shield. Once in place, gently pull each end toward the bottom of the LCD breaking the adhesive as you go. This will make things much easier than using the picks and possibly breaking the LCD.
The fishing line trick is amazing… although i had already broken the LCD when i saw that comment. Good Learn!
This step is what destroys my LCDs :(
I was able to do this the first time w/out damaging the LCD simply by following the instructions to the letter, slowly and carefully. The only thing I did differently was to follow Northstar’s instructions to remove the two pieces of tape at the bottom of the LCD before beginning.
I found a good way to remove the LCD without breaking it. Once you finish to clean up around the LCD just lift a bit one of the white metal backing plate and insert in the gap a plastified playing card under le LCD and slowly make your way to the center of the LCD. Repeat on the other side and the LCD will lift up intact.
nothing Brocken after
(I did not read the comments before doing it lol)
-
-
-
Starting at the top right of the device, slide the spudger in between the LCD frame and metal backing plate, which will separate the adhesive as you push.
These steps were hard. I was too scared that I was going to brake the LCD. Luckily I got it off! Don’t know how delicate these things are and how much force they can take.
me to it was hard
-
-
-
Lift the LCD up a couple inches from the rear case to ensure it's free from the adhesive.
When I did it I found that the adhesive sticking was mainly on the edges, so if you take a spudger and just break that adhesive carefully it will help. Be gentle lifting the lcd as it’s very breakable.
-
-
-
While holding the LCD with one hand, Insert the flat end of a spudger into the gap between this tape and the left speaker.
-
Gently pull the LCD away from the speakers while rotating the spudger outward to separate the tape from the speaker.
-
-
-
Remove the following screws securing the LCD shield plate to the rear case of the iPad:
-
Two 2.6 mm Phillips #00
-
Thirteen 1.7 mm Phillips #00
-
One additional 1.7 mm Phillips #00 on some devices.
On my 1432 there were mixed in 4 tiny #000 screws holding the shield plate aong the right side. Looks like these can be mixed in without consequence as they are shorter anyway
I have a missing plate and screws
-
-
-
Remove the LCD shield plate from the iPad.
Once the LCD is clear of the shield, wiggle a long plastic spudger up the center between the shield and the battery to gently bend the shield. That will help in getting it away from the sides and make it easier to come out.
-
-
-
Remove the three 1.3 mm Phillips #00 screws securing the connector shield to the logic board.
Note: These three screws are smaller than the rest of the screws holding the larger LCD shield although they look similar. If you substitute the larger screws, you will pop a screw bracket which can damage the board on both the mini original and mini 2 retina. I just wrote a blog post about how this happens: http://mendonipadrehab.com/entries/gener...
Hi jessabethany. Thank you for the warning. I read your blog post and found it to be very informative. Thanks for adding the warning to the step. It will most definitely help others avoid any damage to the logic board. Thanks!
-
-
-
Use a plastic opening tool to gently pry the battery connector up from its socket on the logic board.
Make sure you disconnect the battery. If not and ipad is still on you can have problems with the LCD backlight. To fix that problem you have to solder
I may be experiencing the backlight problem you mentioned. What connection needs to be soldered?
Have an issue - heard that if you don't disconnect the battery a fuse is blown. I need help to fix the blown fuse.
There is an extensive thread in Answers about iPad mini backlight problems.Th screen stays black after a digitizer replacement.
After unplugging the battery place a guitar pick in-between the two connections.
While continuing to work on the iPad you may inadvertently cause the two connections to touch.
Yeah, you need to put the pick in between the connections so the battery doesn't touch the logic board connector and blow a fuse and make your backlight not turn on. You really don't want to have to solder the 2 connections together, especially if you don't know how, like me! I will use your comment's advice when working.
I put a piece of cellotape on the contact side of the connector and could happily forget about it while getting on with the rest of the repair.
-
-
-
Use a plastic opening tool to pry the LCD connector from its socket on the logic board.
Putting the iPad back together: While plugging the LCD Connector back in, take your time finding the socket on the logic board. Do no use pressure until you are certain it is seated properly. Trust me, if you take your time you will know its seated correctly.
Does it shares the same shape/size of the LCD connector between the ipad mini wifi only WHITE and the other one ipad mini 32gb BLACK?
-
-
-
While holding the LCD with one hand, insert the flat end of a spudger between the LCD and tape on the iPad's right side.
-
Slide the spudger outward, separating the tape, while gently lifting up on the LCD to pull it away from the tape.
Removing this tape and such to take the LCD off completely is unneccessary when replacing just the glass and digitizer, the digitizer cable is easily removed without further work to the LCD
When this tape damage, how we can take a new?
When this tape are damage, how we can order and take a new one?
Following from Nick H’s comment about LCD removal being unnecessary - I tried that first and got my broken glass OUT of the assembly by threading it thru a limited space beneath the LCD. Later when trying to reseat the digitizer connector I gave up and removed the LCD anyhow. Not that much extra work but a LOT easier to install the digitizer and reseat the connector without having to navigate around the LCD and its cable. Removal of the tape holding the LCD was easy - there are two short lengths of rubber or foam along the bottom edge of the LCD that faces the outside world. Remove those(save them) and then _carefully_ peel up the tape; I saw some metallic looking residue underneath. Later when re-assembling everything, I put the tape back and then those two short lengths of foam.
-
-
-
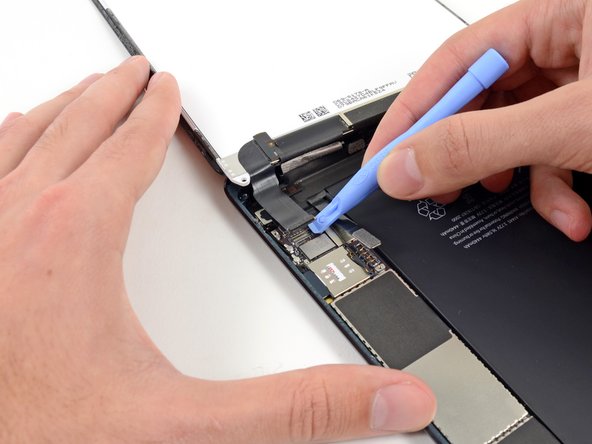
To minimize stress on the socket, try prying under the short edge of the connector, rather than the long edge which is shown in these images.
-
Gently pry the digitizer connector up from its socket on the logic board.
-
-
-
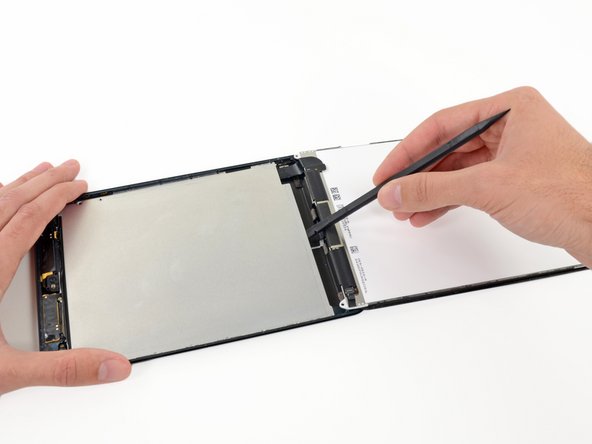
Gently pry the digitizer cable board up from the rear case.
There is adhesive holding it down, so it may take some time to get it off. It helped me to push with my spudger on the piece with the yellow text instead from the same side.
I put the iOpener under the iPad to weaken the adhesive for this step.
-
-
-
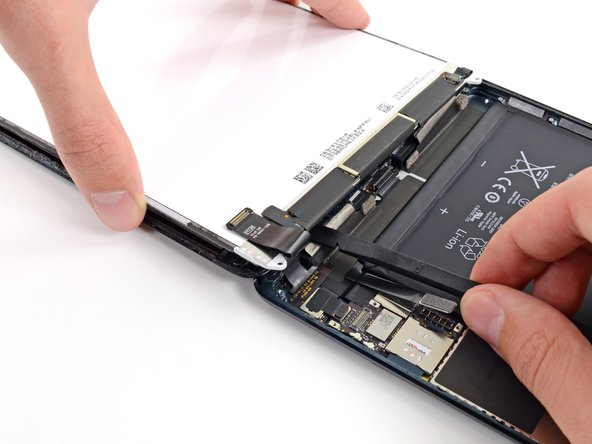
Lift and remove the front panel from the iPad.
== After step 55 ==
Before installing your new digitizer (front panel), make sure to put the necessary bends on the new digitizer's ribbon cable. Look at the old panel that you've removed to see the bends that you'll need to make. Without doing this, once you are at the last step of laying down the digitizer, the cable may bunch-up in between the glass and the iPad's aluminum frame. Thus, it will not allow that corner to sit flush and glue down. If you didn't make the bends, you can use the tweezers at that point to situate the cable. It is just easier to do this beforehand. Do not make the bends as if you were folding paper. You run the risk of damaging the ribbon by doing so. You just want enough pressure to make the cable retain a bend. Again, look at and copy the cable from your old panel.
Good Luck!!!!
If your panel is shattered, you may want to have some canned air to get rid of all those pesky little glass pieces that fly everywhere. I used a Giottos air blaster because that is all I had at my disposal.
Mike -
might be better to use a vacuum for safety reasons. you really dont want glass shards all over the place
If your case corners are damaged from being dropped, seal across the corners with wide packing tape, then grind them out carefully with a small motor tool. Use a corner piece from the broken screen (adhesive side upwards) as the template. Keep removing aluminium until screen piece above fits snug and flat. Remove all traces of metal filings before reassembly.
Good tip! Most times the corners are damaged.
-


To reassemble your device, follow these instructions in reverse order.
To reassemble your device, follow these instructions in reverse order.
Annuleren: ik heb deze handleiding niet afgemaakt.
32 andere personen hebben deze handleiding voltooid.

3 opmerkingen
i say you have too many steps.
and youre missing some too.
i'd put that bad boy in the dehydro for 30 mins and the lcd and glass come out like butta.
spudger on the top and the lcd comes off like nothing!
60C
30mins
remember to also cover all the contacts on the new digi so you don't short it.
if you're wondering which, theyre on the bottom, look at the OEM glass and look at the replacment, see the gold that isn't covered?
cover it, as well as transfer the magnets over to the new glass.
presto!
you win!
Cheers guys hope i helped!
In case of broken glass, here are some hints:
- I prefer 3M "3350" tape; a metalized polypropylene tape with an acrylic adhesive. It's a very thin, silvery HVAC tape, not your standard duct tape.
- Test your tape to make sure it sticks really well to the glass.
- Use isopropyl alcohol on a paper towel to remove fingerprints and other dirt to help the tape stick to the screen.
- Use the widest tape you can find, and apply it evenly, without trapping bubbles, without crinkles: This greatly improves your chance of success with the suction cup later.
- Cut tape pieces long enough and go over the (rounded) edge; afterwards carefully run a scalpel alongside the edge (between bezel and glass) to trim off any excess.
- Don't overlap edges of the tape: butt-join them instead.
- If needed: repeat in other direction.
- If needed: Cut square piece of tape (size of suction cup) and place it where you want to lift the glass, so that the suction cup doesn't cover any butt-joins.
Good luck, you brave person!
volty - Antwoord
This is the second broken screen I’ve fixed. Overlapped package tape carefully stuck to the glass and trimmed to the edges will contain most of the shards. I found that a hair dryer works for softening the glue. After getting under an edge with the suction cup I carefully followed the opening sequence using a combination of plastic picks and a single edge razor blade to get under the small pieces. It was slow going with lots of reheating with the dryer (about 45 minutes), but the taped glass came off without glass everywhere.
Bill Roughen - Antwoord