Deze versie kan foutieve bewerkingen bevatten. Schakel over naar de recentste gecontroleerde momentopname.
Wat je nodig hebt
-
-
Vul een pan met genoeg water om de iOpener volledig in onder te dompelen.
-
Verwarm het water tot het kookt. Zet het vuur uit.
-
Leg je iOpener gedurende 2-3 minuten in het hete water. Zorg dat de iOpener volledig in het water ligt.
-
Gebruik een tang om de iOpener uit de pan te halen.
-
Droog je iOpener grondig met een handdoek.
-
Je iOpener is gereed om te worden gebruikt! als je je iOpener opnieuw op wilt warmen, verwarm je het water weer tot het kookt, zet je het vuur uit en plaats je de iOpener gedurende 2-3 minuten in het water.
-
-
-
Als het glas van je scherm gebarsten is, kun je de scherven bij elkaar houden door het scherm met doorzichtige tape te beplakken. Zo voorkom je ook fysieke schade tijdens de reparatie.
-
Bedek het volledige scherm met overlappende lagen doorzichtige tape.
-
Probeer de rest van de handleiding zo gedetailleerd mogelijk op te volgen. Als het glas echter eenmaal gebroken is, zal het verder breken tijdens de reparatie en zul je misschien een metalen tool nodig hebben om het scherm er alsnog uit te wrikken.
-
-
Deze stap is niet vertaald. Help het te vertalen
-
Elevate the iPad enough for the Anti-Clamp's arms to rest above and below the screen.
-
Pull the blue handle towards the hinge to disengage opening mode.
-
Position the suction cups near the top edge of the iPad—one on the front, and one on the back.
-
Push down on the cups to apply suction to the desired area.
-
-
Deze stap is niet vertaald. Help het te vertalen
-
Push the blue handle away from the hinge to engage opening mode.
-
Turn the handle clockwise until you see the cups start to stretch.
-
Wait one minute to give the adhesive a chance to release and present an opening gap.
-
Insert an opening pick under the screen when the Anti-Clamp creates a large enough gap.
-
Skip the next two steps.
-
-
-
Trek de zuignap met een stevige kracht omhoog om zo een kleine opening te creëren tussen de schermmodule en de achterste behuizing.
-
Als je een opening hebt gecreëerd die groot genoeg is, breng je een openingsplectrum aan om te voorkomen dat de lijm zich opnieuw aan het toestel gaat hechten.
-
-
-
-
Verwijder de volgende vier Phillips-schroeven die de beugel op de kabel van de bovenste onderdelen aan het tablet bevestigen:
-
Twee 1.6 mm lange schroeven
-
Twee 1.3 mm lange schroeven.
-
Schuif de beugel onder de beschermende flappen vandaan en verwijder deze uit de iPad.
-
-
Deze stap is niet vertaald. Help het te vertalen
-
Disconnect the antenna cables by gently prying them straight up from their sockets.
-
-
Deze stap is niet vertaald. Help het te vertalen
-
Firmly grasp the antenna cable and peel up the grounding tape attaching it to the motherboard.
-
-
Deze stap is niet vertaald. Help het te vertalen
-
Remove the following four Phillips screws from the right antenna bracket:
-
Three 1.4 mm screws
-
One 1.5 mm screws
-
-
Deze stap is niet vertaald. Help het te vertalen
-
Lift the right Wi-Fi antenna out of its housing and remove it.
-
-
Deze stap is niet vertaald. Help het te vertalen
-
Grasp the antenna cable with tweezers and gently peel up the grounding tape.
-
-
Deze stap is niet vertaald. Help het te vertalen
-
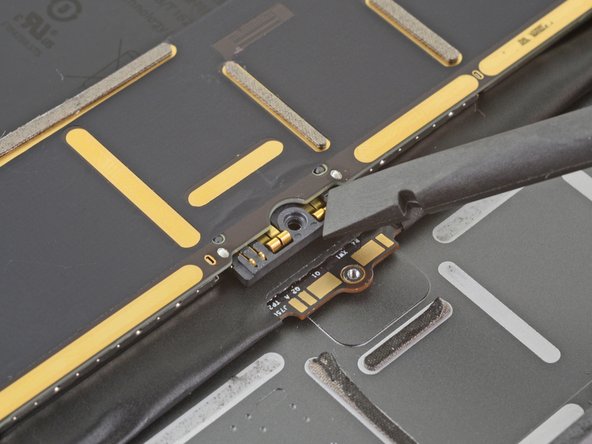
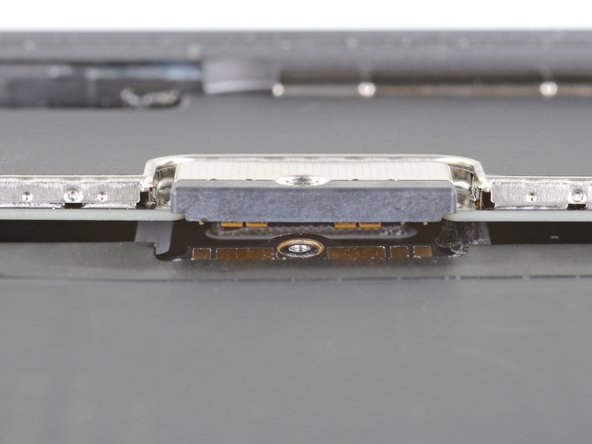
Use the flat end of a spudger to pry up the FaceTime camera cable socket from its socket.
-
Pry the cable up to free it from the adhesive securing it to the rear case.
-
Fold the FaceTime camera cable up and out of the way.
-
-
Deze stap is niet vertaald. Help het te vertalen
-
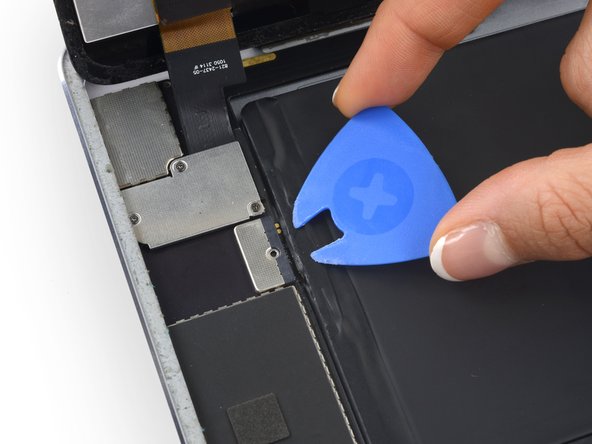
Use the flat end of a spudger to pry up the audio jack cable connector from its socket.
-
Pry the cable up to free it from the adhesive securing it to the rear case.
-
Fold the ribbon cable to the left, out of the way of the antenna cable.
-
-
Deze stap is niet vertaald. Help het te vertalen
-
Peel up the two remaining pieces of grounding tape attaching the left antenna to the rear case, as done in the previous steps.
-
-
Deze stap is niet vertaald. Help het te vertalen
-
Remove the following four Phillips screws securing the left Wi-Fi antenna:
-
Three 1.4 mm screws
-
One 1.5 mm screw
-
-
Deze stap is niet vertaald. Help het te vertalen
-
Lift the left Wi-Fi antenna out of its housing and remove it.
-


Annuleren: ik heb deze handleiding niet afgemaakt.
8 andere personen hebben deze handleiding voltooid.

2 opmerkingen
I installed as directed. Thanks for that. Easy to follow. But still no wifi?
chuck it out the window then
Diogo F -