Inleiding
Vooraf vereiste handleiding voor het verwijderen van de gehele schermmodule.
Wat je nodig hebt
-
-
Til het scherm omhoog uit het frame tot het bijna rechtop staat.
-
-
-
-
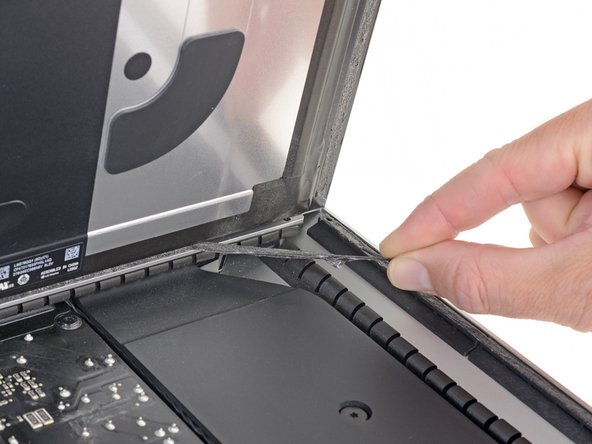
Pak het kleine lipje aan het eind van een van de kleefstrips onderaan het scherm vast en trek dit richting de bovenkant van de iMac om de strip te verwijderen.
-
Herhaal deze stap om de andere kleefstrip te verwijderen.
At step 21-22, releasing the adhesive strips from the bottom of the display, I noticed a tab on the outer end of each strip. Pull the tab to remove the whole strip, no need to mess around with the plastic cards!
Instead of the plastic cards, use the flat end of a spudger. Use it as scraper. Be careful as there are antennas mounted on the inside edge of the frame on the right side (facing you), and the top right (facing you). The original adhesive strips are on those as well. - ECJ
A little bit of hot air (eg. hair dryer) will help soften the adhesive. Use a piece of cardboard or equivalent if you want to avoid blowing hot air towards the electronics.
Be careful to remove absolutely everything - any remainder will create a bump and prevent your screen from sticking back to the frame when reassembling.
-
-
-
Til het scherm uit het frame omhoog en verwijder het scherm uit de iMac.
-
Mogelijk moet je eerst een kant van het scherm omhoogtillen om de nog vastzittende lijm aan de onderkant los te trekken.
Après l'étape 23, j'ai suivi les instructions de la vidéo intitulée: Upgrade RAM in a mid-2017 21-inch iMac without complete disassembly.
Lien: https://www.youtube.com/watch?v=_k9I7N9B...
J'ai pu upgrader la RAM en enlevant juste le ventilateur.
-


Volg bovenstaande instructies in omgekeerde volgorde om je toestel weer in elkaar te zetten.
Volg bovenstaande instructies in omgekeerde volgorde om je toestel weer in elkaar te zetten.
Met dank aan deze vertalers:
100%

Thomas Keulemans helpt ons de wereld te herstellen! Wil je bijdragen?
Begin met vertalen ›

The best way to remove the chin adhesive is to use the tabs at either end (there are two strips that run from each outside corner to near the centre). Carefully pull the tabs up and the strips should peel off.
Advance Technical Service - Antwoord