Inleiding
Deze handleiding laat je zien hoe je het moederbord van je iMac Intel 21.5" EMC 3068 verwijdert om de RAM te kunnen vervangen.
Sommige afbeeldingen in deze handleiding tonen een iMac uit 2015. Deze kan verschillen van de iMac die je hebt, maar dit heeft geen invloed op de reparatieprocedure, die identiek is.
Deze handleiding is als 'potentieel gevaarlijk' geclassificeerd omdat je werkt met de stroomvoorziening van de iMac, die grote condensatoren bevat. Haal de stekker van de iMac uit het stopcontact en houd de aan-uitknop gedurende minimaal 10 seconden ingedrukt om de condensatoren te ontladen. Pak het stroomvoorzieningsbord altijd bij de zijkanten en randen vast en zorg dat je de elektronica niet aanraakt.
Wat je nodig hebt
-
-
Voordat je begint met de reparatie aan je iMac: Verwijder de stekker van je iMac uit het stopcontact en houd de aan-uitknop gedurende tien seconden ingedrukt om de condensatoren van de stroomvoorziening te ontladen.
-
-
-
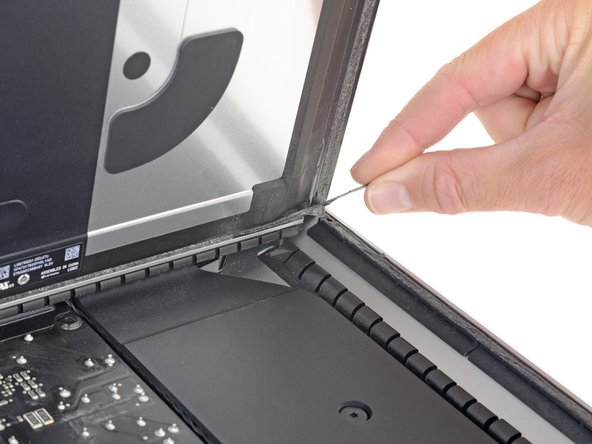
Begin aan de linkerkant van het scherm, in de buurt van de aan-uitknop, en steek je iMac-openingstool in de naad tussen het glazen paneel en de achterste behuizing.
Don’t get too worried about starting exactly where the picture says. The glue is stronger in some parts so just start wherever is easier and then work slowly and patiently around in the direction shown.
As this guide doesn’t cover replacing the adhesive strips, I found referring to the following was useful (noting that it’s not for the same model of iMac, so the modification they mention wasn’t necessary): iMac Intel 21.5" EMC 2544 Vervanging van de kleefstrips
This part of the exercise should be done with extreme patience. I took my sweet time with the opening tool, rolling it through the entire panel and enclosure gap over and over again, until I was very sure no parts were sticking together anymore. And when I thought I was I done, I decided to do it over again.
You can "warm up" the adhesive before try to cut it with the tool using a hair dryer. Heat the edges for about a minute, keep moving it so you don't cause stress in the glass. Also the above note.. use the tool and then the cards. Do not use a guitar pick or other objects as the thickness will cause you to break the front glass, which is a bonded part of the display (expensive).
Merci pour ce conseil
-
-
-
Gebruik je tool als een pizzasnijder—rol deze door de opening en het zal de schuimen lijm in het midden doorsnijden.
-
Duw je tool langs de linkerzijde van het scherm omhoog.
If re-opening a screen that was opened and re-attached using iFixit’s adhesive strips, I would strongly recommend heating it first with an iOpener, heat gun or hair dryer. 20 minutes after attaching with the iFixit adhesive I tried to open it again with the pizza slicer to fix something and cracked the screen on the left-hand side.
-
-
-
Ga verder met je tool langs de bovenkant van het scherm.
In this step can I cut along the display without make any damage to the front camera?
Hi! Actually - there is no need to cut the tape around the camera area - there is no tape to cut at all! And so, the way go is easy - just pass 10 mm to the left and to the right from camera and start cutting!
P.S. Just did the whole procedure to replace a RAM and to add SSD on PSIe an hour ago! Seems to be different reading the instructions... you know - 2/10 and so on. But it's really not that hard, trust me. I'll give it 5/10.
P.P.S. By the way there is one trick to pass the difficult steps. Any action which requires pulling smth (motherboard, speaker, power supply unit) from the narrow crack (or should i say - slit?) at the bottom of your Imac is really not so easy.
And the trick is to first remove a thin metal stripe with some kind of insulation on it which held by 5 small (very small!!) screws at the bottom of your Imac. After you done it - it's easy to pull everything! Pay attention to the fact that one of this 5 screws at the center are more shortly than others.
If you're changing cracked EMC 2638 display to new assembly, there's two more steps:
Step 24: Use the tip of a spudger to flip up the metal retaining bracket on the display data cable.
Carefully pull the display data cable from its socket on the display assembly.
Step 25: Use the tip of a spudger to unplug bracket of the thermal sensor small cable near display data cable.
Carefully remove scotch tape covering thermal sensor. Using iSesamo or flat tip of the spudger carefully peel the thermal sensor away.
omg - forgot to switch the termal sensor from the old display...
now fan runs like crazy...
-
-
-
Rol je tool tot slot richting de rechter onderhoek van het scherm.
Yes, do it many times to loosen the adhesive.
Would be good data to show the 3 areas (wifi antennas where the "tape" is larger and covers them. The rest of the "tape" is 1.4" and easy. Also after removing the display, be sure to remove the old "tape" from both the display and the rubber parts of the case. Use the spudger to start an end and it should pull off easily. Careful on the baackside of the display as you can scratch off the black paint/covering.
-
-
-
Steek vervolgens een plastic kaart tussen het scherm en het frame, beginnend in de rechter bovenhoek van de iMac.
this step is extremely important NOT to stick in the cards too far….. doing so, you risk a 600 euro replacement as I experienced………
I drew a 3/8” line on my cards with a marker first.
I’m reading this on the EU store, please change all measurements to cm/mm.
@ifixit The next batch of cards you create should have a line printed on the card 3/8” in from the edges. Would make a nice reference.
Better to remove stand wedge at this point? Can’t see from pics
-
-
-
Draai je plastic kaart om een opening tussen het scherm en het frame te maken.
-
Ga langzaam en voorzichtig te werken en voorkom dat je te veel druk op het glas zet. Je hebt een opening van ruim een halve centimeter nodig.
This part must be done very carefully or you can damage the flat cable from display, despite it was under a iron cover.
-
-
-
Schuif de kaart richting het midden van het scherm om de laatste stukken lijm rondom de rechter bovenhoek van het scherm door te snijden.
-
-
-
Houd het scherm vast met je ene hand terwijl je met je andere hand de stroomkabel van het scherm loskoppelt.
Can this cable be replaced? I am worried mine is damaged. I have no display after the screen fell and stressed the display flex cables following an SSD upgrade.
This step should be done with extreme caution and care, as this step 19 is not described in great detail (sorry, author).
The first (most outward) cable will slide out by gently pulling it by its tabs. The second (inner) cable is more tricky, as the locking lever must be moved backward first, before gently pulling backward on the cable connector. The angled tweezers are useful here, to help lift that locking lever, because fingers are too big for this.
I found the best way to unplug this display power cable was to use my right hand, and the fingernails of my index finger and thumb to grab the ends of the tabs on either side of the connector, squeeze, and pull the connector out gently.
i think the cable nearest the case edge is held in by friction and can be gently pulled, maybe with fingernails or a spudger. The next cable is held by a wire lever clip as described above it unlocks so the cable can be removed. These cables are also fiddly to re-insert, I didn't get one of them home and had no display after power-up, so at the end, don't re-seal the screen until tested.
-
-
-
Klap, terwijl je met een hand het scherm blijft ondersteunen, het metalen bevestigingsbeugeltje op de schermdatakabel omhoog.
-
Trek de schermdatakabel voorzichtig uit het contact op het logic board.
Cannot seem to find a replacement cable for this, as I suspect mine is damaged. Can’t even find a part number. Anyone know what it might be?
https://www.amazon.com/gp/product/B08TTL...
That's the part I ordered for mine and it seems to work ok. I did make a point of contacting the seller and advising them of my requirement and they ensured I got the right part and it matches the description of the link. Bear in mind I bear no responsibility if yours does not work since I am just sharing what I did and what I ordered. Thanks.
I also need that cable.
It's a little difficult to tell... but looking at the connection to the logic board on the video data cable, are the pins faced up or down?
On the display, same question since it appears you have to "twist" the cable during the reconnection step.
For this particular cable, take a good look before pulling on anything. Plug is locked on its socket with a bracket. You can lift this bracket by holding the small, flat black plastic handle that is attached to it. If you're struggling to grab it, use the end of the pizza roller handle to lift it, or the tweezers. Cable then comes off by pulling parallel to the main board.
How can I tell if either of this cable is bad? My iMac display won't turn on after reconnecting it. I'm using an external display and everything is working except for the iMac display. If I go to settings - display the built-in display is recognize. But again nothing shows up in the screen - not even the apple logo when turning it on.
-
-
-
Til het scherm op tot een bijna verticale positie.
The adhesive strip along the bottom is designed with a pull tab on each outer end. Rather than lever and pull the screen simply carefully pull the tab which removes that half of the lower adhesive strip and frees up the screen.
-
-
-
-
Pak het kleine lipje aan het einde van een van de kleefstrips aan de onderkant van het scherm en trek de kleefstrip naar de bovenkant van de iMac om de strip te verwijderen.
-
Herhaal deze stap om ook de andere kleefstrip te verwijderen.
Vorsicht: Wenn man den Bildschirm einfach versucht vom Kleber wegzureissen, besteht die sehr grosse Gefahr, dass danach der Bildschirm tatsächlich defekt ist, was daran zu erkennen ist, dass dieser bei der Inbetriebnahme schwarze Diagonale Striche oder Lücken enthält. Dann muss der ganze Bildschirm ersetzt werden, was dann recht teuer wird!
Caution: If you simply try to tear the screen away from the adhesive, there is a very high risk that the screen will actually be defective, which can be seen from the fact that it contains black diagonal lines or gaps during commissioning. Then the whole screen has to be replaced, which then becomes quite expensive!
-
-
-
Verwijder de vijf kruiskopschroeven die de onderste ondersteuningsbeugel op z'n plek houden:
-
Vier 3.2 mm lange schroeven
-
Eén 1.7 mm lange schroef
2 notes for reassembly, carful with screws not to strip the heads as they are really really small, make note to cut a gap in the the adhesive over the whole for the microphone.
I managed to strip the head of one of the screws when putting it back in. So be carful with them when putting in / taking out. If you strip it on the way out you will need to take a fine drill and rill it out. Going back in, well as long as you never need to strip it down again not a problem.
The second problem is a real pain, you need to make sure to cut a gap in the adhesive just to the right of Center at the button to allow for the microphone opening. If you don’t, the adhesive tape will stop any real pick up on the Mic, so you just need to cut a small gap in it before putting on the screen. Unfortunately I didn’t find this out (or do my checked before sticking it all back down, so have to pull screen back off and reapply new adhesive
witha cut out in it at an other time.Refer her for more info on the mic / adhesive work around —> Muffled Microphone - iMac 21.5" (mid 2017) - Following Adhesive Strips
-
-
-
Verwijder de T10 Torx-schroeven die de beugels van de harde schijf in de iMac bevestigen:
-
Twee 21 mm lange schroeven
-
Eén 9 mm lange schroef
-
Eén 27 mm lange schroef
At step 26, when reassembling, it's super easy to over-tighten the 9mm screw and strip the brass ferrule out of its hole in the plastic bracket (%#*@).
Mine has 4 different length screws, the two red colored 21mm screws in this guide are actually two differ lengths
buongiorno, l'imac del 2019, non monta alcuna ssd, ma monta una m2 direttamente sulla scheda madre!
pertanto nella guida andrebbe aggiunto il cavo sata con sensore temperatura da aggiungere sulla scheda madre, per poter collegare un nuovo hd ssd altrimenti rimarrete come me bloccati con un imac aperto e non assemblato, in attesa di ricevere il cavo acquistato su internet da amazon o terze parti.
vi consiglio inoltre di aggiungere una foto reale del ò'imac 2019 nella guida in cui manca l'ssd, renderà subito la problematica che avranno in molti!
Hi, mine doesn’t HAVE an HD/SSD to remove, the bay is empty (yes it was fully working yesterday. So what do we do ? I see someone else with the sane issue above….
-
-
-
Gebruik de punt van je spudger om beide zijden van de aansluiting van de aan-uitknop om en om uit het contact te duwen om de aansluiting als het ware uit het contact te 'lopen'.
-
-
-
Om de kabel los te koppelen, druk je de lip aan de achterkant van de aansluiting in en trek je de aansluiting uit het contact.
-
-
-
Gebruik het platte einde van je spudger om de lip aan de zijkant van de AC-voedingsaansluiting in te drukken.
-
Pak de AC-voedingskabel vast en trek, terwijl je de lip met je spudger ingedrukt houdt, de aansluiting in een rechte beweging uit het contact.
-
-
-
Trek de aansluiting van de ventilator op voorzichtige wijze uit het contact op het moederbord.
-
-
-
Til de harde schijf van de kant die het dichtst bij het moederbord ligt omhoog en trek het een beetje uit de uitsparing in de behuizing.
The newer drives have rubber ends and an adhesive side, be careful removing them if replacing the drive and be sure they are securely pushed back into the holder
-
-
-
Gebruik een spudger om de enkele SATA-kabel los te koppelen door de aansluiting met een spudger uit de harde schijf te wrikken.
When reconnecting the SATA cable, there is nothing to make the connector hold still, and it is hard to reach, so it took several tries. I ended up taking off the rubber baby buggy bumpers to get more room, and then jamming them back on after getting the SATA connector snugged up.
If by rubber baby buggy bumper, you mean left speaker, then yes, I agree. Reinstall the hard drive before the left speaker.
Kudo to @jerrid_foiles! I was going crazy trying to attach the SATA cable until I took the two screws out of the left speaker and slid the top end of it aside by about 3/4 inch. Make the whole process SO MUCH easier!!
We solved this by removing the hard drive tray screw, then inserting the cable into the SATA hard drive. Then hold the hard drive a bit out of the way to insert the 7.3mm hard drive tray screw.
Agree with this method, found it an impossible task to reconnect the SATA connector until removed the tray screw, then it was relatively easy to reconnect and then replace the tray screw.
Also agree with this method!
-
-
-
Verwijder de harde schijfmodule uit de iMac.
When reassembling, I found it easier to loosen the HD tray screw from Step 48 and pull the tray outwards from the left side in order to plug the SATA cable in more easily.
Thanks! I, too, had a hard time reconnecting the SATA cable.
I found this helpful too!
Anwar -
I did loosen the speaker so I could get a tool behind the SATA cable to push it on to the SSD drive. Otherwise hard to align cable.
I found the easiest way to connect the SATA cable was to not screw the plastic hard drive tray down until you plug the drive in. That way you can easily push the connector in and due to the cable you’ve got some wiggle room. You can position the tray then just lift one end of the drive up and secure the screw. Then just push the drive down.
This was the step that I had the most trouble with. I’m used to replacing a hard drive in a MacBook Pro, where the “plug” that you plug the drive into is a rigid thing that you can firmly press the hard drive into.
With the iMac, the plug is situated on the end of a non-rigid cord, so the plug moves back when you try to snap a drive into it. Also, those two rubber gasket things that you adhere to the side of the drive really make it difficult to maneuver the now-overly-chubby drive towards the plug.
After must frustration/concern, what I ended up doing was temporarily removing the rubber gasket things, using the “spudger” as kind of a lever behind the “plug on a cord” so that it didn’t move as much, and then pushed the gasket-less SSD into the plug.
Once I got it connected, I put the rubber gaskets back on the sides of the SSD and kind of coaxed it down into place, using the pointy end of the spudger to get the chubby corner pieces to “sit” correctly in the rigid plastic tray that the SSD kind of rests in.
From another comment elsewhere on this repair, I *highly* recommend removing the two screws holding the left speaker in place, then sliding it just a tad out of the way to be able to easily attach the SATA cable. You don’t have to move it much to make the whole process so much easier!
-
-
-
Verwijder de 7.3 mm lange T8 Torx-schroef die de harde schijfhouder in de achterste behuizing bevestigt.
it`s a t10 screw..! ;)
I found it easier to connect SATA cable before fixing tray.
-
-
-
Verwijder de harde schijfhouder.
I am following these procedures for the following: iMac Retina 4K - 21.5" - 3GHz Quad Core - Radeon Pro 555 2GB - 4GB/4GB (8GB total - 2 slots) 2400MHz DDR4 SO-DIMM - Mid 2017 - Model: MNDY2LL/A - iMac18,2 - A1418 - 3069. In my case, the SATA cable is clipped into the bottom of the hard drive tray. Pull the hard drive tray up slightly and angle to reveal clips. SATA cable pops out from the side of each clip.
-
-
-
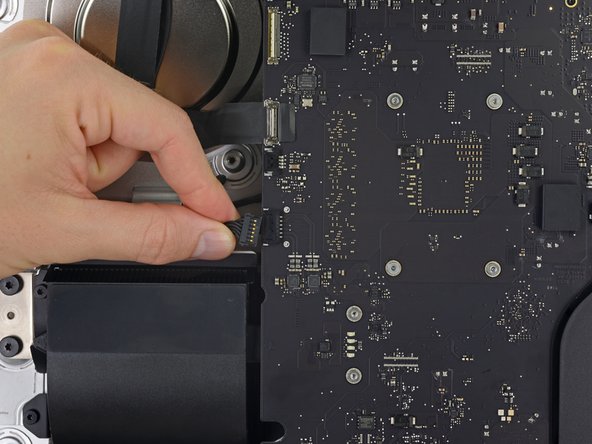
Trek de linkerspeakerkabel rustig en in een rechte beweging uit het contact op het moederbord.
-
-
-
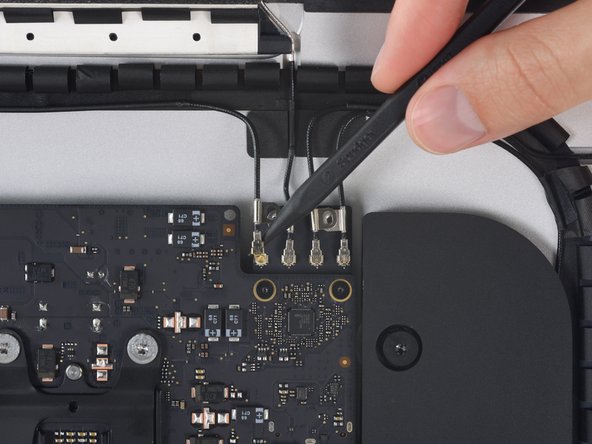
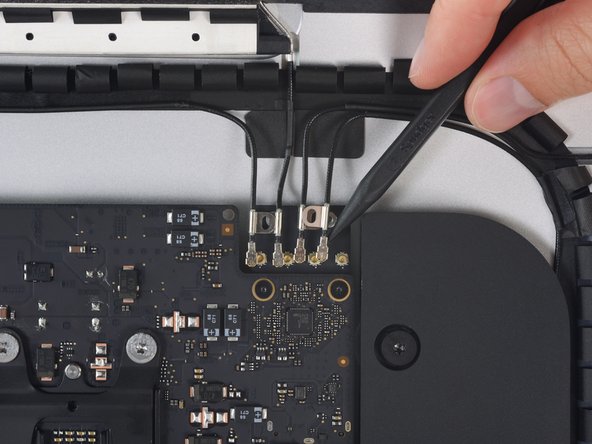
Verwijder de twee 4.0 mm lange T5 Torx-schroeven die de vier antenne-aansluitingen op de AirPort-Bluetooth-kaart bevestigen.
-
-
-
Gebruik de punt van een spudger om de vergrendeling op het ZIF-contact van de microfoonkabel omhoog te klappen.
-
Trek de microfoonkabel voorzichtig en in een rechte beweging uit het contact.
-
-
-
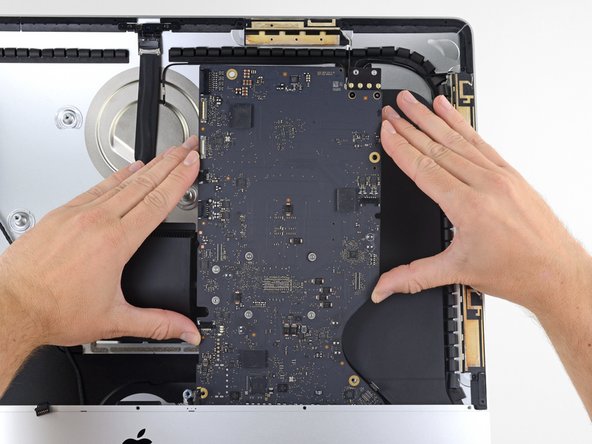
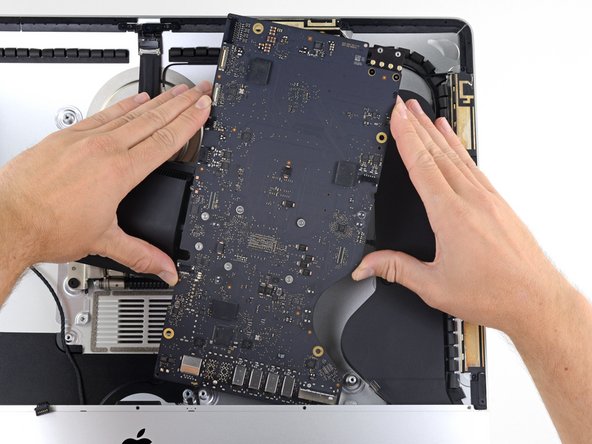
Til de bovenkant van het moederbord uit de achterste behuizing omhoog.
-
Til het moederbord in een rechte beweging uit de iMac omhoog.
I found removing the speaker (be careful of the antenna wire in the slot along the outside edge) made re-assembly much easier and it might have helped with disassembly.
-
-
-
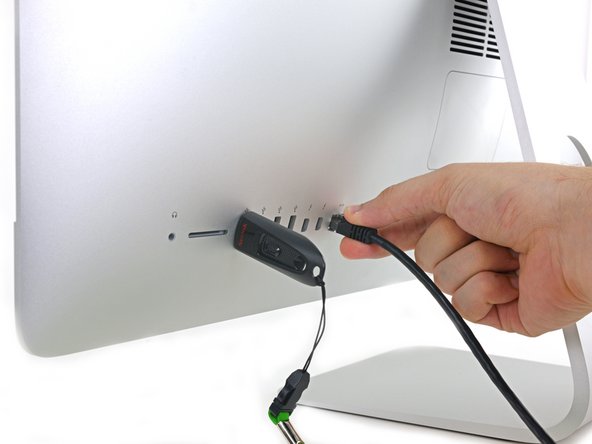
We raden je aan een USB- en/of ethernetkabel op de poorten aan te sluiten, zodat je zeker weet dat het moederbord op de juiste plek zit als je de schroeven aandraait.
I found removing the speaker (be careful of the antenna wire in the slot along the outside edge) made re-assembly much easier and it might have helped with disassembly.
-
-
-
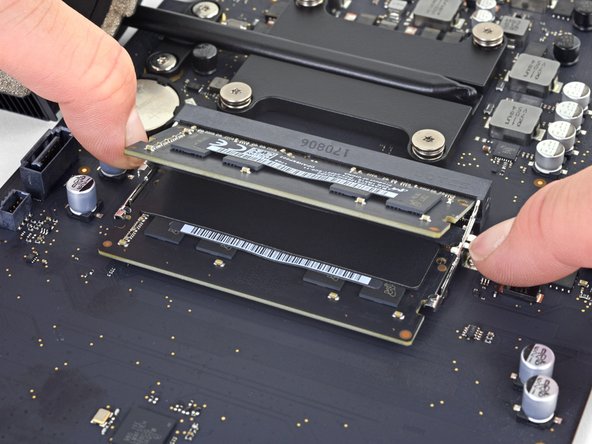
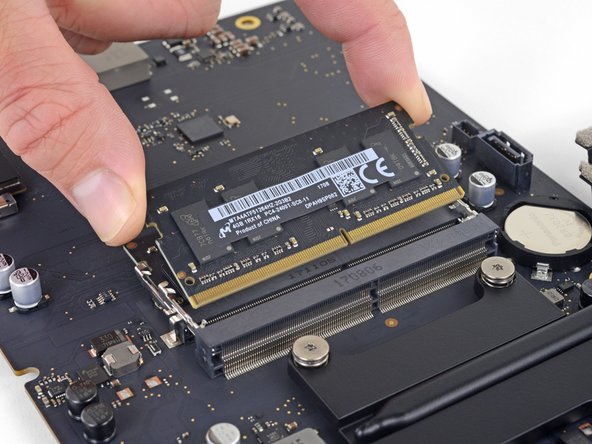
Pak het bord bij de randen vast en draai het moederbord om bij de twee RAM-modules te kunnen.
-
De RAM-module wordt door twee klemmen op z'n plek gehouden, een aan iedere kant. Gebruik je vingers om de klemmen naar buiten te trekken.
-
-
-
Trek het thermisch kussen van de originele RAM af en plaats het over naar je nieuwe RAM voordat je deze in de sleuf bevestigt.
once you have done all these 63 steps, you should take the opportunity to also replace the PRAM battery with a new one, just two bucks more...
-


Volg bovenstaande instructies in omgekeerde volgorde om je toestel weer in elkaar te zetten.
Volg bovenstaande instructies in omgekeerde volgorde om je toestel weer in elkaar te zetten.
Annuleren: ik heb deze handleiding niet afgemaakt.
28 andere personen hebben deze handleiding voltooid.
Met dank aan deze vertalers:
100%

Thomas Keulemans helpt ons de wereld te herstellen! Wil je bijdragen?
Begin met vertalen ›

9 opmerkingen
Thought this was going to be extremely difficult but once I started with these instructions it actually wasn’t that bad, though it took me a slow and careful 3.5 hours. Was quite nervous handling that power supply though!
Excellent guide! It took me about 1.5 hours to complete the entire RAM+SSD installation. The iMac has massively improved and feels like a new computer: way way faster than before, with a 1TB Samsung SSD, 32GB of RAM and a brand new installation of macOS Catalina. Be very careful with the I/O ports, especially with the USB-C/Thunderbolt ones: the alignment is critical, as well as the correct position of the logic board in relation to the case. Even a slight misalignment can impede the USB-C plug from fully entering the port, making it hard or impossible to establish a connection.
Great guide… took a mediocre “unupgradable” iMac to 32 GB ram and new SSD HD (the other guide… but crosses with this). Excellent guidance. If you have to fix or upgrade anything else while changing out the RAM, this is the time and performed steps to do it with. Read the others to see the variations you need to do (like steps to clone the HD before changing, etc.) but as deep as you get into this machine, it exposes pretty much everything. Again, great work!
Wonderful guide! I was afraid that I am not going to make it since I don’t have a lot of experience in such things but following the steps carefully, paying attention to every detail, has led me to successfully upgrade my iMac 3086 with 1TB SSD and 32GB RAM. I was really afraid that this RAM upgrade probably won’t work because it’s been said on everymac.com that the maximum is 16GB and I’ve read somewhere about a person whose iMac didn’t even start after such intervention. I decided to purchase Crucial 2x16GB at 2400MHz, despite that the iMac has 2133Mhz bus. I trust this brand and I’ve already upgraded my MacBook Pro 15” mid-2012 with the same brand, again pushing the RAM beyond the official limits and it still works great. The SSD I put here is also from Crucial and I just turned on the iMac and it runs like never before! The whole procedure took me a bit over 2 hours. Thanks for the great work with this guide!!!
Hey Alex, I’m also worried about the compatibility of the Crucial RAM, so could you tell me which especific model did you use, please?
I did this, while also replacing the hard drive. Four mistakes: didn't check alignment of USB ports before reassembly (now I can't fit a USB cable in one of the ports), I put the adhesive on the bottom part of the screen on backwards (not addressed in this tutorial at all), the alignment of the screen with the chassis is slightly off, and I didn't wipe the camera lens with a microfiber cloth before I adhered the screen to the base (little smudge that drives me crazy; also not addressed here). Overall, I am calling this a win (32GB RAM, 1TB SSD installed). I hope this helps someone. I will do it again to fix the USB port alignment and the smudge on the camera.
Done and dusted, if your confident pulling things apart, something you can knock over in 2 hours from start to finish, mine took about 3 as I didn’t seat one of the sticks of RAM properly, luckily I was testing without the screen stick back down so was able to fix (but added another 45 mins to the process).
Guide is really really good for strip down, and not bad to follow for reassemble. Note about the Mic holes bottom of screen just right of centre, need to cut a gap in the adhesive to make way for the holes refer to —> Muffled Microphone - iMac 21.5" (mid 2017) - Following Adhesive Strips
I forgot to take off the thermal pad from the old ram and put it on the new ram. Hoping that nothing happens. Powers on fine and runs so hoping for the best!
Brilliant guide used this along with parts of the other guides here for 2017 Imac. Changed Sata drive to 2TB SSD and upgraded the factory 8GB to 32gb with 2x16GB Crucial Sodimm Modules (Part Number CT16G4SFS824A) which I can confirm work 100%. Whilst the Mac was in bits I also changed the PRAM Battery and had a general clean of fans etc etc. Makes sense to do it all when its apart as the less times you have to remove that screen the better! All in all took about 3 hours which also included 30 mins for finding where I had lost my isopropyl Alcohol too so as to be able to remove all the glue residue before refitting the screen. I would recommend buying the iMac opening tool, really does exactly what it says on the Tin and with the wheel being plastic It reduces the chance of damage to the edge of that screen but works extremely well in doing the job. If you are reading this and thinking of doing it then just make sure you have plenty of space so you can lay everything out in order as you remove it.
The wedge is an extremely tight fit for this model. I was worried that the amount of force needed to use it as shown might damage the stand, so I used it with the long side down instead. It worked fine that way and didn’t need anywhere near as much force to insert.
roberttrevellyan - Antwoord
Here’s a good YouTube vid on upgrading the RAM: Can a Normal Person Upgrade the RAM in the 2017 21.5" iMac?
Dan - Antwoord
Here are a couple tips from me:
1) Expose the adhesive to extreme temperatures. I did this by transporting my iMac in my car, screen-down on a piece of cardboard on a cold February morning (in Chicago). When I went to pick up the iMac, the screen practically fell off the chassis. I would have been distraught by this if I hadn’t already planned this replacement. So it was a happy accident.
2) Remember to expell the residual power from the power supply by pushing the power button while the iMac is unplugged. This does NOT guarantee it’s safe to touch, but when I accidentally brushed the solder and exposed capacitors, I didn’t get shocked.
jerrid_foiles - Antwoord
Instead of using the wedge, I placed the iMac faced up with the top side (web cam) facing me while I ran the pizza roller around. It worked out great!
Sam Fung - Antwoord
“All iMacs also come with a traditional hard drive” mine doesn’t!! it’s HDD bay is completely empty, no SATA cable or anything. I guess I’ll have to upgrade the PCIe SSD instead.
Chris Hughes - Antwoord
There is no replacement glass for this model, it is part of the LCD and impossible to remove or replace- the entire LCD has to be replaced unfortunately if the glass is cracked or damaged. You will have to Google search for a replacement. Also be careful with some of the lock tight tork screws as I broke one of my screw mounts taking one out.
Phil Tesone - Antwoord
I used this service wedge but also found it a very tight fit. The same stabilization can be achieved by using a big rolled up towel.
Ernst - Antwoord
While this is a good instruction guide, I recommend to also look at OWC’s instruction video about drive installation, before starting the exercise. Those install videos are very detailed and useful.
Ernst - Antwoord
Main advice: TAKE YOUR TIME with the pizza roller.
Make several passes, until you really feel like there's no more sticker in the way. Stay away from the camera though (approx. 1inch / 2.5cm on both sides). This will reduce the work left with the plastic card. Adhesive is really on the edge of the screen so there is absolutely no need to go any further than the recommended 1cm / 3/8inch depth.
Where are the sensitive parts?
Facing your iMac, imagine you're looking at a watch. There are antennas on 1, 2 and 4 o'clock. Do not insert any metal piece there (nor anywhere else, btw). Other than that AND the screen cables underneath the camera, not much danger.
Froggy Manny - Antwoord