Deze versie kan foutieve bewerkingen bevatten. Schakel over naar de recentste gecontroleerde momentopname.
Wat je nodig hebt
-
Deze stap is niet vertaald. Help het te vertalen
-
Loosen the two captive Phillips screws securing the access door to the iMac.
-
Remove the access door from the iMac.
-
-
Deze stap is niet vertaald. Help het te vertalen
-
Remove the following four screws:
-
Three 6 mm T8 Torx.
-
One 8 mm T8 Torx.
-
-
Deze stap is niet vertaald. Help het te vertalen
-
Flip your iMac over and lay it stand-side down on a flat surface.
-
To lift the front bezel off the iMac, simultaneously:
-
Use your thumbs to press in the RAM arms and hold the iMac down.
-
Use your index fingers to pull the small bridge of material on the front bezel toward yourself.
-
Pull the Front bezel up with your index fingers.
-
Once the small bridge of material has cleared the RAM arms, lift the front bezel by its lower edge just enough to clear the bottom edge of the rear case.
-
-
Deze stap is niet vertaald. Help het te vertalen
-
Insert a plastic card up into the corner of the air vent slot near the top of the rear case.
-
Push the card toward the top of the iMac to release the front bezel latch.
-
Pull the front bezel away from the rear case.
-
Repeat this process for the other side of the front bezel.
-
If the bezel refuses to release, try pressing the lower edge back onto the rear case and repeat this opening process.
-
-
Deze stap is niet vertaald. Help het te vertalen
-
Lay your iMac stand-side down on a table.
-
Lift the front bezel from its lower edge and rotate it away from the rest of your iMac, minding the RAM arms that may get caught.
-
Lay the front bezel above the rest of the iMac.
-
-
Deze stap is niet vertaald. Help het te vertalen
-
If necessary, remove the piece of kapton tape(it is ok to toss this) wrapped around the microphone and camera cables.
-
-
Deze stap is niet vertaald. Help het te vertalen
-
Remove the two 4.8 mm T6 Torx screws securing the display data cable to the logic board.
-
Grab the display data cable connector by its black tab and pull it straight up off the logic board.
-
-
-
Deze stap is niet vertaald. Help het te vertalen
-
Inverter cable on 24inch iMac pulls off to the left.
-
Pull the inverter cable connector straight up off its socket on the logic board.
-
-
Deze stap is niet vertaald. Help het te vertalen
-
Peel back the aluminum EMI tape from the two vertical edges of the display.
-
-
Deze stap is niet vertaald. Help het te vertalen
-
Remove the four 8 mm with 2 mm thick head coarse-thread T10 Torx screws securing the display to the rear case.
-
-
Deze stap is niet vertaald. Help het te vertalen
-
Lift the display from its lower edge and pull it toward yourself to peel off the EMI shield attached to its top edge.
-
-
Deze stap is niet vertaald. Help het te vertalen
-
Remove the two 7 mm T10 Torx screws securing the optical drive clip to the logic board.
-
-
Deze stap is niet vertaald. Help het te vertalen
-
Pull the optical drive thermal sensor cable connector away from its socket on the logic board.
-
-
Deze stap is niet vertaald. Help het te vertalen
-
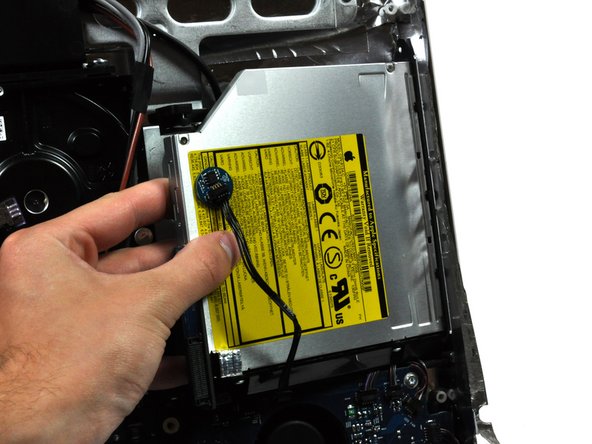
Squeeze the two optical drive bracket ears together while pulling the drive toward yourself.
-
Pull the optical drive away from the side of the rear panel and remove it from the iMac.
-
-
Deze stap is niet vertaald. Help het te vertalen
-
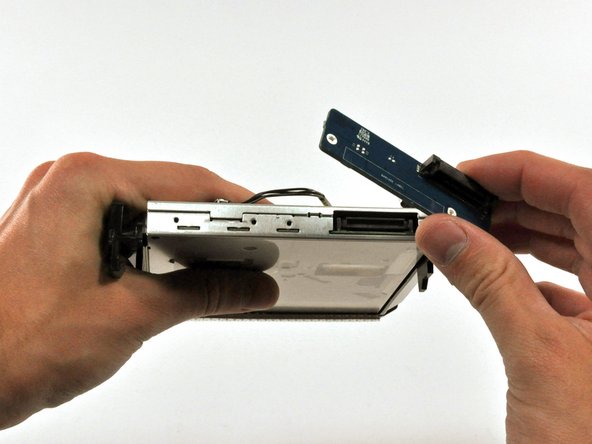
Remove the two T6 Torx screws securing the connector board to the optical drive.
-
Pull the connector board away from the optical drive.
-
-
Deze stap is niet vertaald. Help het te vertalen
-
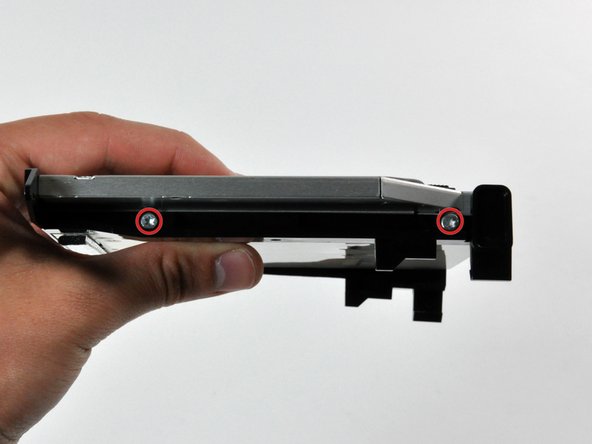
Remove the two T10 Torx screws from each side of the optical drive (four screws total).
-
-
Deze stap is niet vertaald. Help het te vertalen
-
Use the flat end of a spudger to remove the EMI gasket from the underside of the optical drive.
-
-
Deze stap is niet vertaald. Help het te vertalen
-
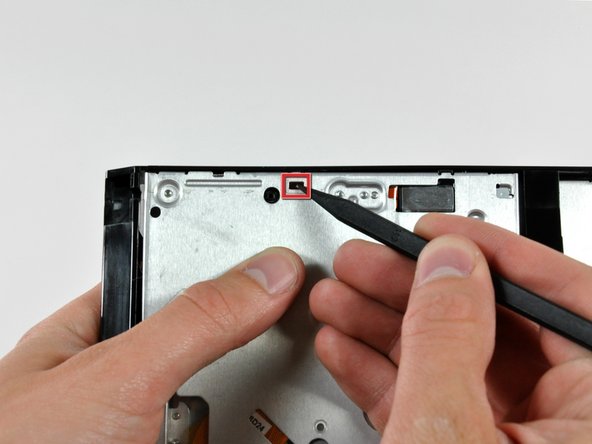
Use the sharp end of a spudger to push the optical drive bracket tabs out of their slots on the bottom of the optical drive.
-
-
Deze stap is niet vertaald. Help het te vertalen
-
Using the sharp end of a spudger, press the optical drive bracket tab out of its slot on the side of the optical drive.
-
-
Deze stap is niet vertaald. Help het te vertalen
-
Push the optical drive bracket tabs out of their slots in the top of the optical drive.
-
-
Deze stap is niet vertaald. Help het te vertalen
-
Pull the optical drive away from its bracket, minding any tabs that may still be caught in their slots.
-
-
Deze stap is niet vertaald. Help het te vertalen
-
Use a flat end of a spudger to remove the EMI gasket from the top of the optical drive.
-
-
Deze stap is niet vertaald. Help het te vertalen
-
Use the flat end of a spudger to pry the optical drive thermal sensor off the adhesive holding it to the top of the optical drive.
-
Don't forget to transfer this to your new drive.
-


Annuleren: ik heb deze handleiding niet afgemaakt.
25 andere personen hebben deze handleiding voltooid.

2 opmerkingen
There are two things not mentioned in this guide (which is, all-in-all very good)
1. There is a short lead connected through the EMI shielding at the top of the IMac to th right (inside vie) of the camera board, to a very small daughter card marked Apple 820 2009-A 2006 srewed to the inside upper ABS case surface by a single 1mm torx screw. The lead s othere end goes to the power board. Check this has not been severed. I extended mine.
2. The Super drive DVD drive is very difficult to re-position because apart from the mounting frame ears mentioned, there are two "dowels" moulded into the ABS bezel. If these are not correctly aligned when fitting, then the CD/DVD will not eject because of the mis-alinement. The ears can be difficult to release because the unit is forced against the logic board at the point where the board to drive connector is situated.
I didn't buy a DVD I'm taking it out of my other 27" IMAC I'm hoping this works as there was no mention of what drive to use buy but this is an excellent guide and I hope others have easier time also I'm replacing the screen new>(LP171WU1 (TL)(A3) LINES in it from walmart $54.00 and got a deal on V4 adapter. Thank you all for this info .