Wat je nodig hebt
-
-
Remove the two 7 mm T10 Torx screws securing the optical drive clip to the logic board.
-
-
-
-
Pull the optical drive thermal sensor cable connector away from its socket on the logic board.
What possible reason can there be for dis-connecting the thermal sensor connector from the logic board, when step 26 or so tells you to pry the sensor off the drive? Why stress a logic board connector, then try de-routing the cable from underneath the board, when you're going to disconnect it at the other end anyway? Why not leave it on the board and just pry it off the drive? (And the same with the hard drive temp sensor.)
This is retarded! Why bother with the additional strain on everything taking off a connector and cable wrapped around other stuff, for no reason? You have to remove the heat sensor from the drive anyway, just take it off and leave the connector and cabling and motherboard alone!
Please correct me if I'm missing something here, but doesn't this seem a totally unnecessary step?
-
-
-
Squeeze the two optical drive bracket ears together while pulling the drive toward yourself.
-
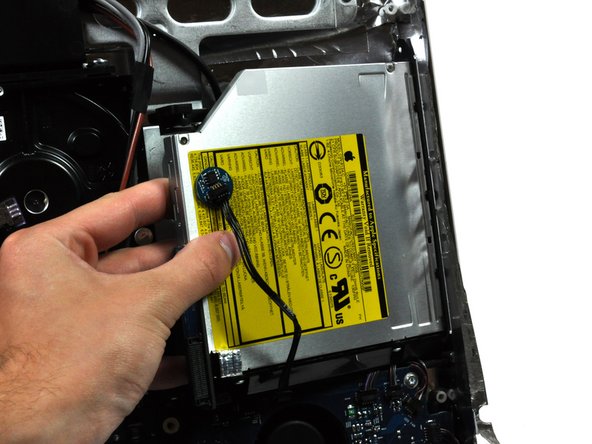
Pull the optical drive away from the side of the rear panel and remove it from the iMac.
Step 17 was very hard for me. Squeezing those ears together took a lot of pressure, and did not want to release from the inner frame of the iMac. After quite a few swear words I got it to release. I just don't agree with the design....All it needs is 2 screws to hold it down, this is not a snap-together model!
I agree 100% with dsmacd; one tool they left off the list for this job is needle-nosed vice grips to tug and push and pry and wriggle and twist that stoopid tray out of there. Man, everything about Mac's optical drive sucks! I've got 2 & 4-year-old machines with bad slot drives, (all the same; won't eject; two replacements same!) and 8 & 10 year-old machines with well-used tray drives, still working like a charm. Apple, get the message; it's too small a package to cram in such mechanical complexity. Go back to a reliable tray drive!
I just now attempted to edit Step 17 to tell how I dealt with getting one of the brackets loose.
=I was able to easily detach the upper/top-side bracket; but, the bottom one [towards bottom of the iMac] was another story! So after detaching the upper bracket, I loosened the 2 screws holding the 'bottom' bracket to the drive. Then I was able to lift the drive enough to easily detach the bottom bracket from the metal framework.
I needed to get a disc out of my iMac's (EMC 2114) Pioneer DVR-K06PC, and to do that I only needed to remove the four very small screws on the cover to get it out. A little jiggling at the plastic opening of the drive was necessary. To put the cover back on, I needed to engage the front of the cover with the black plastic entrance fitting and then work with getting the rest of the cover back on.
I concur with Henry StL. Once I removed the two left side screws, I was able to pull the drive right out with no obstruction. I used a 9mm Torx craftsman driver.
-


To reassemble your device, follow these instructions in reverse order.
To reassemble your device, follow these instructions in reverse order.
Annuleren: ik heb deze handleiding niet afgemaakt.
Één andere persoon heeft deze handleiding voltooid.
