Deze versie kan foutieve bewerkingen bevatten. Schakel over naar de recentste gecontroleerde momentopname.
Wat je nodig hebt
-
Deze stap is niet vertaald. Help het te vertalen
-
Loosen the two Phillips screws securing the access door to your iMac.
-
-
Deze stap is niet vertaald. Help het te vertalen
-
Remove the three T8 Torx screws securing the front bezel to the rear panel.
-
-
Deze stap is niet vertaald. Help het te vertalen
-
Use your thumbs to press both RAM arms in past the front bezel for enough clearance to lift it off the rear case.
-
-
Deze stap is niet vertaald. Help het te vertalen
-
While holding the RAM arms in with your thumbs, lift the lower edge of the front bezel enough to clear the rear case.
-
-
Deze stap is niet vertaald. Help het te vertalen
-
Insert a plastic card up into the corner of the air vent slot at the top of the rear case.
-
Push the card toward the top of the iMac to release the front bezel latch.
-
Pull the front bezel away from the rear case.
-
Repeat this process for the other side of the front bezel.
-
-
Deze stap is niet vertaald. Help het te vertalen
-
Lay your iMac stand-side down on a table.
-
Lift the front bezel from its lower edge and rotate it away from the rest of your iMac, minding the RAM arms that may get caught.
-
Lay the front bezel above the rest of the iMac.
-
-
-
Deze stap is niet vertaald. Help het te vertalen
-
If necessary, remove the piece of kapton tape wrapped around the microphone and camera cables.
-
-
Deze stap is niet vertaald. Help het te vertalen
-
Peel back the aluminum EMI shield up off the lower three edges of the rear case.
-
-
Deze stap is niet vertaald. Help het te vertalen
-
Remove the two 5 mm T6 Torx screws securing the display data cable to the logic board.
-
Using its attached black tab, pull the display data cable connector up off the logic board.
-
-
Deze stap is niet vertaald. Help het te vertalen
-
Pull the inverter cable connector up off its socket on the logic board.
-
-
Deze stap is niet vertaald. Help het te vertalen
-
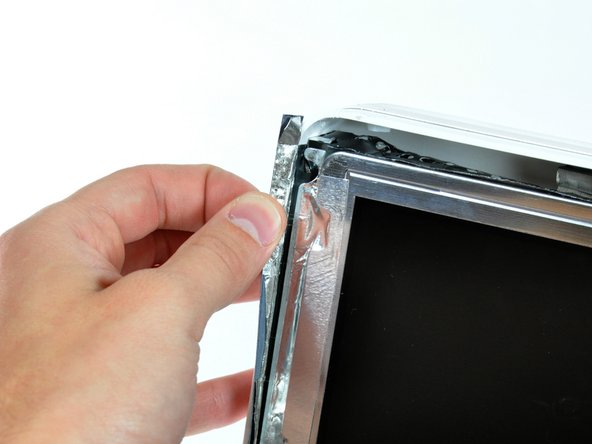
Peel back the aluminum EMI tape from the two vertical edges of the display.
-
-
Deze stap is niet vertaald. Help het te vertalen
-
Remove the four recessed coarse-thread 7.5 mm T10 Torx screws securing the display to the rear case.
-
-
Deze stap is niet vertaald. Help het te vertalen
-
Lift the display from its lower edge and pull it toward yourself to peel it off the EMI shield attached to its top edge.
-
-
Deze stap is niet vertaald. Help het te vertalen
-
Remove the single 5 mm T6 Torx screw securing the IR board bracket to the logic board.
-
Remove the IR cable finger and move the IR board, with cable still attached, out of the way.
-
-
Deze stap is niet vertaald. Help het te vertalen
-
Remove the single 30 mm T10 Torx screw securing the left speaker to the rear case.
-
Pull the left speaker out of the rear case.
-
-
Deze stap is niet vertaald. Help het te vertalen
-
De-route the left speaker cable along its path across the logic board.
-
-
Deze stap is niet vertaald. Help het te vertalen
-
Remove the single 17 mm T10 Torx screw securing the right speaker to the logic board.
-
Lift the right speaker out of the rear case and move it out of the way.
-
-
Deze stap is niet vertaald. Help het te vertalen
-
If necessary, lift the IR board cable to free the left speaker cable pinned beneath.
-
Pull the speaker connector toward the top edge of your iMac to disconnect it from the logic board.
-


Annuleren: ik heb deze handleiding niet afgemaakt.
2 andere personen hebben deze handleiding voltooid.
