Ga door naar hoofdinhoud

iMac G5 17" Model A1144 Display Replacement

Wat je nodig hebt

  1. iMac G5 17" Model A1144 Display Replacement, Access Door: stap 1, afbeelding 1 van 1
    • Before you work on the computer, unplug the computer and press the power button for 20-30 seconds to drain the stored energy in the power supply.

    • Loosen the two Phillips screws securing the access door to your iMac.

    • These screws are captive in the access door.

  2. iMac G5 17" Model A1144 Display Replacement: stap 2, afbeelding 1 van 1
    • Remove the access door from your iMac.

  3. iMac G5 17" Model A1144 Display Replacement, Front Bezel: stap 3, afbeelding 1 van 1
    • Remove the three T8 Torx screws securing the front bezel to the rear panel.

  4. iMac G5 17" Model A1144 Display Replacement: stap 4, afbeelding 1 van 2 iMac G5 17" Model A1144 Display Replacement: stap 4, afbeelding 2 van 2
    • Orient the iMac face-up, on its backside.

    • Use your thumbs to press both RAM arms in past the front bezel for enough clearance to lift it off the rear case.

  5. iMac G5 17" Model A1144 Display Replacement: stap 5, afbeelding 1 van 1
    • While holding the RAM arms in with your thumbs, lift the lower edge of the front bezel enough to clear the rear case.

  6. iMac G5 17" Model A1144 Display Replacement: stap 6, afbeelding 1 van 3 iMac G5 17" Model A1144 Display Replacement: stap 6, afbeelding 2 van 3 iMac G5 17" Model A1144 Display Replacement: stap 6, afbeelding 3 van 3
    Gereedschap gebruikt in deze stap:
    Plastic Cards
    $2.99
    Koop
    • Re-orient your iMac so it sits upright on the stand.

    • Insert a plastic card up into the corner of the air vent slot at the top of the rear case.

    • Push the card toward the top of the iMac to release the front bezel latch.

    • Pull the front bezel away from the rear case.

    • Repeat this process for the other side of the front bezel.

    • It may be necessary to apply several layers of duct tape to the top of the access card to aid in releasing the latches.

    • If the bezel refuses to release, try pressing the lower edge back onto the rear case and repeat this opening process.

    Using a strongish magnet will grab and release the latches.

    darkstar448 - Antwoord

    Citaat van darkstar448:

    Using a strongish magnet will grab and release the latches.

    Are you sure it's safe to do this? How close is the hard drive, won't magnets interfere with it?

    Sarah - Antwoord

    It's almost certainly fine. Modern hard drives are very resistant to magnetic fields.

    zschroeder6212 -

  7. iMac G5 17" Model A1144 Display Replacement: stap 7, afbeelding 1 van 1
    • Lay your iMac stand-side down on a table.

    • Lift the front bezel from its lower edge and rotate it away from the rest of your iMac, minding the RAM arms that may get caught.

    • Lay the front bezel above the rest of the iMac.

  8. iMac G5 17" Model A1144 Display Replacement: stap 8, afbeelding 1 van 1
    • If necessary, remove the piece of kapton tape wrapped around the microphone and camera cables.

  9. iMac G5 17" Model A1144 Display Replacement: stap 9, afbeelding 1 van 2 iMac G5 17" Model A1144 Display Replacement: stap 9, afbeelding 2 van 2
    • Disconnect both the camera and microphone cables.

  10. iMac G5 17" Model A1144 Display Replacement, Display: stap 10, afbeelding 1 van 1
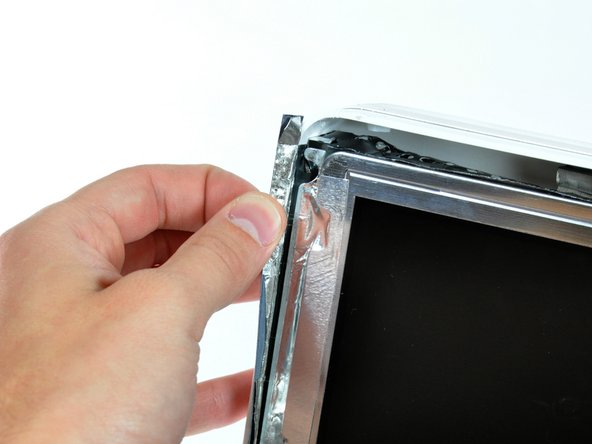
    • Peel back the aluminum EMI shield up off the lower three edges of the rear case.

    • It is not necessary to peel the EMI shield off the display.

    • We found it helpful to tape the EMI shield up against the display to keep it out of the way.

  11. iMac G5 17" Model A1144 Display Replacement: stap 11, afbeelding 1 van 2 iMac G5 17" Model A1144 Display Replacement: stap 11, afbeelding 2 van 2
    • Remove the two 5 mm T6 Torx screws securing the display data cable to the logic board.

    • Using its attached black tab, pull the display data cable connector up off the logic board.

  12. iMac G5 17" Model A1144 Display Replacement: stap 12, afbeelding 1 van 1
    • Pull the inverter cable connector up off its socket on the logic board.

  13. iMac G5 17" Model A1144 Display Replacement: stap 13, afbeelding 1 van 1
    • Peel back the aluminum EMI tape from the two vertical edges of the display.

    • During reassembly, it is helpful to use several small strips of tape to hold the EMI shielding along the left and right edges of the display footprint out of the way before lowering the display into the rear case of your iMac.

  14. iMac G5 17" Model A1144 Display Replacement: stap 14, afbeelding 1 van 2 iMac G5 17" Model A1144 Display Replacement: stap 14, afbeelding 2 van 2
    • Remove the four recessed coarse-thread 7.5 mm T10 Torx screws securing the display to the rear case.

    • These screws are recessed, so a thin screwdriver such as this is essential for removal. Bit drivers tend to be too short for this application.

    No problem taking those screws off, HUGE problem trying to put them back in. Reassembling this step is a lot more complicated. Those 4 screws are impossible to reinstall if you don't have a magnetized screwdriver, which I don't.

    Javier Lopez - Antwoord

    I used some 'chapstik' on my t10 driver and it held the screws long enough to insert them.

    aquarianknows -

    Citaat van javier:

    No problem taking those screws off, HUGE problem trying to put them back in. Reassembling this step is a lot more complicated. Those 4 screws are impossible to reinstall if you don't have a magnetized screwdriver, which I don't.

    Since I could not get a hold on a nice magnetized T10, I inverted the whole unit and worked upside down to avoid lost screws inside an iMac.

    Javier Lopez - Antwoord

    Citaat van javier:

    Since I could not get a hold on a nice magnetized T10, I inverted the whole unit and worked upside down to avoid lost screws inside an iMac.

    Great, now my problem is to find a new cable that connects the panel to LB.

    I'm from Italy and nobody has got it .

    Please help me

    Thanks for all

    Carlo

    Lars - Antwoord

    I found a group of wires not mentioned on the instructions along the underside of the display at the right. They were connected to something at the right bottom of the display near the white plastic piece. I am unable to raise the display more than a couple of inches at this side of it and am wondering what do do.

    modorange - Antwoord

    The group of wires on the right side of the display is the inverter. Seems like a few steps were omitted, so I'll try to fill in the gaps. Use the T10 to remove the right speaker. It's the big white plastic squarish thing on the bottom right side of the iMac. It pulls stright up and you can either disconnect it or just leave it hanging. This should release the inverter cable from hanging up the right side of the display (it did for me, even disconnecting the inverter didn't help as the cable was under the speaker, the inverter doesn't need to be disconnected but it might be helpful to disentangle things and it's an easy one to take apart). The other step missing is to remove the perforated tape at the top of the LCD from the LCD, otherwise you can't really remove it. I found a spudger helpful for this task.

    I know it's a couple years since the OP posted, but hope this helps someone.

    Cheers

    Jeff Kamis

    maccentric -

    I've found that 'coating' the tip of the screwdriver with glue from a glue-stick will help to keep the screws from coming off of a non-magnetized driver.

    Henry in StL - Antwoord

  15. iMac G5 17" Model A1144 Display Replacement: stap 15, afbeelding 1 van 1
    • Lift the display from its lower edge and pull it toward yourself to peel it off the EMI shield attached to its top edge.

    • Be mindful of any cables that may get caught during removal.

Conclusie

To reassemble your device, follow these instructions in reverse order.

21 andere personen hebben deze handleiding voltooid.

0 opmerkingen

Voeg opmerking toe

Weergavestatistieken:

Afgelopen 24 uren: 0

Afgelopen 7 dagen: 2

Afgelopen 30 dagen: 22

Altijd: 22,670