Ga door naar hoofdinhoud

iDea USA CT 1020 Front & Rear Camera Assembly Replacement

Wat je nodig hebt

  1. iDea USA CT 1020 Front & Rear Camera Assembly Replacement, Front & Rear Camera Assembly: stap 1, afbeelding 1 van 1
    • First, power down the tablet to avoid the chance of electrical shock or damaging the machine during repair work

    • Place the tablet on a clean surface with the screen down

  2. iDea USA CT 1020 Front & Rear Camera Assembly Replacement: stap 2, afbeelding 1 van 2 iDea USA CT 1020 Front & Rear Camera Assembly Replacement: stap 2, afbeelding 2 van 2
    • Remove the back plastic casing of the tablet by releasing the plastic clips with a plastic opening tool or a spudger.

    • Be cautious and take your time here; the plastic clips are quite fragile.

  3. iDea USA CT 1020 Front & Rear Camera Assembly Replacement: stap 3, afbeelding 1 van 1
    • Use a plastic opening tool or spudger to lift and release the camera assembly ZIF tab.

    • Gently pull the ribbon cable free.

  4. iDea USA CT 1020 Front & Rear Camera Assembly Replacement: stap 4, afbeelding 1 van 2 iDea USA CT 1020 Front & Rear Camera Assembly Replacement: stap 4, afbeelding 2 van 2
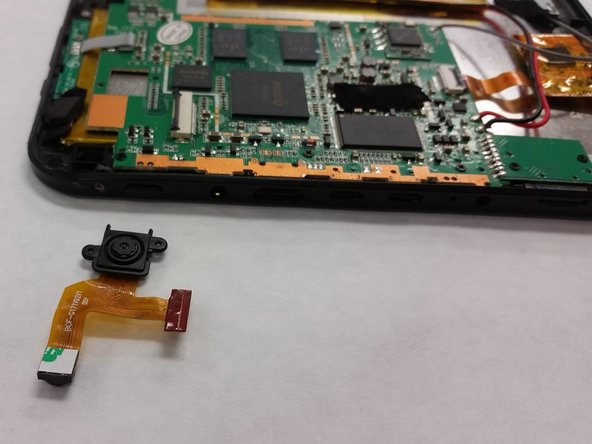
    • The camera is held in place by adhesive material on the back of the camera

    • To complete removal, peel the camera off the mother board

Conclusie

To reassemble your device, follow these instructions in reverse order.

Één andere persoon heeft deze handleiding voltooid.

David Lawrence

Lid sinds: 01/22/18

109 Reputatie

1 Handleiding geschreven

Team

IUPUI, Team S1-G3, Freund Spring 2018 Lid van IUPUI, Team S1-G3, Freund Spring 2018

IUPUI-FREUND-S18S1G3

3 Leden

4 handleidingen geschreven

0 opmerkingen

Voeg opmerking toe

Weergavestatistieken:

Afgelopen 24 uren: 0

Afgelopen 7 dagen: 1

Afgelopen 30 dagen: 1

Altijd: 98