Ga door naar hoofdinhoud

Zenithink ZTPAD ZT280 C91 Screen Replacement

Wat je nodig hebt

  1. Zenithink ZTPAD ZT280 C91 Screen Replacement, Back Panel: stap 1, afbeelding 1 van 1
    • Remove the two screws on the bottom using a Phillips #00 screwdriver.

    • For differentiation purposes, these screws are 4mm long.

  2. Zenithink ZTPAD ZT280 C91 Screen Replacement: stap 2, afbeelding 1 van 3 Zenithink ZTPAD ZT280 C91 Screen Replacement: stap 2, afbeelding 2 van 3 Zenithink ZTPAD ZT280 C91 Screen Replacement: stap 2, afbeelding 3 van 3
    • Using a spudger, start prying the case apart by working around the edge slowly.

    • Be careful not to damage any of the latches that hold the back panel in place, especially if you are using a metal spudger.

    • While prying, be careful to not lose the power and volume buttons; the case is the only thing holding them in place so they will easily come out once the panel has been removed

    • Be careful to not damage the speaker cables, they will still be connecting both panels.

  3. Zenithink ZTPAD ZT280 C91 Screen Replacement, Motherboard: stap 3, afbeelding 1 van 1
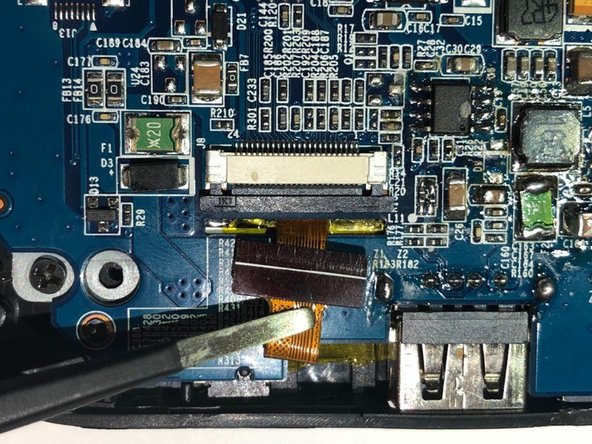
    • Peel back the touch interface chip (which is on the top right of the motherboard, covered in yellow tape.)

  4. Zenithink ZTPAD ZT280 C91 Screen Replacement: stap 4, afbeelding 1 van 1
    • Flip up the small gate and unplug the ribbon cable shown.

  5. Zenithink ZTPAD ZT280 C91 Screen Replacement: stap 5, afbeelding 1 van 1
    • Using a Phillips #00 screwdriver, remove the screws highlighted with the orange rings as shown in the picture.

    • For differentiation purposes, these screws are 3.5mm long.

  6. Zenithink ZTPAD ZT280 C91 Screen Replacement: stap 6, afbeelding 1 van 1
    • Slide back the plastic latch for the main display cable.

    • Carefully unplug the cable with tweezers.

  7. Zenithink ZTPAD ZT280 C91 Screen Replacement: stap 7, afbeelding 1 van 2 Zenithink ZTPAD ZT280 C91 Screen Replacement: stap 7, afbeelding 2 van 2
    • Slide back the plastic latch for the camera cable.

    • Carefully unplug the cable with tweezers.

  8. Zenithink ZTPAD ZT280 C91 Screen Replacement: stap 8, afbeelding 1 van 1
    • Peel back the reflective tape.

  9. Zenithink ZTPAD ZT280 C91 Screen Replacement: stap 9, afbeelding 1 van 2 Zenithink ZTPAD ZT280 C91 Screen Replacement: stap 9, afbeelding 2 van 2
    • Lift up the motherboard assembly, starting by lifting up the top.

    • Be careful not to damage any of the ports on the underside of the tablet.

    • The camera cable will slide through a small notch and end up underneath the board.

  10. Zenithink ZTPAD ZT280 C91 Screen Replacement, Front Panel: stap 10, afbeelding 1 van 1
    • Remove the four highlighted screws using a Phillips #1 screwdriver.

    • For differentiation purposes, these screws are 4mm long and have a larger head than the rest of the screws.

  11. Zenithink ZTPAD ZT280 C91 Screen Replacement: stap 11, afbeelding 1 van 1
    • Starting from the top, slowly lift everything up out of the front panel.

    • Remove the front panel off of the device.

    • Be careful not to damage the ports along the bottom.

  12. Zenithink ZTPAD ZT280 C91 Screen Replacement, Screen: stap 12, afbeelding 1 van 1
    • Peel back the adhesive from one of the top corners.

    • We recommend to use only your hands to avoid damage to the battery.

  13. Zenithink ZTPAD ZT280 C91 Screen Replacement: stap 13, afbeelding 1 van 1
    • While you're peeling the adhesive back, be careful because the display is connected by a cable on the right.

  14. Zenithink ZTPAD ZT280 C91 Screen Replacement: stap 14, afbeelding 1 van 1
    • Using tweezers, slide back the latch and unplug the ribbon cable.

    • Remove the display from the device.

Conclusie

To reassemble your device, follow these instructions in reverse order.

Één andere persoon heeft deze handleiding voltooid.

0 opmerkingen

Voeg opmerking toe

Weergavestatistieken:

Afgelopen 24 uren: 0

Afgelopen 7 dagen: 0

Afgelopen 30 dagen: 0

Altijd: 182