Ga door naar hoofdinhoud

ZTE Axon 7 Charging Port Replacement

Wat je nodig hebt

  1. ZTE Axon 7 Charging Port Replacement, Back Case: stap 1, afbeelding 1 van 2 ZTE Axon 7 Charging Port Replacement, Back Case: stap 1, afbeelding 2 van 2
    • Make sure the device is powered off.

    • Using the SIM Tray Removal Tool, press the pin into the hole on the SIM Tray (located on the top left of the device) to eject the tray.

  2. ZTE Axon 7 Charging Port Replacement: stap 2, afbeelding 1 van 2 ZTE Axon 7 Charging Port Replacement: stap 2, afbeelding 2 van 2
    • Heat the iOpener in the microwave for 15-30 seconds.

    • iOpener will be HOT! Use oven mitts if necessary.

    • Place the iOpener on top of the top and bottom speaker grills to loosen up the adhesive underneath.

  3. ZTE Axon 7 Charging Port Replacement: stap 3, afbeelding 1 van 3 ZTE Axon 7 Charging Port Replacement: stap 3, afbeelding 2 van 3 ZTE Axon 7 Charging Port Replacement: stap 3, afbeelding 3 van 3
    • Use a Jimmy to pry off the top and bottom speaker grills.

    • Remove the speaker grills gently so they don't crack or break off.

  4. ZTE Axon 7 Charging Port Replacement: stap 4, afbeelding 1 van 2 ZTE Axon 7 Charging Port Replacement: stap 4, afbeelding 2 van 2
    • Use a Phillips #00 screwdriver to remove the six 3 mm screws located under the speaker grills.

    • There may be remaining adhesive covering some screws. Take time to gently scrape away the adhesive using a spudger or opening tool.

  5. ZTE Axon 7 Charging Port Replacement: stap 5, afbeelding 1 van 2 ZTE Axon 7 Charging Port Replacement: stap 5, afbeelding 2 van 2
    • Carefully wedge the Jimmy between the screen and aluminum back plate of the device.

    • Begin near the bottom right of the device and carefully work under the screen and slide the Jimmy up the edge of the device to remove the back case.

    • Use plastic picks to keep the display and back aluminum casing from closing as you pry along the perimeter of the phone with the Jimmy.

  6. ZTE Axon 7 Charging Port Replacement: stap 6, afbeelding 1 van 3 ZTE Axon 7 Charging Port Replacement: stap 6, afbeelding 2 van 3 ZTE Axon 7 Charging Port Replacement: stap 6, afbeelding 3 van 3
    • Separate the front and back of the phone, (like a book) to open and gain access to the internal components.

    • Careful to not damage the fingerprint sensor cable attached to the motherboard from the back casing.

    • Place the tip of your opening tool under the edge of the connector, and pry the connector straight up from its socket.

    • Be very careful to pry only under the edge of the connector, and not under the socket itself. If you pry under the socket, you will separate it from the circuit board, which requires specialized microsoldering skills and equipment to repair.

    • To reconnect, align the connector carefully over its socket and press down with your fingertip—first at one side, then the other—until it clicks into place. Don't press down on the middle of the connector until it's fully aligned and seated. If misaligned the connector can be permanently damaged.

  7. ZTE Axon 7 Charging Port Replacement: stap 7, afbeelding 1 van 1
    • The back is now completely removed.

  8. ZTE Axon 7 Charging Port Replacement, Charging Port: stap 8, afbeelding 1 van 2 ZTE Axon 7 Charging Port Replacement, Charging Port: stap 8, afbeelding 2 van 2
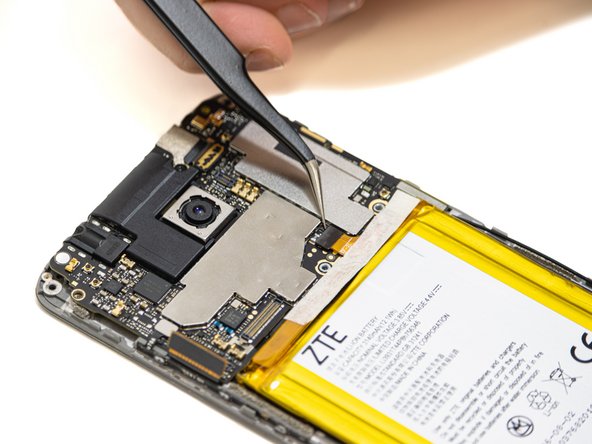
    • Use a Phillips #00 screwdriver to remove the 2.0 mm screw securing the bracket at the top of the battery.

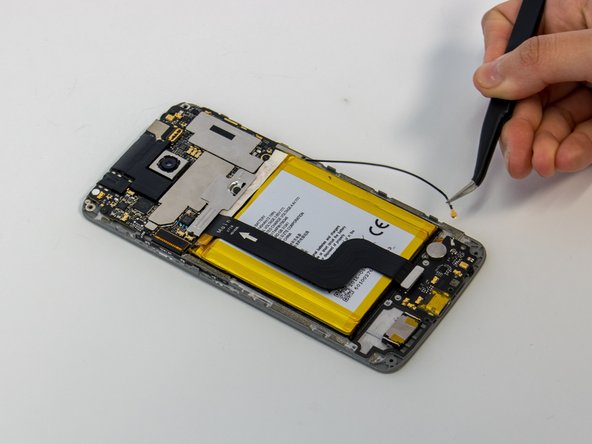
    • Use the angled tweezers to slide the top bracket up and off the phone.

  9. ZTE Axon 7 Charging Port Replacement: stap 9, afbeelding 1 van 2 ZTE Axon 7 Charging Port Replacement: stap 9, afbeelding 2 van 2
    • Place the tip of your opening tool or spudger under the edge of the battery connector, and pry the connector straight up from its socket to disconnect from the motherboard.

  10. ZTE Axon 7 Charging Port Replacement: stap 10, afbeelding 1 van 2 ZTE Axon 7 Charging Port Replacement: stap 10, afbeelding 2 van 2
    • Use a Phillips #00 screwdriver to remove two 2.0 mm screws from the white speaker cover.

  11. ZTE Axon 7 Charging Port Replacement: stap 11, afbeelding 1 van 3 ZTE Axon 7 Charging Port Replacement: stap 11, afbeelding 2 van 3 ZTE Axon 7 Charging Port Replacement: stap 11, afbeelding 3 van 3
    • Use a Phillips #00 screwdriver to remove two 2.0 mm screws securing the bracket near the bottom of the battery, and a single 2.0 mm screw near the vibrator motor.

    • Use angled tweezers to remove the bottom bracket covering the main cable connector.

  12. ZTE Axon 7 Charging Port Replacement: stap 12, afbeelding 1 van 2 ZTE Axon 7 Charging Port Replacement: stap 12, afbeelding 2 van 2
    • Pop the connector up at the bottom of the battery by placing the tip of your opening tool or spudger under the edge of the connector and prying the connector straight up from its socket.

    • Be very careful to pry only under the edge of the connector, and not under the socket itself. If you pry under the socket, you will separate it from the circuit board, which requires specialized microsoldering skills and equipment to repair.

    • To reconnect, align the connector carefully over its socket and press down with your fingertip—first at one side, then the other—until it clicks into place. If the connector isn't aligned, it might damage the connector or pins underneath.

  13. ZTE Axon 7 Charging Port Replacement: stap 13, afbeelding 1 van 2 ZTE Axon 7 Charging Port Replacement: stap 13, afbeelding 2 van 2
    • Slide a thin, ESD-safe pry tool or tweezers under the wire until it's snug against the connector, and pry straight up from the board to disconnect the coaxial antenna cable.

    • To reinstall, hold the connector in place and gently press it straight down. This connector should “snap” into the socket much like the metal snaps on a jacket.

  14. ZTE Axon 7 Charging Port Replacement: stap 14, afbeelding 1 van 3 ZTE Axon 7 Charging Port Replacement: stap 14, afbeelding 2 van 3 ZTE Axon 7 Charging Port Replacement: stap 14, afbeelding 3 van 3
    • Use a spudger to pry under the USB-C board to lift it from the chassis.

    • This piece is strongly connected to the chassis so work the spudger around the perimeter of the USB-C board to ease it out before trying to remove it fully.

Conclusie

To reassemble your device, follow these instructions in reverse order.

Één andere persoon heeft deze handleiding voltooid.

IIKylieMartinII

Lid sinds: 01/23/23

175 Reputatie

1 Handleiding geschreven

0 opmerkingen

Voeg opmerking toe

Weergavestatistieken:

Afgelopen 24 uren: 0

Afgelopen 7 dagen: 0

Afgelopen 30 dagen: 2

Altijd: 135