Deze handleiding heeft recentere wijzigingen. Schakel over naar de nieuwste niet-geverifieerde versie.
Inleiding
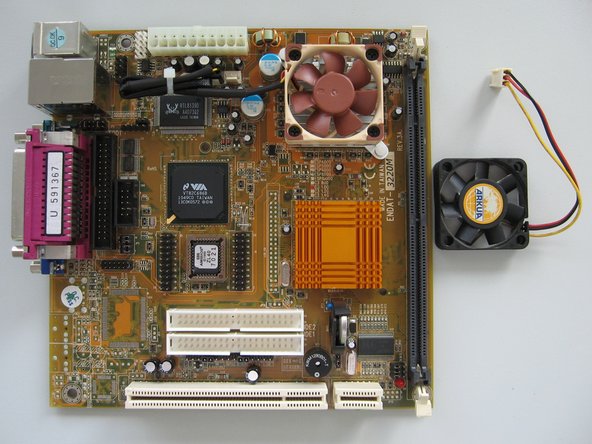
The ZPrinter 650 color powder 3D printer has a large electronics module which is somewhat prone to failures. Replacement module is very expensive, it cost around 5000 USD in 2015. What is even worse, the original producer (Z Corporation) was bought out by 3D Systems and they stopped providing spare parts for older (pre-2012) printers. However, I figured out the main reason why the electronic modules fail: a small embedded PC mainboard based on VIA C3 processor. Taiwanese comrades who manufactured the board used a bit too cheap CPU fan and when it stops working, the CPU will burn out. In one instance, the fan started to fail after mere 2 months! You can't replace the CPU (it's soldered to the board), but it's possible to buy a new mainboard. It has part number ENDAT-3220M and can be usually found on Ebay. Ocassionally, it also appears in PC surplus stores and the like, just Google for it. Other Z Corporation printers also use this mainboard, Zprinter 450 and Zprinter 250 for example. Unfortunately, it also depends on production year of the printer, so I recommend to disassemble the printer and check the actual mainboard type before you buy.
WARNING! This repair should be performed only by skilled technician with background in electronics and/or computer service work. Moreover, it includes manipulation with very sensitive electronic components and ESD precautions must be observed during most steps!
Wat je nodig hebt
-
-
The electronics module is very complex and the mainboard is not the only component that can fail. So first you need to verify that your printer really has bad mainboard and not something else.
-
Normally, the mainboard produces a short beep about 10 seconds after powerup. If it doesn't beep, then it's probably dead.
-
If it beeps more than once or beeps repeatedly, then the mainboard works, but something else failed (dead CMOS battery, bad memory etc). In that case you can diagnose it like in Step 8.
-
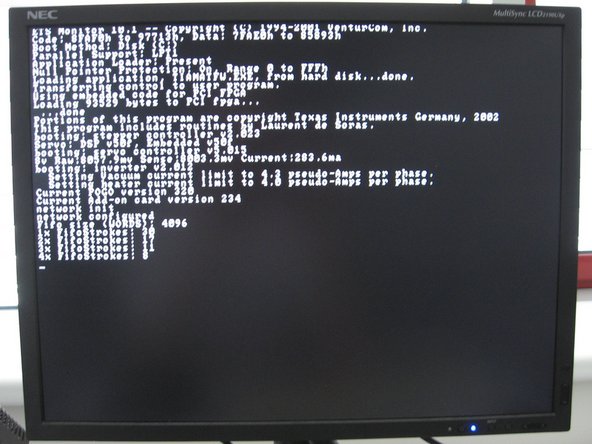
Another indication is the front display - if it lights up but all pixels stay black like in the photo, then it's likely the mainboard is dead. If it doesn't light up at all, then there is some other problem (dead power supply for the entire electronics module, for example).
-
-
-
Power down the printer and unplug all cables from the electronics module on the back. Remove 6 screws from its cover and put it away.
-
-
-
Power up the printer and let it run for at least 10 minutes. Then place your finger to the board on the back side of the CPU (green arrow). If it's hot (>50 degrees Celsius), it means the CPU had burned out.
-
You can also check if the original CPU fan works - if it doesn't, then your CPU burned out for sure. See Step 9 as to how to check.
-
-
-
If you confirmed you have bad mainboard and bought a new one, you need to prepare it first.
-
Firstly, preventively replace the original fan - as I said in introduction, it may fail in a few months. Don't try to skimp here, use the best fluid dynamic bearing fan you can get! I'm using Noctua NF-A4x10 FLX in the photo, but any other 40x40x10 mm fan with 12V 3-pin connector will do. Don't forget to connect the fan cable.
-
Secondly, preventively replace the original CMOS battery (CR2032 type). The mainboard sat in a warehouse for 8 or more years by now, so the original battery will be dead anyway.
-
-
-
-
Unplug all cables from the printer and remove 4 screws as indicated. Then gently pull on the left vertical edge of the mainboard. You will feel some resistance as a PCI riser card disconnects (see Step 7 for more details about it).
-
-
-
Place some sort of pedestal on the ground, so the original mainboard wouldn't hang from the cables. I'm using a cardboard box in the photo.
-
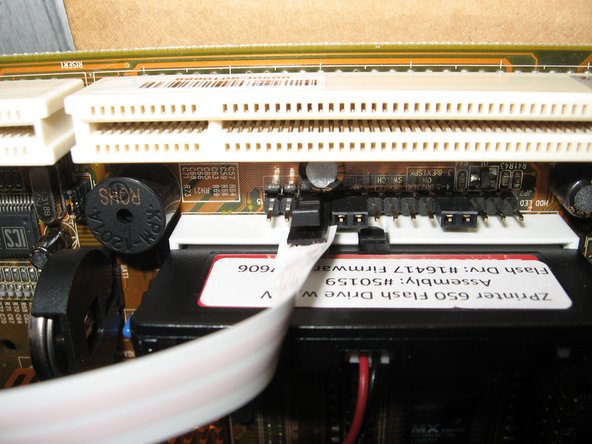
Now you can review all the components you need to move to the new mainboard: 1. DDR memory stick (yellow arrow), 2. small Parallel ATA solid state hard drive (green arrow), 3. power supply converter and connector (purple arrow) and 4. white flat cable (blue arrow) for "power button" header.
-
-
-
This part is a bit tricky, because you need to connect the mainboard onto PCI riser card as you slide it in.
-
First, place mainboard's connectors on the I/O shield at an angle, as shown in the first photo. Then gently push the left edge of the board and check if the riser card is properly mating with the PCI slot (green arrows in the second photo). If it's OK, push the mainboard all the way onto the hexagonal mounting posts and secure it with screws.
-
-
-
Now you should test if the new mainboard helped (i.e. if it really was the source of the fault). Do NOT connect Ethernet cable at this point, otherwise the printer will not boot.
-
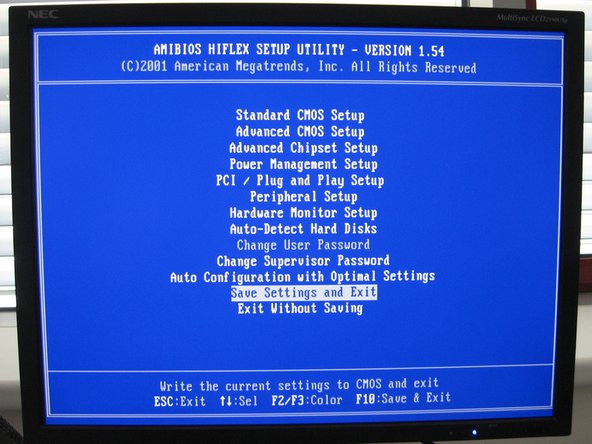
Connect a PS/2 keyboard and a VGA monitor to the mainboard. Then plug in the power cord to the printer and turn it on. The mainboard should beep and show BIOS logo. It will probably stop there and report corrupted CMOS settings (beause of the battery in Step 4).
-
Enter the BIOS (Delete or F1 key), and choose Save settings (second photo). This will set and save default CMOS settings and the mainboard will reboot itself. It then should fully boot into printer firmware (ASCII GUI similar to the third photo). Also, the small display at the front of the printer should work now.
-
-
-
When the printer is running, you should check that you've mounted and plugged the new CPU fan correctly. You can see it rotating with a small mirror or you can carefully feel it with your finger, like in the photo.
-
Tie up the nearby cables, so they can't move and block the fan.
-
-
-
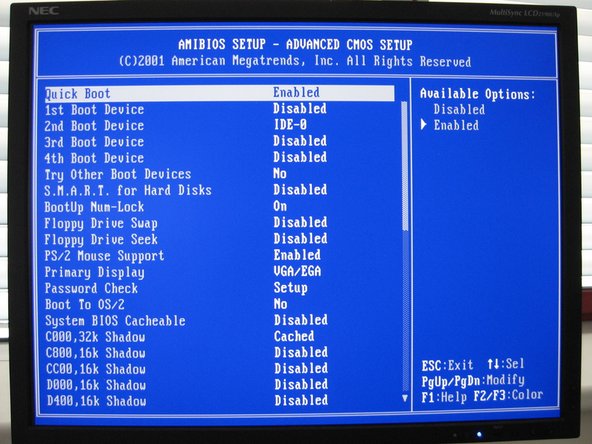
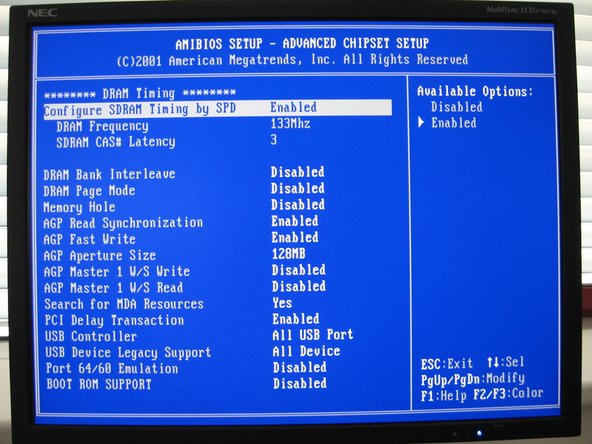
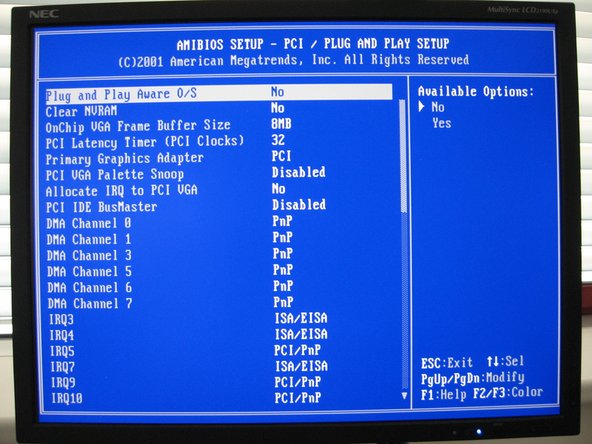
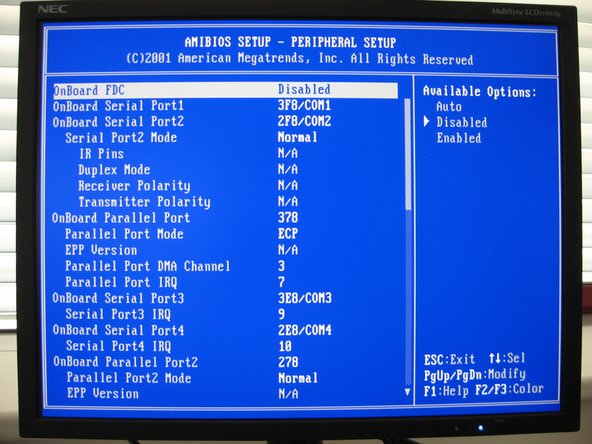
You need to change some settings in the BIOS, otherwise the printer firmware will always freeze as soon as you plug in the Ethernet cable. Specifically, you need to disable some onboard devices to prevent IRQ conflicts (the firmware runs on FreeDOS, which is not Plug and Play OS).
-
Unfortunately, I don't remember which settings exactly have to be changed, but I made photos on a working printer, so you can use them as a guide.
-
-
-
Ifixit allows only 3 photos per step, so here are some more BIOS settings. Incidentally, I think the last one (Peripheral Setup) is the most important one.
-
Don't forget to save the new settings when you're done. Then let the printer boot into its ASCII GUI.
-
-
-
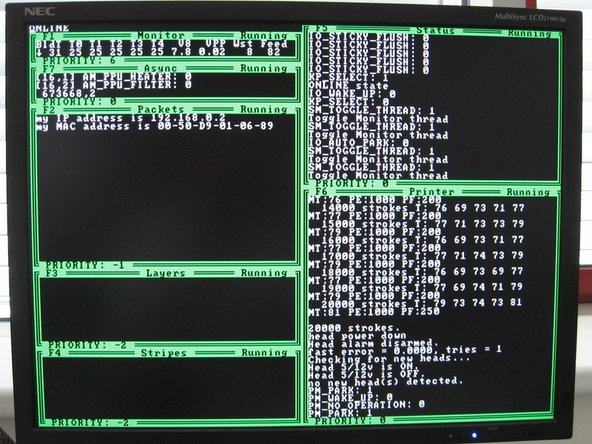
Connect Ethernet cable to the printer and check the ASCII GUI. Normally, some values change every second and they should continue to do so after you plug in the cable. If the firmware freezes, you need to check the BIOS settings again.
-
Moreover, the firmware displays various information during boot (second photo). If you reboot the printer and it always freezes at a particular stage, then that's the likely culprit. Unfortunately, it seems the only way to do a reboot from frozen firmware is by turning the printer off and on again.
-
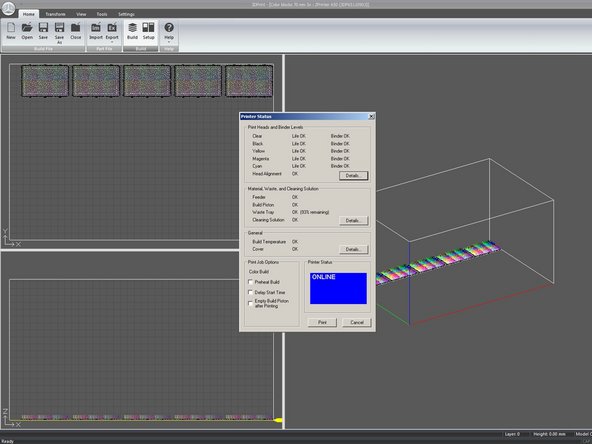
The printer should now work normally. You should be immediately able to connect to it with ZPrint or 3DPrint software, because all settings were stored on its internal HDD. But keep in mind the new mainboard has different MAC address, so some network configuration changes in your institution/workplace may be necessary.
-


Finally, you should turn off the printer, disconnect all cables and put back cover on the electronics module. That completes the repair.
Finally, you should turn off the printer, disconnect all cables and put back cover on the electronics module. That completes the repair.
Annuleren: ik heb deze handleiding niet afgemaakt.
6 andere personen hebben deze handleiding voltooid.
44 opmerkingen
Please send me an image of the hd to aylward Edward at Gmail. Thanks
Check your mail if it arrived, our mailserver antivirus is a bit overzealous when it comes to "non-standard” attachments.
Everyone! Please don’t provide any help or information to Edward Aylward! He is from Noble 3D Printers company which defrauded my employer - we ordered binders for 1000 USD and they never delivered them. And we weren’t the only ones who they cheated:
Thank you for your guide. I have a used 450 and its mother board is/was bad. Someone replaced it with a different one and I am struggling with the board, still. The fan was dead on the NEW board! So I am betting its dead too. What a load of you know what for a $25,000 machine when it was new. Regards. Cismontguy Free Union VA. USA
A different board? You mean different part number than ENDAT-3220M? Please post its type or photos.
Hello Pavel, The board that came with the ZCorp 450, installed when I got was a different board than the ENDAT-3220M. I do not know how you past/upload a picture to this Fixit board/forum. The board I am trying to fix, replace, whatever it takes is a C3VCM6 REV: 1.0A with 1GHz speed. Looks very much like the 3220M but a little different on that narrow ribbon cable.
I would very much like to get some more help fixing this printer. BSA, LLC
In that case your best bet is to replace it with the same board as original. The boards may look similar, but they use completely different northbridge and southbridge chips. The internal printer firmware runs on Freedos, which is not plug-and-play OS, so it may not run properly on a different HW.
Hey @hanakp thanks for posting such detailed instructions about how to replace the ZPrinter’s mainboard! I’m trying to fix a ZPrinter 650 myself recently but I struggle a lot in finding the mainboard in the market.. I was wondering if you know any suppliers or website that might still sell them? Thanks in advance!
Hello, I’ve always got ENDAT-3220M boards from Ebay, so unfortunately I don’t know any other sources. These boards were manufactured by various OEMs and many of them are nearly identical. If you find one with identical CPU, northbridge, southbridge and LAN chip, it’s a good chance it will work as a replacement. Try to ask around on some advanced PC hardware forums, for example here:
https://www.eevblog.com/forum/general-co...
It’s a gamble (like I wrote above, the firmware runs on FreeDOS), but it may be worth a shot. Alternatively, you could try to ask 3D Systems if they sell standalone boards. They refused to do that in 2015, but they do list it as a spare part number 22-15725.
Hi there,
Thanks for your amazing explanation and effort.
I have a zprinter 450 which gives me this error code:
Error 40901:-255
Temp sensor failed
Do you think I have to change main board,
If so where I can buy it from.
Best regards
Lucas
Hello, I’ve never encountered this error, but you can Google them to get at least some idea what causes them. Some Zprinter service manuals are online, such as this one:
http://infocenter.3dsystems.com/product-...
According to this one, Error 40901 is caused by “This error is failure of the circuit that reads the heater temperature.“ I think they mean the air heater with fan that warms up the build after printing ends. However, the actual temperature sensor can be mounted anywhere in the build area and I don’t know where. It may be in the heater module itself and maybe the sensor itself is fine, but some wires or connectors got loose. You really need someone with expertise in electronics to identify and repair such problem. If you don’t know anyone, your best bet is to call the official Zprinter service in your country.
In any case, replacing the mainboard will NOT fix this.
Hi there, can you please sent me a copy of the hdd image. p7uisdev@gmail.com
Where I can find BIOS for 3220M Rev 3.A (VIA-800MHz). Please five me link. My email rig21ru@gmail.com
BIOS? You mean the AMIBIOS that’s on the mainboard? Why do you need it?
Greetings Pavel,
I hope you are doing fine. I have been looking all day for answers, and you got by far a great description and provide excellent guidance. THANK YOU!
I just got an used Zcorp 450 and for what I am reading, I need to replace the mainboard :( I looked on the web it is quite expensive:
https://www.stockcheck.com/product/unico...
I am curious to learn if an old mainboard can be fixed by replacing the CPU. Please advise.
Thanks
Yes, it’s possible to replace the CPU, but the real problem is to obtain a replacement one. I tried looking for them about 3 years ago, but I found nothing. Have you found them somewhere? Please provide a link if you did.
In any case, you need a SMT rework station and some other specialized equipment to replace the CPU. In practice, it looks like this:
https://www.youtube.com/watch?v=d6iGqyBs...
There are companies who do this for a fee. Of course, there are people who manage to do the same with various homemade tools, but it requires a lot of experience.
Alternatively, user BlueSwallowAircraft mentioned that his printer came with C3VCM6 mainboard, so maybe you could try it? As I mentioned above, it has different chipset etc., but I think the printer firmware is universal, because 3DS haven’t updated it in ages. Plus, C3VCM6 can be bought rather cheaply, so IMO it’s worth a try. Let us know the result if you decide to go this path.
Greetings Pavel,
We opened he electronics panel and performed some cleaning and tested the CPU fan, to our surprise, the fan was working and we also replaced the Cr2032 battery. After this, we plugged in the printer and turned it on. We heard the 5 vital beeps so we connected the monitor and followed your instructions of step 10.
The printer was performing initial checkups but it looks like the feeder motor got stuck.
The current condition of this printer is like a car that has not been used in a long time, unfortunately it was exposed to humidity weather and has a lot of rust and mold as you can see in the pictures. We believe that there must be old powder inside the feeder.
Do you think that the binder solution in the reservoir container should be replaced?
We also not sure where is the best place to buy consumables.
Thanks
Here is the link with the pictures:
https://drive.google.com/drive/folders/1...
Let me know if you were able to see them ok.
Thanks again.
The powder is 80% plaster, so yes, it may have solidified inside the feeder if the printer sat in high humidity environment. But I don’t think you need to replace the feeder - if you remove all the old powder, it should be possible to make it moving again. The mechanism is rather complex, but with a bit of skill, patience and lot of WD40, it should be repairable. As for the mold, I can’t really help you, I’ve never encountered it. Is it really mold? Does it smell or something? The same with binder - if it looks suspect, you could replace it, but again, purging the tanks is an arduous task because you must not leave any solid contaminants inside (they would clog the print heads).
Even if your PC fan works, I recommend to replace it, it will probably fail soon anyway.
As for consumables, we’re using aftermarket ones from Canada Powder:
They’re not as good as originals, but good enough for our purposes. And stay away from Noble 3D Printers, they’re crooks (as I explained above)!
Greetings Pavel,
The removal of solidified powder -mainly in the building bed area-and mold was exhausting, but so far it's working; we replaced the fan as you suggested and turned the machine back on, no errors this time. so we are in the task to connect it to the internet but we need to download Z print software, Any idea where can we get it besides 3dsystems?
And where do you buy the binder from?
Thanks again.
We're using the original Zprint software which you can get here (have you even tried searching for it?):
https://zprint-software.software.informe...
It actually has more settings and service options than the newer (and hipster-looking) 3D Print program by 3D Systems. And like I already said, we buy aftermarket consumables from Canada Powder, they have the powder, binder and others. The cartridge fillers are particularly handy, even if they're pricey.
Hello again,
We looked for the program on the web and luckily a 3d printing enthusiast shared the program with us, we had into the link that you also provided and sent us directly to 3dsystems, which is hard to get information from, specially if it is about legacy products.
Now we are encountering networking connection, the machine boots while the ethernet cable is connected to the computer but the Zprint program does not recognize it, it shows a "No printers were found on the network" error.
Does it have to be a special ethernet cable? or what we are missing here?
Thanks!
I can't really help you with that. The last time I did network setup for these printers was 10 years ago and I don't remember how it's done. But you have to set an IP address for the printer... somehow. Isn't it in the front panel menu somewhere?
Here we are once more :)
You were right Pavel, the IP address was displayed in the front panel when rebooting, we just needed to create an IP address on our PC based on the IP shown.
So we are now connected to the printer and getting ready to print, we would not be able to accomplish thus far if it was not for your Posting. we are so grateful!
Lastly, we have a question that concerns us, when we were replacing the fan on the mainboard, we noticed that one of the electronic components was missing material, not sure what happening here. We are attaching the link with the photos. Do you think we should be concerned about it?
https://drive.google.com/file/d/1jRBme24...
https://drive.google.com/file/d/1lBBwX74...
thanks
You're welcome.
Regarding the photos, it seems like a power inductor which has part of its ferrite core chipped off. That's not good, but if it works, you're probably OK. I never replaced that little power board, so I have no idea if 3D Systems sells it separately or if there is some 3rd party alternative. It would be best if you asked an official 3D System service partner in your country about this.
Will do, thank you!
Greetings Pavel,
We are having shrinking issues while using Canada Powders, we had done the following:
Increased the Powder density, use the dry environment to 1, changed shell and core percentages. By doing all these, the color would improve but the parts are distorted.
Any info on this matter, will be very helpful.
Thanks,
I've never encountered this problem. It would be best if you contacted Canada Powder about it, send them photos etc.
Greetings Pavel,
We would definitely contact them , but we were curious to learn if you had to create a modified powder as they suggested due in part to their powder density. What type of powder in Zprint you selected to run it with their powder?
Actually, we haven't used CP powder yet. We acquired a large stockpile of original ZP150 powder and we combine it with CP binders. If you manage to resolve this issue, post it here!
Greetings Pavel,
After many attempts, we could not get good results out of the Canada Powder; we did not get any feedback from the manufacturer either, which would be very much needed, so we are selling it on Ebay plus two binder filters, Here is the info if you are interested: https://www.ebay.com/itm/275354371414
Are you absolutely sure it's a problem with the powder and not the printer, though? You see, the powder feeding and spreading mechanism is rather intricate and all its parameters need to be just right. For example, the spreading arm needs to have an exact angle in relation to the print bed. In fact, we had to call the official Zcorp service - twice - to correct this issue. I can imagine your feeder mechanism will be much worse, particularly if you literally chiseled old hardened powder from it.
Greetings Pavel,
This 3dprinter is a different one from the one you help us to fix, we bought it as a working one to get the production going and we actually 3dprinted in color with the powder that came with it and printed as expected, no distortion or discoloration or any building issues that we experienced with the canada powder, as a matter of fact, we followed ALL canada powder modifications within ZPrint, and ask questions -did not reply to our concerns- to what could possible were not doing right, but at the end we came to the conclusion that:
we could get parts with no distortion but poor color, and the more saturation color we added to bring up the colors, the parts got weaker, tried different numbers in the middle, but again, the distortion was mostly present.
We rather work with a company that is willing to work with us, and unfortunately this is not the case.
By the Way, the machine that you help us to start back again is running and building parts beautifully.
Greetings Zbyszek
I found recycling on ZPRINTER 450 with a damaged headboard which I bought on EBAY, now I need the ZPRINT program, as if someone could rescue it at zbyniu1972@gmail.com, thank you
We have an old ZCorp 450 that seems to be working perfectly, boots up and can go through all the motions.
The only issue is the ethernet port appears to not be working as we cannot connect to the machine or even ping it. No lights on the ethernet socket either.
Is there a quick easy fix for this or must the entire motherboard be replaced?
So the Ethernet port worked previously and then suddenly stopped? Or you bought an used machine and it was already dead? Have you checked whether it's enabled in BIOS? Do you have a proper cable (these old boards don't support auto detect of crossed pairs)?
In any case, the real trouble would be sourcing a replacement mainboard. I searched for ENDAT-3220M about a year ago and it was hopeless. Maybe C3VCM6 would work as a replacement (see discussion above), but I've never tried it.
There are people who could test the Ethernet controller (Realtek RTL8139D) and associated circuitry on the mainboard. They could even replace it if it's really dead. It would be probably cheaper than new mainboard officially offered by 3D Systems:
https://www.layerbylayer-shop.com/en/p/m...
I have no idea whether it's compatible with Zprinter 450 too, though.
Hello Pavel,
I came across your guide looking for resources on Zprinter 650 and Projet 660. As we're using our Projets with different powder, I'm looking for as much info on how to control the powder feeding and layer spreading hardware. Maybe you'd be interested in sharing some insights?
Mind dropping me an email at glassobryk@gmail.com so I can ask a few questions?
I'm looking for some explanations on .ini file inputs and maybe some way to control roller speed, feeder "mixer" revolutions etc.
Kind regards,
Aleksander Bryk
Hello, I won't be able to help you with that. We actually had some problems with powder spreading when one printer was new, but we called official service to fix it. I never learned any details about its workings or configuration. Also, we got rid of all our Zprinters last year - all developed faults in the electronic box and it simply wasn't economical to fix and run then anymore.
Hi guys need help please . I have a Z450 and left on then one day has died. How will I know if motherboard or Psu?
Did you read steps 1, 3 and 8? How the printer behaves?
Hello Pavel,
Thanks for this article ;) Can you send a backup image of this disk or a disk from one of the following 150,250,350, 650 or 660. I have to install a new disk.
Thanks
Sure, tell me where I should send it, it has about 7 MB. It's in Acronis True Image format.
Hello Pavel, send to ruijpagostinho@gmail.com , which printer version is it for? send any files you have
What is the version of your Acronis?
Thank you