Inleiding
The Xiaomi Mi 4 has a liquid crystal display (LCD) screen that is very fragile and has a high chance to crack if the phone is dropped or struck too hard. In such cases, the screen is unable to be repaired and must be replaced. This will involve removing the device's back cover, battery, and motherboard before detaching the screen.
Wat je nodig hebt
-
-
Use a pin or paper clip to insert in the hole on the side of the phone next to the micro SIM cardholder to remove the tray.
-
Remove the SIM card tray from the Xiaomi Mi 4 and store it somewhere safe.
-
-
-
Using the flat metal spudger and curved metal spudger, make a wedge between the plastic back cover and the inner frame
-
Using the second spudger, slowly work your way around the perimeter of the device
-
As the back cover is almost completely removed, use the suction-cup tool to remove the plastic cover without damaging the back
Heres a picture from the mi4 backcover
[URL=https://www.imagebanana.com/s/978/F9eUPw...][IMG]https://s1.imagebanana.com/file/180224/t...[/IMG][/URL]
-
-
-
Use a 000 phillips head screwdriver to remove the 10 1.2mm phillips head screws in the plastic frame that hold the motherboard and battery.
-
Use a 000 phillips head screwdriver to remove the 3 0.5mm phillips head screws in the plastic frame that hold the motherboard and battery.
-
Use the small plastic opening tool and place it in the slot on the bottom right corner of the inner frame and carefully pry it off.
I don't think it is necessary to remove the three 0.5mm screws. Note: the right-most orange circle should be placed instead of the red circle above the two larger orange circles - those are the 0.5mm screws which secures a small plate under the plastic cover which is in NOT physically (but electrically via two metal contacts) to the mainboard.
-
-
-
-
Use tweezers to gently disconnect the connections that run across the battery and are connected to the motherboard.
-
Proceed to gently remove the tape like connector from the battery until it is completely off.
-
Use tweezer to disconnect battery’s wire from the motherboard.
-
-
-
Use the plastic opening tool to gently pry the battery out of its casing for removal.
Using a Pry tool damaged a bit the casing of the battery. I ended up pulling the battery's plastic sticker to remove it (adhesive holding the battery in place)
Is it safe, can we fix the back cover perfectly?
-
-
-
With the battery removed locate the left-hand cable connected to the motherboard. With the tweezers, firmly grasp the wires of the connector and gently disconnect the cable from the motherboard.
-
Find the other cable connecting the motherboard to the device at the top right-hand side of the phone, and carefully use the tweezers to remove that as well.
-
-
-
Wedge the plastic opening tool, between the motherboard and the inner region of the phone in the slot atop the motherboard.
Do not just try to pry open!
Here you have to be careful, there are two plastic parts restraining the motherboard.
- If we use the above picture as reference, there is the first plastic piece in the top right corner: push it out of the way.
- Second piece of plastic: imagine the motherboard as a rectangle; the plastic piece is in the middle of the bottom segment.
- Push it out, pry out.
Also, in my phone, the mother board had a thin black cable connected to the down speaker.
EDIT: You can disconnect the cable by using a prying tool to gently "unclip" the connector.
-
-
-
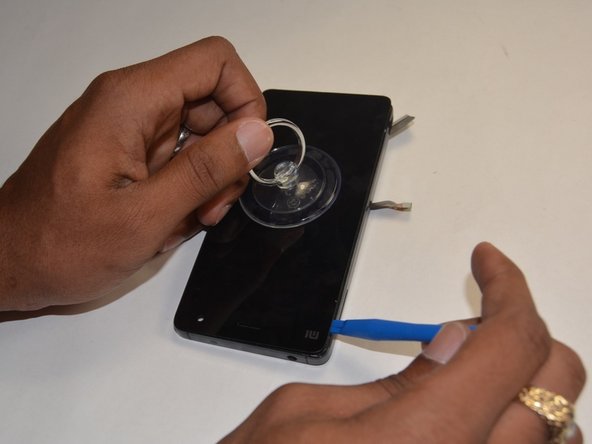
After removing your device's back cover, battery, and motherboard, turn your phone over to start removing the LCD screen.
-
Start by fixing the suction cup firmly on the screen. Then wedge a plastic opening tool around the perimeter of the screen while maintaining a pulling force on the suction cup.
-
-
-
Once you have pulled the screen completely off the device, there will be a ribbon wire that you previously detached from the motherboard that can be pulled gently through a hole.
-
Make sure you carefully dispose of the LCD screen if it is cracked in any way as to not be cut from the glass shards it may contain
-


To reassemble your device, follow these instructions in reverse order.
To reassemble your device, follow these instructions in reverse order.
Annuleren: ik heb deze handleiding niet afgemaakt.
50 andere personen hebben deze handleiding voltooid.

Team

USF Tampa, Team 16-1, Blackwell Winter 2016 Lid van USF Tampa, Team 16-1, Blackwell Winter 2016
USFT-BLACKWELL-W16S16G1
4 Leden
11 handleidingen geschreven
3 opmerkingen
This guide is completely useless. It skip passages like how to deal with the flash module, some ribbon cables to disconnect from the motherboard, the antenna, and most important of all, IT DOES NOT TELL YOU THAT YOU NEED A HEAT GUN FOR THE SCREEN REMOVAL. Terrible guide.
I've damaged some part of the silver coating( of the base plate) while trying to remove the existing screen module.Is that fine ?
I agree with Tobia above, this guide is far too lacking in details to be really useful. If you need to replace the screen (or even simply the battery) of your xiaomi mi 4, you bettere refere to this video guide: https://www.youtube.com/watch?v=A693MYIg...