Ga door naar hoofdinhoud

Deze handleiding heeft recentere wijzigingen. Schakel over naar de nieuwste niet-geverifieerde versie.

Xbox Power Board Replacement

Wat je nodig hebt

  1. Xbox Power Board Replacement, Hard Drive: stap 1, afbeelding 1 van 1
    • Make sure your Xbox is safely unplugged and is laying on a flat, stable surface.

  2. Xbox Power Board Replacement: stap 2, afbeelding 1 van 1
    • Turn the Xbox over to reveal the four rubber feet.

    • Use a metal spudger to pry off the four rubber feet.

    The screw is in the outside corner. If you pry up only the half of the foot on that side, you can easily remove the (very long) screw, and the foot will stay attached.

    Ian Butler - Antwoord

    Ah I always used to damage the feet.

    Andrew Veiga - Antwoord

  3. Xbox Power Board Replacement: stap 3, afbeelding 1 van 2 Xbox Power Board Replacement: stap 3, afbeelding 2 van 2
    • There are 2 more screws hidden under the two labels on the bottom of the case.

    • You can either remove the labels or simply feel for the screw holes through the labels and then cut or punch a hole through them.

    It is also easy to feel for the screw hole with your finger and then cut a hole, or punch it out with the tip of the Torx driver to reveal the screw.

    Ian Butler - Antwoord

  4. Xbox Power Board Replacement: stap 4, afbeelding 1 van 1
    • Remove the six T20 Torx screws securing the top cover to the bottom cover.

  5. Xbox Power Board Replacement: stap 5, afbeelding 1 van 2 Xbox Power Board Replacement: stap 5, afbeelding 2 van 2
    • Once the bottom and top shells are no longer attached, carefully turn the Xbox right-side-up, lift and remove the top cover.

  6. Xbox Power Board Replacement: stap 6, afbeelding 1 van 2 Xbox Power Board Replacement: stap 6, afbeelding 2 van 2
    • Remove the three 3 mm T10 screws securing the hard drive to the Xbox.

    • There is one screw on the rear left side of the hard drive that is only visible when the IDE ribbon cable is lifted up. The other two are at the front right and left sides of the hard drive.

    • The screw on the lower left corner of the disk drive is not in the hole that it appears to be in, but rather just closer to the corner.

  7. Xbox Power Board Replacement: stap 7, afbeelding 1 van 2 Xbox Power Board Replacement: stap 7, afbeelding 2 van 2
    • Free the hard drive power cable from the carrier for sufficient slack to lift the hard drive out.

    • Lift the plastic hard drive carrier out of the Xbox case.

  8. Xbox Power Board Replacement: stap 8, afbeelding 1 van 3 Xbox Power Board Replacement: stap 8, afbeelding 2 van 3 Xbox Power Board Replacement: stap 8, afbeelding 3 van 3
    • Remove the four 3.4 mm T15 Torx screws from the plastic hard drive carrier (two screws per side).

    • Carefully remove the hard drive from the plastic carrier. Gentle rocking will see the hard drive come out quite easily.

  9. Xbox Power Board Replacement: stap 9, afbeelding 1 van 2 Xbox Power Board Replacement: stap 9, afbeelding 2 van 2
    • Pull both the hard drive data ribbon cable and the power cable straight up from the hard drive.

    • They may be firmly seated, so be careful trying to remove them. DO NOT pull the wires as you may damage the cable assembly.

    Remember that the new drive will only work if it has been properly prepared, and the Xbox has been modified.

    Ian Butler - Antwoord

    there is NO way to legally replace the xbox hard drive. it is LOCKED to the motherboard and the xbox will not boot to the OS or make it past the BIOS if the HDD is not the one that came with it from the factory. you MUST use a mod chip and “home brew” to do a HDD swap and expect it to work

    James Vawter - Antwoord

    Could you point me to a good tutorial on using a modding an original Xbox? All I want to do is swap an HDD in original Xbox with another original Xbox HDD because I want my saved game data. Any way to figure this out? Seems like modding is a !&&* of a burden.

    michaelaugustin2000 -

    Can i replace the original hard drive with new one

    Andrew Veiga - Antwoord

  10. Xbox Power Board Replacement, Disc Drive: stap 10, afbeelding 1 van 3 Xbox Power Board Replacement, Disc Drive: stap 10, afbeelding 2 van 3 Xbox Power Board Replacement, Disc Drive: stap 10, afbeelding 3 van 3
    • Remove the disk drive. It should come right out.

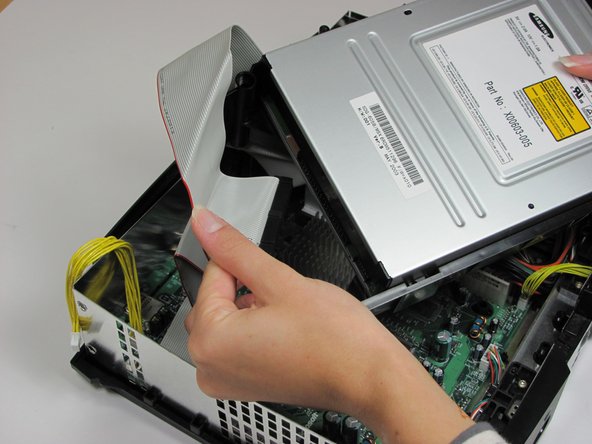
    • Unplug the ribbon cable and yellow cables from back of disk drive.

    I dont got the tools and i dont know how to do ut

    jacob lowery - Antwoord

  11. Xbox Power Board Replacement: stap 11, afbeelding 1 van 1
    • Pry back the black plastic tabs around the disk drive in order to remove it from its housing. Once removed, set the drive aside.

    • ONLY REMOVE IF DEAD!

    It is ok to remove the drive if it isn't dead. If repairs are required to the drive it needs to be removed from the drive's housing.

    Navy Vet 2015 - Antwoord

    Surely this needs to be removed to access the motherboard?

    Jonathan Cousins - Antwoord

    Yes, it does.

    Zerobuss -

  12. Xbox Power Board Replacement, Power Board: stap 12, afbeelding 1 van 1
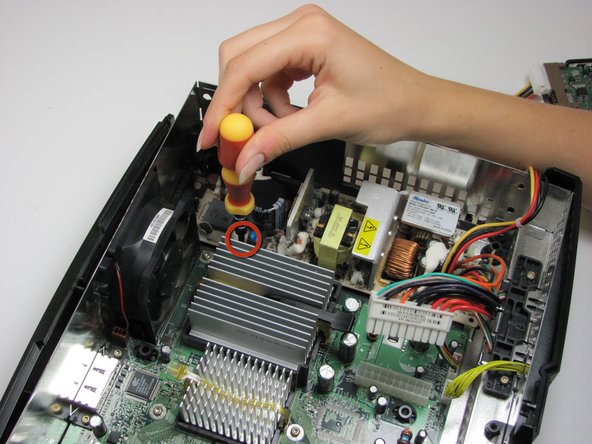
    • Unplug the multi-colored power cord from the motherboard. It is in there pretty tightly, so it may take some effort.

  13. Xbox Power Board Replacement: stap 13, afbeelding 1 van 2 Xbox Power Board Replacement: stap 13, afbeelding 2 van 2
    • Using T10 Torx screwdriver, remove two 3mm screws from the tan power supply board.

  14. Xbox Power Board Replacement: stap 14, afbeelding 1 van 1
    • Remove the power supply and set it aside. It should lift right out.

    • Be very careful not to touch the copper coil or capacitors on the power supply. They may shock you.

Conclusie

To reassemble your device, follow these instructions in reverse order.

34 andere personen hebben deze handleiding voltooid.

rmarstel

Lid sinds: 10/29/09

5.674 Reputatie

5 handleidingen geschreven

Team

Cal Poly, Team 18-2, Maness Fall 2009 Lid van Cal Poly, Team 18-2, Maness Fall 2009

CPSU-MANESS-F09S18G2

3 Leden

24 handleidingen geschreven

Één opmerking

http://www.ebay.com/gds/How-To-Determine...

Utilize the information on this website to determine what Xbox version you have so you know what replacement parts to look for.

Navy Vet 2015 - Antwoord

Voeg opmerking toe

Weergavestatistieken:

Afgelopen 24 uren: 8

Afgelopen 7 dagen: 42

Afgelopen 30 dagen: 178

Altijd: 33,251