Ga door naar hoofdinhoud

Xbox One X Project Scorpio Edition Outer Case Replacement

Wat je nodig hebt

  1. Xbox One X Project Scorpio Edition Outer Case Replacement, Outer Case: stap 1, afbeelding 1 van 2 Xbox One X Project Scorpio Edition Outer Case Replacement, Outer Case: stap 1, afbeelding 2 van 2
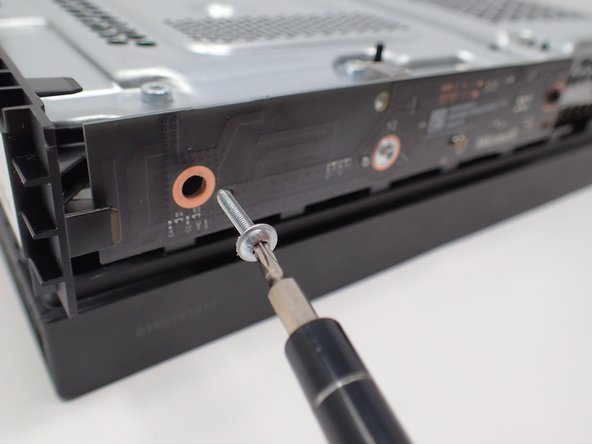
    • Use a T9 Torx screwdriver to remove the 13mm screw which is under and to the left of the power input.

  2. Xbox One X Project Scorpio Edition Outer Case Replacement: stap 2, afbeelding 1 van 3 Xbox One X Project Scorpio Edition Outer Case Replacement: stap 2, afbeelding 2 van 3 Xbox One X Project Scorpio Edition Outer Case Replacement: stap 2, afbeelding 3 van 3
    • Using precision tweezers, remove the screw tab located on opposite side of the box.

    • Use a T9 Torx screwdriver to remove the 13mm screw revealed underneath the tab.

  3. Xbox One X Project Scorpio Edition Outer Case Replacement: stap 3, afbeelding 1 van 3 Xbox One X Project Scorpio Edition Outer Case Replacement: stap 3, afbeelding 2 van 3 Xbox One X Project Scorpio Edition Outer Case Replacement: stap 3, afbeelding 3 van 3
    • Orient the case so that the front of the Xbox (the side with the power button) is facing you.

    • Remove the top of the case by sliding the case towards you.

  4. Xbox One X Project Scorpio Edition Outer Case Replacement: stap 4, afbeelding 1 van 3 Xbox One X Project Scorpio Edition Outer Case Replacement: stap 4, afbeelding 2 van 3 Xbox One X Project Scorpio Edition Outer Case Replacement: stap 4, afbeelding 3 van 3
    • Using a T9 Torx screwdriver, remove the two 15mm silver screws that are holding a circuit board/panel to the side of the interior metal casing.

    • Using the same screwdriver, remove the 9mm black screw located farther to the right on the same circuit board/panel.

  5. Xbox One X Project Scorpio Edition Outer Case Replacement: stap 5, afbeelding 1 van 2 Xbox One X Project Scorpio Edition Outer Case Replacement: stap 5, afbeelding 2 van 2
    • Remove the unscrewed panel from the side of the device by pulling it toward you.

    • Be mindful of the connector, as it is fragile.

  6. Xbox One X Project Scorpio Edition Outer Case Replacement: stap 6, afbeelding 1 van 2 Xbox One X Project Scorpio Edition Outer Case Replacement: stap 6, afbeelding 2 van 2
    • Pull the upper edge of the white clip down, and then remove the white connector from the dislocated panel using precision tweezers.

    • Do not force the connector out, as it is fragile. Wiggling may be necessary.

  7. Xbox One X Project Scorpio Edition Outer Case Replacement: stap 7, afbeelding 1 van 3 Xbox One X Project Scorpio Edition Outer Case Replacement: stap 7, afbeelding 2 van 3 Xbox One X Project Scorpio Edition Outer Case Replacement: stap 7, afbeelding 3 van 3
    • On the top of the device in the corner directly above the white connector, there is an oval plate held in place by two screws.

    • Remove both of these 7mm screws with a Torx T9 screwdriver.

    • Lift the detached plate off to the side.

    • The plate is still connected to the device.

  8. Xbox One X Project Scorpio Edition Outer Case Replacement: stap 8, afbeelding 1 van 2 Xbox One X Project Scorpio Edition Outer Case Replacement: stap 8, afbeelding 2 van 2
    • Use a Torx T9 screwdriver to remove the six 47mm long screws, which attach the bottom side of the outer case.

  9. Xbox One X Project Scorpio Edition Outer Case Replacement: stap 9, afbeelding 1 van 3 Xbox One X Project Scorpio Edition Outer Case Replacement: stap 9, afbeelding 2 van 3 Xbox One X Project Scorpio Edition Outer Case Replacement: stap 9, afbeelding 3 van 3
    • Turn the Xbox over, so that the bottom of the case is on top.

    • Lift the bottom of the case off of the Xbox by pulling it up and toward you.

Conclusie

To reassemble your device, follow these instructions in reverse order.

7 andere personen hebben deze handleiding voltooid.

Ashley Masuda

Lid sinds: 01/24/18

2.763 Reputatie

7 handleidingen geschreven

Team

Cal Poly, Team S2-G6, Livingston Winter 2018 Lid van Cal Poly, Team S2-G6, Livingston Winter 2018

CPSU-LIVINGSTON-W18S2G6

4 Leden

23 handleidingen geschreven

2 opmerkingen

Where do you get the outer case from? And if I only want to replace the outer case could I just follow the first 3 steps?

Daniel - Antwoord

Following. I need a replacement project Scorpio case. the system I got it from was from Mercari and the guy did a poor job in taking care of the case and I need a top Scorpio case.

Britteny X. Wilson -

Voeg opmerking toe

Weergavestatistieken:

Afgelopen 24 uren: 0

Afgelopen 7 dagen: 1

Afgelopen 30 dagen: 17

Altijd: 5,299