Ga door naar hoofdinhoud

Deze handleiding heeft recentere wijzigingen. Schakel over naar de nieuwste niet-geverifieerde versie.

Xbox One Wireless Controller Top Motherboard Replacement

Wat je nodig hebt

  1. Xbox One Wireless Controller Top Motherboard Replacement, Battery Pack: stap 1, afbeelding 1 van 1
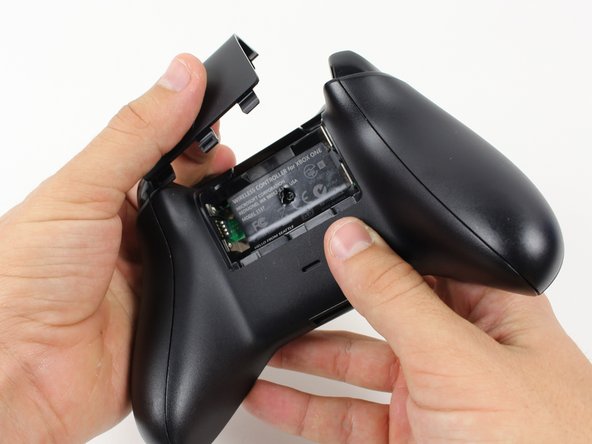
    • Remove the battery pack cover.

    • Remove batteries.

  2. Xbox One Wireless Controller Top Motherboard Replacement, Side Handles: stap 2, afbeelding 1 van 2 Xbox One Wireless Controller Top Motherboard Replacement, Side Handles: stap 2, afbeelding 2 van 2
    • We recommend using a nylon spudger for this step. A metal spudger is shown.

    • Grip the controller firmly to remove the side handles, wedging a spudger into the seam between the front and handle plates.

    • Pry the side plate away from the front plate by moving the spudger back and forth. You will need to do this all the way around the side plate's seam.

  3. Xbox One Wireless Controller Top Motherboard Replacement, Screws: stap 3, afbeelding 1 van 2 Xbox One Wireless Controller Top Motherboard Replacement, Screws: stap 3, afbeelding 2 van 2
    • There is a hidden screw located in the middle of the controller behind the label.

    • Use a screwdriver and punch a hole directly in the center of the label.

    • You may also lift the label if you do not want to puncture it.

    • Remove the five 10mm screws located on the back of the controller using the TR8 Security Torx Screwdriver.

  4. Xbox One Wireless Controller Top Motherboard Replacement, Backplate: stap 4, afbeelding 1 van 1
    • Remove the backplate.

  5. Xbox One Wireless Controller Top Motherboard Replacement, Faceplate: stap 5, afbeelding 1 van 1
    • Remove the faceplate.

  6. Xbox One Wireless Controller Top Motherboard Replacement, Top Motherboard: stap 6, afbeelding 1 van 2 Xbox One Wireless Controller Top Motherboard Replacement, Top Motherboard: stap 6, afbeelding 2 van 2
    • You may let the rumble motors hang freely out of their sockets.

    • De-solder the soldered joints while holding the red and black wires down on the top motherboard.

    • De-solder the black and gray wires that are attached to the top motherboard.

    • Remove the rumble motors and set them aside.

    • Be careful while using the soldering iron not to damage other components or hurt yourself.

    • For information on how to solder, click here.

  7. Xbox One Wireless Controller Top Motherboard Replacement: stap 7, afbeelding 1 van 1
    • Unscrew the two 7mm T6 screws located near the rumble motor sockets.

  8. Xbox One Wireless Controller Top Motherboard Replacement: stap 8, afbeelding 1 van 1
    • Firmly grip sides of motherboard near the middle.

    • Lift upwards while slightly wiggling the motherboard forward and backward.

    • Lifting the motherboard will require some force.

Conclusie

To reassemble your device, follow these instructions in reverse order.

28 andere personen hebben deze handleiding voltooid.

Liam Gow

Lid sinds: 01/22/15

5.285 Reputatie

3 handleidingen geschreven

Team

Cal Poly, Team 20-15, Maness Winter 2015 Lid van Cal Poly, Team 20-15, Maness Winter 2015

CPSU-MANESS-W15S20G15

5 Leden

50 handleidingen geschreven

6 opmerkingen

where can i get a top motherborde replacement??

Lol John - Antwoord

Hi John,

Unfortunately, beyond the parts list given on the main page, I don't know of any other reliable links. I'd suggest Googling the part, or maybe searching on eBay.

Liam Gow -

I was only able to unscrew 2 of the Torx screws. They have a pin right in the middle that doesn't allow for the screwdriver to be fully inserted, or at all. The two screws I was able to unscrew must've had a shorter pin than the others.

Rami Girgis - Antwoord

These points on the head is what we call a security torx screw. You will need the specific T8 or T6 Security Torx Screwdriver to remove these screws.

jbagge0023 -

You can use a small flat blade screwdriver ;-)

If any of the screws are tight, the centre pin may snap, then you can just use a normal Torx bit.
Lee Houston -

Voeg opmerking toe

Weergavestatistieken:

Afgelopen 24 uren: 7

Afgelopen 7 dagen: 49

Afgelopen 30 dagen: 259

Altijd: 75,691