Ga door naar hoofdinhoud

Xbox One Wireless Controller Thumbstick Replacement

Wat je nodig hebt

  1. Xbox One Wireless Controller Thumbstick Replacement, Battery Pack: stap 1, afbeelding 1 van 1
    • Remove the battery pack cover.

    • Remove batteries.

  2. Xbox One Wireless Controller Thumbstick Replacement, Side Handles: stap 2, afbeelding 1 van 2 Xbox One Wireless Controller Thumbstick Replacement, Side Handles: stap 2, afbeelding 2 van 2
    • We recommend using a nylon spudger for this step. A metal spudger is shown.

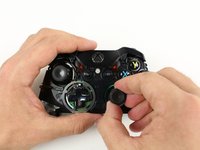
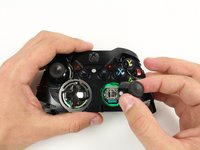
    • Grip the controller firmly to remove the side handles, wedging a spudger into the seam between the front and handle plates.

    • Pry the side plate away from the front plate by moving the spudger back and forth. You will need to do this all the way around the side plate's seam.

  3. Xbox One Wireless Controller Thumbstick Replacement, Screws: stap 3, afbeelding 1 van 2 Xbox One Wireless Controller Thumbstick Replacement, Screws: stap 3, afbeelding 2 van 2
    • There is a hidden screw located in the middle of the controller behind the label.

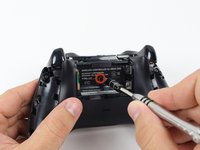
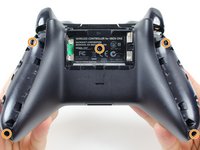
    • Use a screwdriver and punch a hole directly in the center of the label.

    • You may also lift the label if you do not want to puncture it.

    • Remove the five 10mm screws located on the back of the controller using the TR8 Security Torx Screwdriver.

  4. Xbox One Wireless Controller Thumbstick Replacement, Backplate: stap 4, afbeelding 1 van 1
    • Remove the backplate.

  5. Xbox One Wireless Controller Thumbstick Replacement, Faceplate: stap 5, afbeelding 1 van 1
    • Remove the faceplate.

  6. Xbox One Wireless Controller Thumbstick Replacement, Thumbstick: stap 6, afbeelding 1 van 2 Xbox One Wireless Controller Thumbstick Replacement, Thumbstick: stap 6, afbeelding 2 van 2
    • Remove thumbsticks by pulling them up off their poles.

Conclusie

To reassemble your device, follow these instructions in reverse order.

188 andere personen hebben deze handleiding voltooid.

Garrett George

Lid sinds: 01/22/15

6.151 Reputatie

3 handleidingen geschreven

Team

Cal Poly, Team 20-15, Maness Winter 2015 Lid van Cal Poly, Team 20-15, Maness Winter 2015

CPSU-MANESS-W15S20G15

5 Leden

50 handleidingen geschreven

30 opmerkingen

Is there any advice for a controller that has had this repair, but continues to drift? I have done this repair successfully many times, and now i have a controller that (with 2 different replacement parts) continues to drift.

Is there a reset or config I can do?

Jim - Antwoord

Drift issues are a different problem you would need to solder a new joystick box to fix that this is for loose or damaged thumb sticks

myhero667 -

I used a cotton ball on my Xbox one Elite to fix drifting issues.

ajcroyle -

Does anyone know the correct SKU for the joystick box for the Model 1537 in particular? And any link to purchase it. Thanks

ZuYao -

Can i apply 2 thumbsticks off the xbox 360 controller when i removed them?

Merlijn Fransen - Antwoord

Voeg opmerking toe

Weergavestatistieken:

Afgelopen 24 uren: 55

Afgelopen 7 dagen: 362

Afgelopen 30 dagen: 1,728

Altijd: 365,760