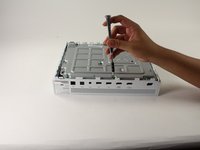
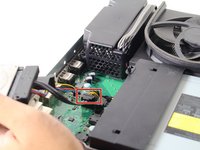
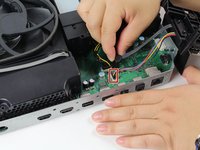
Ga door naar hoofdinhoud

Xbox One S Optical Drive Assembly

Wat je nodig hebt

  1. Xbox One S Optical Drive Assembly, Case: stap 1, afbeelding 1 van 1
    • Flip the Xbox One S so that the bottom of the case is facing upward.

  2. Xbox One S Optical Drive Assembly: stap 2, afbeelding 1 van 1
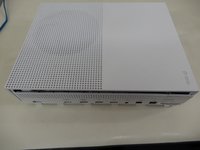
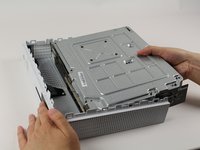
    • Begin by working at the case on the rear where the warranty sticker is located. Insert the plastic opening tool into the gap between the bottom of the case and the grated top side. Then find the clips in between that hold the case in place. Use the opening tool to pop the clips out. The best method is to pry the black case away from the bottom.

    • Use the opening tool to pop the clips out. The best method is to pry the black case away from the bottom.

    • You will hear clicking sounds when you are prying the case open. It may be fairly difficult to remove the bottom.

    • It's possible that the clips may break when you remove the bottom from the case.

    • We recommend starting at the back where the warranty sticker is located. Pry along the rear edge until all clips are free. From there do each side. When three sides are free start at the end of the front opposite the sync button. Be cautious and take your time and all should separate without any damage.

  3. Xbox One S Optical Drive Assembly: stap 3, afbeelding 1 van 1
    • Once all of the clips are opened, remove the bottom part of the case.

  4. Xbox One S Optical Drive Assembly: stap 4, afbeelding 1 van 2 Xbox One S Optical Drive Assembly: stap 4, afbeelding 2 van 2
    • Use a T10 Torx screwdriver to remove the six green 50 mm long screws from the metal case labeled F1 through F6.

  5. Xbox One S Optical Drive Assembly: stap 5, afbeelding 1 van 2 Xbox One S Optical Drive Assembly: stap 5, afbeelding 2 van 2
    • Gently separate the interior case from the white exterior case using the appropriate method.

    • Pry the white plastic sides outwards at the rear to separate from the plastic I/O shield

  6. Xbox One S Optical Drive Assembly, Interior Case Top Panel: stap 6, afbeelding 1 van 1
    • Flip the interior case so it is fan side upward.

  7. Xbox One S Optical Drive Assembly: stap 7, afbeelding 1 van 1
    • To access the hardware within the casing, you can pop and lift the top panel of the casing. It should come right off.

  8. Xbox One S Optical Drive Assembly, Hard Drive Assembly: stap 8, afbeelding 1 van 2 Xbox One S Optical Drive Assembly, Hard Drive Assembly: stap 8, afbeelding 2 van 2
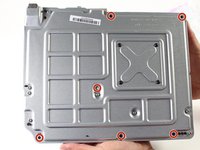
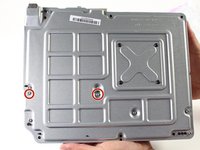
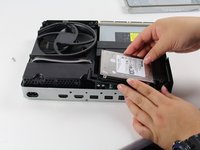
    • To replace the hard drive, flip over the console and remove the two 10 mm T-10 Torx screws, C3 and C5, from the backside of the Xbox One S.

    • Some models may require C4 and C5.

    • This will allow the plastic casing surrounding the hard drive to become detached from the rest of the console.

  9. Xbox One S Optical Drive Assembly: stap 9, afbeelding 1 van 3 Xbox One S Optical Drive Assembly: stap 9, afbeelding 2 van 3 Xbox One S Optical Drive Assembly: stap 9, afbeelding 3 van 3
    • Gently disconnect the hard drive from the motherboard (at the two plastic connector bodies).

  10. Xbox One S Optical Drive Assembly, Optical Drive Assembly: stap 10, afbeelding 1 van 1
    • To remove the optical disc drive, remove the silver 10 mm T-10 Torx screw labeled "C4."

  11. Xbox One S Optical Drive Assembly: stap 11, afbeelding 1 van 1
    • Pull the disc drive slightly off the motherboard and disconnect the plastic connectors from the motherboard.

Conclusie

To reassemble your device, follow these instructions in reverse order.

19 andere personen hebben deze handleiding voltooid.

Victoria Law

Lid sinds: 04/26/17

973 Reputatie

3 handleidingen geschreven

Team

Cal Poly, Team S22-G3, Livingston Spring 2017 Lid van Cal Poly, Team S22-G3, Livingston Spring 2017

CPSU-LIVINGSTON-S17S22G3

4 Leden

56 handleidingen geschreven

2 opmerkingen

alles schwachsinn: habe an meiner xbox one s dfas optische Laufwerk ausgetauscht ,da beim alten die spiele immer einfrohren .Alles nach Anleitung wie hier beschrieben . nun geht Garnichts mehr , kein bild kein ton geschweige noch ein spiel neu zu installiren .

siegfrieheide - Antwoord

Das Problem ist, dass Microsoft das Laufwerk und die Hauptplatine “verheiratet" hat. Man kann also nur ein Laufwerk mitsamt der zugehörigen Hauptplatine austauschen.

VauWeh - Antwoord

Voeg opmerking toe

Weergavestatistieken:

Afgelopen 24 uren: 1

Afgelopen 7 dagen: 17

Afgelopen 30 dagen: 80

Altijd: 8,984