Ga door naar hoofdinhoud

Wat je nodig hebt

Deze demontage is geen reparatiehandleiding. Om je Xbox One Elite Controller (Model 1698) te repareren, gebruik onze reparatiehandleidingen.

  1. Xbox One Elite Controller (Model 1698) teardown, Remove The Battery, Thumbsticks, and D-pad: stap 1, afbeelding 1 van 3 Xbox One Elite Controller (Model 1698) teardown, Remove The Battery, Thumbsticks, and D-pad: stap 1, afbeelding 2 van 3 Xbox One Elite Controller (Model 1698) teardown, Remove The Battery, Thumbsticks, and D-pad: stap 1, afbeelding 3 van 3
    • Expel the remaining electricity by pushing and holding the home button down for several seconds once the battery has been removed.

    • This is done to ensure there are no electrical discharges during the teardown that could harm you or the components.

    • Removing the thumbsticks and D-pad will make the rest of the teardown smoother.

  2. Xbox One Elite Controller (Model 1698) teardown, Removing The Rear Grips: stap 2, afbeelding 1 van 3 Xbox One Elite Controller (Model 1698) teardown, Removing The Rear Grips: stap 2, afbeelding 2 van 3 Xbox One Elite Controller (Model 1698) teardown, Removing The Rear Grips: stap 2, afbeelding 3 van 3
    • Using a soft pry tool, start from the top near the triggers and work your way down prying, and loosening the grips until they are removed.

    • Double-sided tape and snaps are used to attach this part to the rear housing case. Extra force is required to remove this part. Be cautious and work slowly as not to break any plastic snaps on the grips during removal.

    • You can take the time to clean the rear grips now or wait till the tear down is complete.

  3. Xbox One Elite Controller (Model 1698) teardown, Removing The Front Housing Shell: stap 3, afbeelding 1 van 3 Xbox One Elite Controller (Model 1698) teardown, Removing The Front Housing Shell: stap 3, afbeelding 2 van 3 Xbox One Elite Controller (Model 1698) teardown, Removing The Front Housing Shell: stap 3, afbeelding 3 van 3
    • Remove the 4 T8 screws that were covered by the rear grips.

    • Remove the T8 screw behind the sticker in the battery compartment.

    • If you want to preserve the sticker carefully work the corner of the sticker free with the pry tool until it can be grabbed with you fingers, and work the the rest of the top of the sticker free and slowly peel it downward until the screw is exposed.

    • If done slowly and carefully, the sticker won't be deformed. Allowing it to be replaced by sliding a finger from the bottom part of the sticker still attached to the rear housing and moving upward during reassembly.

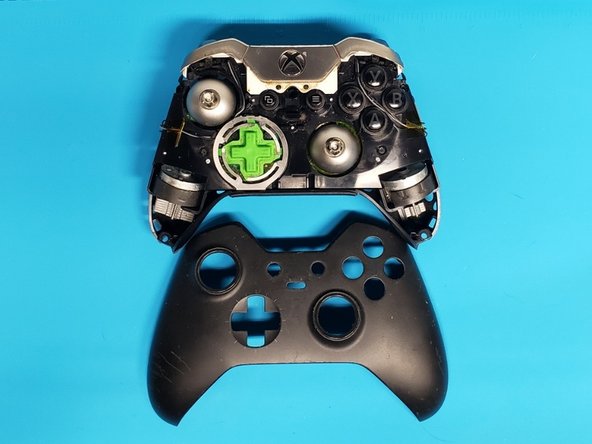
    • Wiggle the edges of the front housing shell to work it free. It will then come off with little effort.

  4. Xbox One Elite Controller (Model 1698) teardown, Remove The Joysticks and The Selector Switch: stap 4, afbeelding 1 van 2 Xbox One Elite Controller (Model 1698) teardown, Remove The Joysticks and The Selector Switch: stap 4, afbeelding 2 van 2
    • Remove the joysticks and selector switch.

  5. Xbox One Elite Controller (Model 1698) teardown, Removing The Rear Housing Shell: stap 5, afbeelding 1 van 2 Xbox One Elite Controller (Model 1698) teardown, Removing The Rear Housing Shell: stap 5, afbeelding 2 van 2
    • The audio input jack catches on the rear housing shell. Lightly pry the shell around the jack while pulling up on the midframe to remove it.

  6. Xbox One Elite Controller (Model 1698) teardown, Disconnect The Midframe Ribbon Cable From The Rear Housing Shell: stap 6, afbeelding 1 van 2 Xbox One Elite Controller (Model 1698) teardown, Disconnect The Midframe Ribbon Cable From The Rear Housing Shell: stap 6, afbeelding 2 van 2
    • Wiggle and pull the ribbon away from the connector.

  7. Xbox One Elite Controller (Model 1698) teardown, Removing The Components From The Midframe Housing: stap 7, afbeelding 1 van 3 Xbox One Elite Controller (Model 1698) teardown, Removing The Components From The Midframe Housing: stap 7, afbeelding 2 van 3 Xbox One Elite Controller (Model 1698) teardown, Removing The Components From The Midframe Housing: stap 7, afbeelding 3 van 3
    • Remove the retaining ring and the D-pad.

    • The retaining ring is clipped in. Lightly pull back and up to remove.

    • Make sure that the top of the retaining ring is detached before trying to remove it completely so as not to deform the part.

    • Remove the bumpers by pushing down on the ends and lifting outward to unclip them. Then, holding from the middle, wiggle the rest free while pushing the home button down.

  8. Xbox One Elite Controller (Model 1698) teardown, Removing The Daughterboard: stap 8, afbeelding 1 van 3 Xbox One Elite Controller (Model 1698) teardown, Removing The Daughterboard: stap 8, afbeelding 2 van 3 Xbox One Elite Controller (Model 1698) teardown, Removing The Daughterboard: stap 8, afbeelding 3 van 3
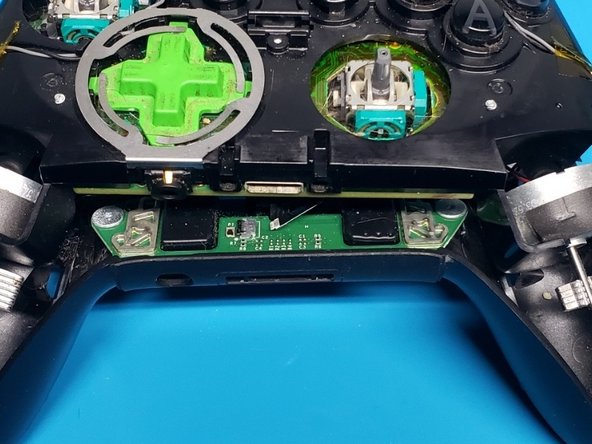
    • Desolder both sets of rumble motor wires and trigger wires from the back of the daughter board.

    • Take a picture of the wire orientation for when it is time to resolder these connections, so you know which wires are positive and negative.

    • Remove the 2 T6 screws from the back of the daughterboard

    • Slowly and carefully work the pry tool evenly around the daughterboard, and between the midframe Lightly pulling out on it until it disconnects.

    • Set the audio input jack aside

  9. Xbox One Elite Controller (Model 1698) teardown, Removing The Main Board: stap 9, afbeelding 1 van 3 Xbox One Elite Controller (Model 1698) teardown, Removing The Main Board: stap 9, afbeelding 2 van 3 Xbox One Elite Controller (Model 1698) teardown, Removing The Main Board: stap 9, afbeelding 3 van 3
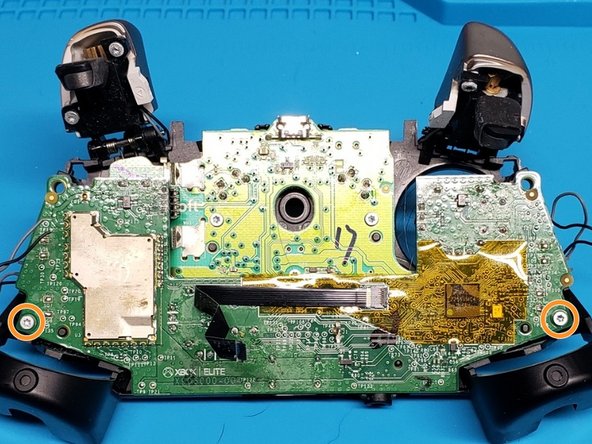
    • Remove the 6 T6 screws from the main board.

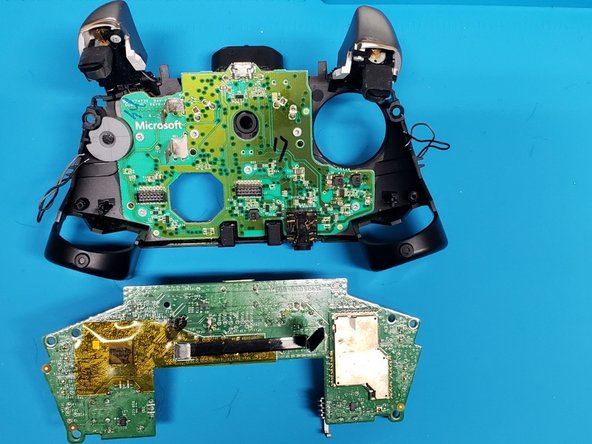
    • Once the screws are removed, the board can be pulled straight out and set to the side.

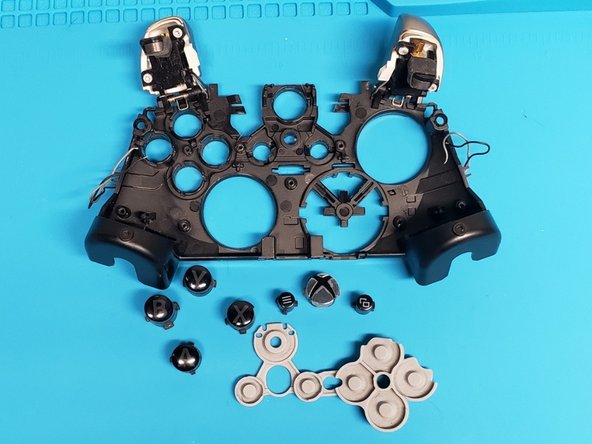
    • Remove the grey rubber button backing and remove the buttons, and move them to the side.

Camron Corcoran

Lid sinds: 02/09/23

169 Reputatie

1 Handleiding geschreven

0 opmerkingen

Voeg opmerking toe

Weergavestatistieken:

Afgelopen 24 uren: 5

Afgelopen 7 dagen: 43

Afgelopen 30 dagen: 139

Altijd: 1,849