Ga door naar hoofdinhoud

Wyze Cam V2 Microphone Replacement

Wat je nodig hebt

  1. Wyze Cam V2 Microphone Replacement, Back Panel: stap 1, afbeelding 1 van 1
    • Open up the camera stand to expose the bottom plate of the camera.

    • Remove two 4 mm silver screws using the Phillips #0 screwdriver.

  2. Wyze Cam V2 Microphone Replacement: stap 2, afbeelding 1 van 1
    • Using the iFixit opening tool, carefully pry open the bottom plate to gain access to the camera's internals.

  3. Wyze Cam V2 Microphone Replacement: stap 3, afbeelding 1 van 2 Wyze Cam V2 Microphone Replacement: stap 3, afbeelding 2 van 2
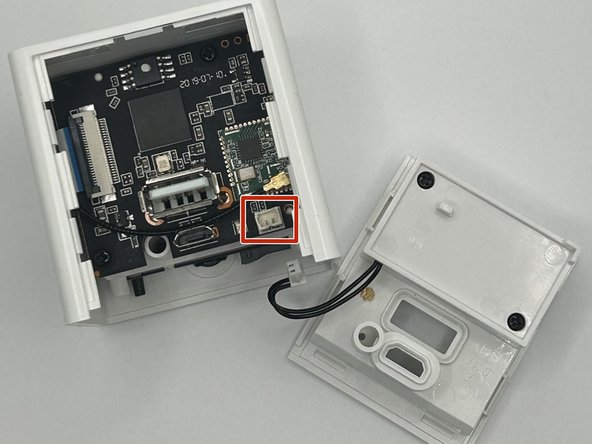
    • Open up the back panel using the iFixit opening tool and unclip the panel from the rest of the device.

    • Be careful of the charging port while taking it off.

  4. Wyze Cam V2 Microphone Replacement: stap 4, afbeelding 1 van 2 Wyze Cam V2 Microphone Replacement: stap 4, afbeelding 2 van 2
    Gereedschap gebruikt in deze stap:
    Tweezers
    $3.99
    Koop
  5. Wyze Cam V2 Microphone Replacement, Motherboard: stap 5, afbeelding 1 van 1
    • Remove the single 6 mm screw located deep inside the device using a Phillips #000 screwdriver.

    • Carefully remove the motherboard from the device.

  6. Wyze Cam V2 Microphone Replacement: stap 6, afbeelding 1 van 1
    • Remove the remaining two 6 mm screws from the motherboard with a Phillips #0 screwdriver.

  7. Wyze Cam V2 Microphone Replacement: stap 7, afbeelding 1 van 1
    Gereedschap gebruikt in deze stap:
    Tweezers
    $4.99
    Koop
    • Using the precision tweezers, detach the charging port’s motherboard from the camera’s motherboard.

  8. Wyze Cam V2 Microphone Replacement, Microphone: stap 8, afbeelding 1 van 1
    • On the camera's motherboard locate the microphone labeled "MIC1".

  9. Wyze Cam V2 Microphone Replacement: stap 9, afbeelding 1 van 1
    • Desolder the iron piece holding down the microphone to the motherboard.

  10. Wyze Cam V2 Microphone Replacement: stap 10, afbeelding 1 van 1
    • Carefully detach the microphone from the motherboard.

Conclusie

To reassemble your device, follow these instructions in reverse order.

Oluajo

Lid sinds: 09/12/23

243 Reputatie

2 handleidingen geschreven

0 opmerkingen

Voeg opmerking toe

Weergavestatistieken:

Afgelopen 24 uren: 0

Afgelopen 7 dagen: 0

Afgelopen 30 dagen: 7

Altijd: 67