Ga door naar hoofdinhoud

Wii U GamePad Camera Replacement

Gearchiveerde handleiding
Deze handleiding wordt enkel nog bijgehouden voor historische doeleinden. Gebruik de laatste versie van deze gids om uw reparatie uit te voeren.

Wat je nodig hebt

  1. Wii U GamePad Camera Replacement, Battery: stap 1, afbeelding 1 van 1
    • Place Gamepad face down and remove the two 4.7 mm screws with a Phillips size #00 screwdriver.

  2. Wii U GamePad Camera Replacement: stap 2, afbeelding 1 van 1
    • Lift and remove the battery plate.

  3. Wii U GamePad Camera Replacement: stap 3, afbeelding 1 van 3 Wii U GamePad Camera Replacement: stap 3, afbeelding 2 van 3 Wii U GamePad Camera Replacement: stap 3, afbeelding 3 van 3
    • With your finger, press down and pull back on the battery connector plug.

    • Remove the battery from the battery case.

  4. Wii U GamePad Camera Replacement, Outer Case: stap 4, afbeelding 1 van 3 Wii U GamePad Camera Replacement, Outer Case: stap 4, afbeelding 2 van 3 Wii U GamePad Camera Replacement, Outer Case: stap 4, afbeelding 3 van 3
    • Remove 10 9mm screws with Tri-Wing size Y1 screwdriver around the outer case.

    • Lift up on the back of case.

    • Lift gently because the rumble motor in the back of the case is still connected by a cable to the motherboard.

  5. Wii U GamePad Camera Replacement: stap 5, afbeelding 1 van 1
    • Unplug outer case rumble motor connector from the motherboard with your fingers.

    • Do not pull on the wires as shown in this picture, they will likely break off. Pull directly on the plug (NOT the receptacle)

  6. Wii U GamePad Camera Replacement, Speakers: stap 6, afbeelding 1 van 2 Wii U GamePad Camera Replacement, Speakers: stap 6, afbeelding 2 van 2
    • With your fingers, unplug the left speaker cable from the motherboard.

  7. Wii U GamePad Camera Replacement: stap 7, afbeelding 1 van 2 Wii U GamePad Camera Replacement: stap 7, afbeelding 2 van 2
    Gereedschap gebruikt in deze stap:
    Tweezers
    $4.99
    Koop
    • Remove the right speaker cable that's connected to the motherboard with the tweezers.

  8. Wii U GamePad Camera Replacement, WiFi: stap 8, afbeelding 1 van 3 Wii U GamePad Camera Replacement, WiFi: stap 8, afbeelding 2 van 3 Wii U GamePad Camera Replacement, WiFi: stap 8, afbeelding 3 van 3
    Gereedschap gebruikt in deze stap:
    Tweezers
    $4.99
    Koop
    • Open the top and bottom clasp that connects the white flex cable to the motherboard with the tweezer.

    • Remove the white flex cable with the tweezers.

  9. Wii U GamePad Camera Replacement: stap 9, afbeelding 1 van 2 Wii U GamePad Camera Replacement: stap 9, afbeelding 2 van 2
    • With your fingers, lift and remove WiFi board.

    • Remove the board carefully as there are still two wires attached.

  10. Wii U GamePad Camera Replacement: stap 10, afbeelding 1 van 2 Wii U GamePad Camera Replacement: stap 10, afbeelding 2 van 2
    • Disconnect the black and white wires off of the back of the WiFi module.

  11. Wii U GamePad Camera Replacement: stap 11, afbeelding 1 van 1
    • Lift and remove the WiFi module.

  12. Wii U GamePad Camera Replacement, Motherboard: stap 12, afbeelding 1 van 1
    Gereedschap gebruikt in deze stap:
    Tweezers
    $4.99
    Koop
    • Disconnect the analog connector with tweezers.

  13. Wii U GamePad Camera Replacement: stap 13, afbeelding 1 van 2 Wii U GamePad Camera Replacement: stap 13, afbeelding 2 van 2
    • Remove the blue connector using tweezers.

  14. Wii U GamePad Camera Replacement: stap 14, afbeelding 1 van 2 Wii U GamePad Camera Replacement: stap 14, afbeelding 2 van 2
    • Carefully lift the black clasp. It is prone to breaking if only lifted from one point. Remove the brown ribbon by using the tweezers.

    • Unclasp and release the small digitizer ribbon cable to the left of the brown ribbon. Be careful, the clasp breaks easily.

  15. Wii U GamePad Camera Replacement: stap 15, afbeelding 1 van 1
    • Remove the small orange ribbon with the tweezers.

  16. Wii U GamePad Camera Replacement: stap 16, afbeelding 1 van 3 Wii U GamePad Camera Replacement: stap 16, afbeelding 2 van 3 Wii U GamePad Camera Replacement: stap 16, afbeelding 3 van 3
    • Remove these two connectors to the motherboard with your fingers.

  17. Wii U GamePad Camera Replacement: stap 17, afbeelding 1 van 2 Wii U GamePad Camera Replacement: stap 17, afbeelding 2 van 2
    • Remove the NFC communicator.

    • When removing the NFC communicator, be careful with the small connector on the back side.

    • Remove the small connector plug-in on the back.

  18. Wii U GamePad Camera Replacement: stap 18, afbeelding 1 van 3 Wii U GamePad Camera Replacement: stap 18, afbeelding 2 van 3 Wii U GamePad Camera Replacement: stap 18, afbeelding 3 van 3
    • Remove the remaining three 5.1 mm screws using the Phillips size #0 screwdriver.

    • Lift and remove the mother board.

  19. Wii U GamePad Camera Replacement, Camera: stap 19, afbeelding 1 van 2 Wii U GamePad Camera Replacement, Camera: stap 19, afbeelding 2 van 2
    Gereedschap gebruikt in deze stap:
    Tweezers
    $4.99
    Koop
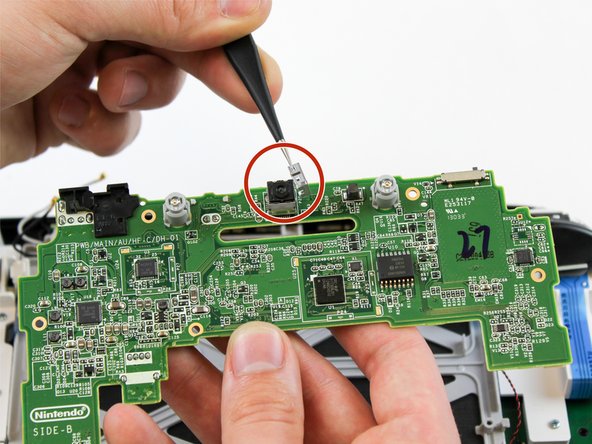
    • Flip motherboard over.

    • Remove the metal housing around the camera with tweezers.

  20. Wii U GamePad Camera Replacement: stap 20, afbeelding 1 van 1
    • Pull the camera out using the tweezers.

Conclusie

To reassemble your device, follow these instructions in reverse order.

Valentina Cerruty

Lid sinds: 02/10/16

3.369 Reputatie

7 handleidingen geschreven

Team

USF Tampa, Team 1-6, Sullivan Spring 2016 Lid van USF Tampa, Team 1-6, Sullivan Spring 2016

USFT-SULLIVAN-S16S1G6

4 Leden

40 handleidingen geschreven

0 opmerkingen

Voeg opmerking toe

Weergavestatistieken:

Afgelopen 24 uren: 1

Afgelopen 7 dagen: 7

Afgelopen 30 dagen: 46

Altijd: 2,092