Ga door naar hoofdinhoud

Deze vertaling geeft mogelijk niet de meest recente updates van de bronhandleiding weer. Help ons met het updaten van de vertaling of bekijk de bronhandleiding.

Why! NH57ADS Fan and Heatsink Removal

Wat je nodig hebt

  1. Why! NH57ADS Fan and Heatsink Removal, Battery: stap 1, afbeelding 1 van 3 Why! NH57ADS Fan and Heatsink Removal, Battery: stap 1, afbeelding 2 van 3 Why! NH57ADS Fan and Heatsink Removal, Battery: stap 1, afbeelding 3 van 3
    • Remove the two screws holding the battery in place.

    • Slip your finger into the finger hole provided at the top of the battery and lift to remove it.

  2. Why! NH57ADS Fan and Heatsink Removal, Bottom Cover: stap 2, afbeelding 1 van 3 Why! NH57ADS Fan and Heatsink Removal, Bottom Cover: stap 2, afbeelding 2 van 3 Why! NH57ADS Fan and Heatsink Removal, Bottom Cover: stap 2, afbeelding 3 van 3
    • Remove the five Phillips screws securing the bottom to the case.

    • Slide the cover up slightly to release the catches holding it in place. This is the view on the right. The mark on the cover should now line up with the second mark on the case of the computer.

  3. Why! NH57ADS Fan and Heatsink Removal, Removing the Bottom Cover: stap 3, afbeelding 1 van 3 Why! NH57ADS Fan and Heatsink Removal, Removing the Bottom Cover: stap 3, afbeelding 2 van 3 Why! NH57ADS Fan and Heatsink Removal, Removing the Bottom Cover: stap 3, afbeelding 3 van 3
    • This is the view on the left before and after sliding the cover. The mark on the cover should now line up with the second mark on the case of the computer.

    • Lift the bottom cover to remove it.

  4. Why! NH57ADS Fan and Heatsink Removal, Fan: stap 4, afbeelding 1 van 3 Why! NH57ADS Fan and Heatsink Removal, Fan: stap 4, afbeelding 2 van 3 Why! NH57ADS Fan and Heatsink Removal, Fan: stap 4, afbeelding 3 van 3
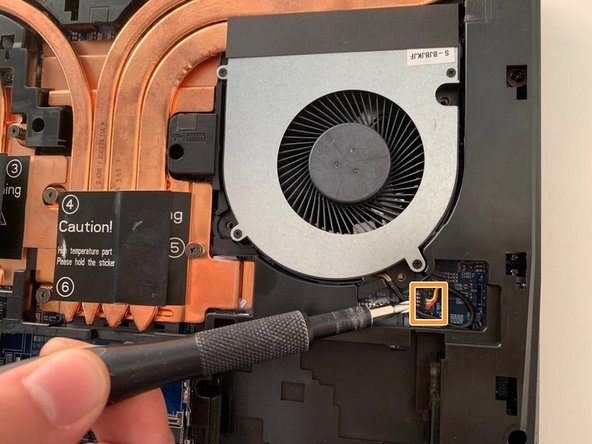
    • Remove the three Phillips screws securing the fan on the right.

    • Carefully unplug the fan's power connector.

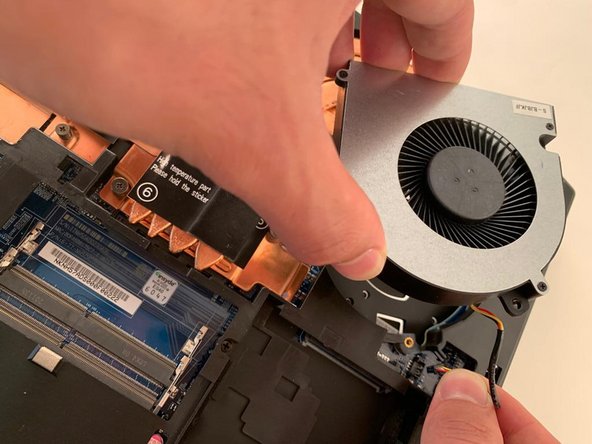
    • Remove the first fan.

  5. Why! NH57ADS Fan and Heatsink Removal, Fan and Heatsink Assembly: stap 5, afbeelding 1 van 3 Why! NH57ADS Fan and Heatsink Removal, Fan and Heatsink Assembly: stap 5, afbeelding 2 van 3 Why! NH57ADS Fan and Heatsink Removal, Fan and Heatsink Assembly: stap 5, afbeelding 3 van 3
    • Remove the two Phillips screws securing the left hand fan.

    • Remove the six Phillips heatsink retaining screws .

    • Carefully unplug the fan's power connector.

    • Using the two black tabs as handles, lift and remove the heatsink.

Conclusie

To reassemble your device, follow the instructions in reverse order.

Met dank aan deze vertalers:

fr en

50%

Jerry Wheeler helpt ons de wereld te herstellen! Wil je bijdragen?
Begin met vertalen ›

Felice Suglia

Lid sinds: 06/15/13

31.100 Reputatie

264 handleidingen geschreven

0 opmerkingen

Voeg opmerking toe

Weergavestatistieken:

Afgelopen 24 uren: 2

Afgelopen 7 dagen: 3

Afgelopen 30 dagen: 9

Altijd: 98