Deze versie kan foutieve bewerkingen bevatten. Schakel over naar de recentste gecontroleerde momentopname.
Wat je nodig hebt
-
Deze stap is niet vertaald. Help het te vertalen
-
Locate the battery panel that is centered between the three leg supports at the bottom of the drum set.
-
-
Deze stap is niet vertaald. Help het te vertalen
-
To remove the battery panel, loosen the 10 mm panel screw using a flathead 4.0 screwdriver.
-
-
Deze stap is niet vertaald. Help het te vertalen
-
Using your fingers, pry open and remove the back battery panel.
-
-
Deze stap is niet vertaald. Help het te vertalen
-
Use your fingers to remove each battery from its housing.
-
-
Deze stap is niet vertaald. Help het te vertalen
-
Using a Phillips #2 screwdriver, loosen and remove the six 14 mm screws.
-
-
-
Deze stap is niet vertaald. Help het te vertalen
-
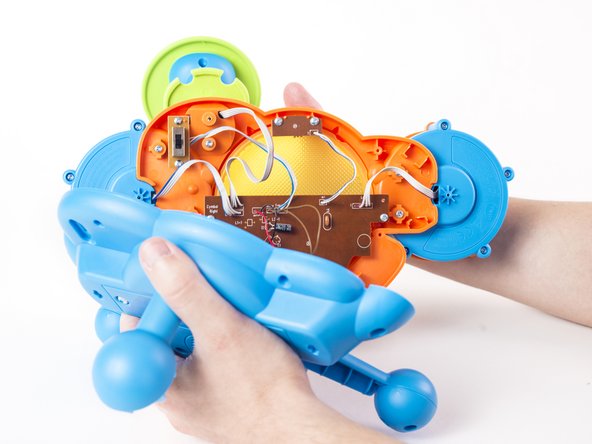
With your hands, separate the bottom panel from the drum set.
-
-
Deze stap is niet vertaald. Help het te vertalen
-
Use Phillips #2 screwdriver to loosen and remove the single 16 mm screw.
-
-
Deze stap is niet vertaald. Help het te vertalen
-
Using your hands, remove the blue cymbal stand from the orange base.
-
-
Deze stap is niet vertaald. Help het te vertalen
-
Loosen and remove the two 14 mm screws using a Phillips #2 screwdriver.
-
-
Deze stap is niet vertaald. Help het te vertalen
-
Using your hands, separate the two halves of the blue cymbal stand.
-
-
Deze stap is niet vertaald. Help het te vertalen
-
Using your hands, separate the green cymbal from the blue cymbal base.
-
-
Deze stap is niet vertaald. Help het te vertalen
-
Using a Phillips #00 screwdriver, loosen and remove the three 12 mm screws located on the bottom of the green cymbal.
-
-
Deze stap is niet vertaald. Help het te vertalen
-
Using your hands, separate the green cymbal from the green cymbal base.
-
-
Deze stap is niet vertaald. Help het te vertalen
-
Using your hands, pull apart the green cymbal from the yellow light casing.
-


Annuleren: ik heb deze handleiding niet afgemaakt.
Één andere persoon heeft deze handleiding voltooid.
Team

USF Tampa, Team 2-8, Cagle Spring 2016 Lid van USF Tampa, Team 2-8, Cagle Spring 2016
USFT-CAGLE-S16S2G8
2 Leden
12 handleidingen geschreven