Ga door naar hoofdinhoud

VTech Kidizoom Action Cam Buttons Replacement

Wat je nodig hebt

  1. VTech Kidizoom Action Cam Buttons Replacement, Display Assembly: stap 1, afbeelding 1 van 1
    • Make sure that the master power switch is set to the (O) position.

  2. VTech Kidizoom Action Cam Buttons Replacement: stap 2, afbeelding 1 van 1
    • Using a plastic opening tool, gently pry off the circular plating over the camera lens.

    • The circular plating is held by a mild adhesive. It will not be necessary to replace this adhesive during the reassembly process.

  3. VTech Kidizoom Action Cam Buttons Replacement: stap 3, afbeelding 1 van 1
    Gereedschap gebruikt in deze stap:
    Magnetic Project Mat
    $19.95
    Koop
    • Use a #0 screwdriver to remove the two 2.5mm Phillips head screws located on the second layer of plating.

    • Remove the second layer of plating previously held down by the screws by gripping it with your fingers and pulling upward.

    • As there will be many screws being removed from the device, we recommend using a magnetic device such as the iFixit Magnetic Project Mat.

  4. VTech Kidizoom Action Cam Buttons Replacement: stap 4, afbeelding 1 van 1
    • Pry off the transparent plating and paper design using a plastic opening tool.

  5. VTech Kidizoom Action Cam Buttons Replacement: stap 5, afbeelding 1 van 1
    • Unscrew the (4) 2.5mm Phillips head screws from the third layer of plating using a #0 screwdriver.

  6. VTech Kidizoom Action Cam Buttons Replacement: stap 6, afbeelding 1 van 1
    • Turn the camera around and gently remove the plating that surrounds the LCD screen by grasping it with your fingers and pulling away from the device.

  7. VTech Kidizoom Action Cam Buttons Replacement: stap 7, afbeelding 1 van 3 VTech Kidizoom Action Cam Buttons Replacement: stap 7, afbeelding 2 van 3 VTech Kidizoom Action Cam Buttons Replacement: stap 7, afbeelding 3 van 3
    • Use the plastic opening tool to lift the LCD screen, including the purple casing and set it aside, revealing the motherboard and connector ribbon.

    • Exercise caution while performing this step, as any excessive pulling may tear the connector ribbon from the motherboard.

  8. VTech Kidizoom Action Cam Buttons Replacement, Buttons: stap 8, afbeelding 1 van 2 VTech Kidizoom Action Cam Buttons Replacement, Buttons: stap 8, afbeelding 2 van 2
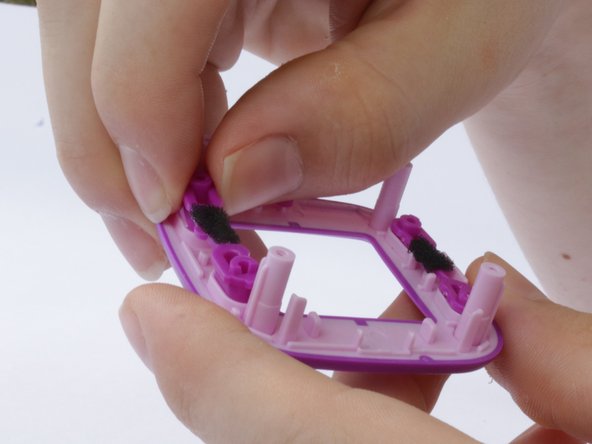
    • Push out the buttons that you wish to take out, and replace them with the new buttons.

    • Cleaning the buttons may fix the issue of sticky buttons, and a replacement may not be necessary.

Conclusie

To reassemble your device, follow these instructions in reverse order.

3 andere personen hebben deze handleiding voltooid.

Ross Anderson

Lid sinds: 02/10/16

630 Reputatie

2 handleidingen geschreven

Team

USF Tampa, Team 3-5, Sullivan Spring 2016 Lid van USF Tampa, Team 3-5, Sullivan Spring 2016

USFT-SULLIVAN-S16S3G5

3 Leden

6 handleidingen geschreven

0 opmerkingen

Voeg opmerking toe

Weergavestatistieken:

Afgelopen 24 uren: 0

Afgelopen 7 dagen: 3

Afgelopen 30 dagen: 13

Altijd: 2,406