Ga door naar hoofdinhoud

Unjamming a X-ACTO Mighty Mite 19501X

Wat je nodig hebt

  1. Unjamming a X-ACTO Mighty Mite 19501X, Unjamming a X-ACTO Mighty Mite 19501X: stap 1, afbeelding 1 van 3 Unjamming a X-ACTO Mighty Mite 19501X, Unjamming a X-ACTO Mighty Mite 19501X: stap 1, afbeelding 2 van 3 Unjamming a X-ACTO Mighty Mite 19501X, Unjamming a X-ACTO Mighty Mite 19501X: stap 1, afbeelding 3 van 3
    • Remove the shavings container.

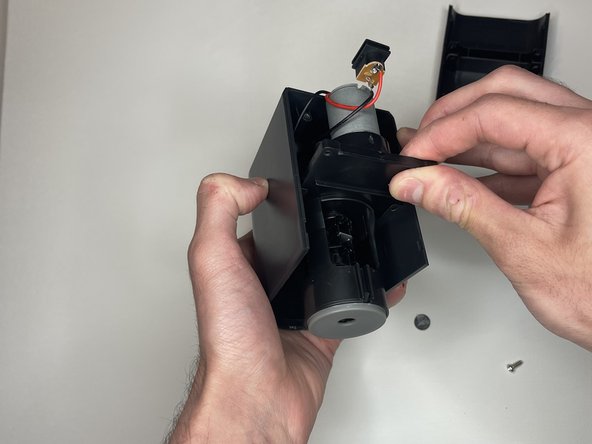
    • Remove the two 2mm Phillips screws inside with a Phillips #0 screwdriver.

  2. Unjamming a X-ACTO Mighty Mite 19501X: stap 2, afbeelding 1 van 3 Unjamming a X-ACTO Mighty Mite 19501X: stap 2, afbeelding 2 van 3 Unjamming a X-ACTO Mighty Mite 19501X: stap 2, afbeelding 3 van 3
    Gereedschap gebruikt in deze stap:
    Tweezers
    $4.99
    Koop
    • Flip the pencil sharpener to expose the bottom.

    • Use a pair of tweezers to remove the two round pads facing the back of the sharpener.

    • Remove the two 1.5 mm Phillips screws with a Phillips #0 screwdriver.

  3. Unjamming a X-ACTO Mighty Mite 19501X: stap 3, afbeelding 1 van 3 Unjamming a X-ACTO Mighty Mite 19501X: stap 3, afbeelding 2 van 3 Unjamming a X-ACTO Mighty Mite 19501X: stap 3, afbeelding 3 van 3
    • Pull the sharpener apart, exposing the internal components.

  4. Unjamming a X-ACTO Mighty Mite 19501X: stap 4, afbeelding 1 van 3 Unjamming a X-ACTO Mighty Mite 19501X: stap 4, afbeelding 2 van 3 Unjamming a X-ACTO Mighty Mite 19501X: stap 4, afbeelding 3 van 3
    • Remove the four 1 mm Phillips screws beside the motor with a Phillips #0 screwdriver.

  5. Unjamming a X-ACTO Mighty Mite 19501X: stap 5, afbeelding 1 van 2 Unjamming a X-ACTO Mighty Mite 19501X: stap 5, afbeelding 2 van 2
    • Lift the protective case, revealing the sharpener blades.

  6. Unjamming a X-ACTO Mighty Mite 19501X: stap 6, afbeelding 1 van 3 Unjamming a X-ACTO Mighty Mite 19501X: stap 6, afbeelding 2 van 3 Unjamming a X-ACTO Mighty Mite 19501X: stap 6, afbeelding 3 van 3
    • Remove any debris or wood shavings from the blades with your tweezers.

Conclusie

To reassemble your device, follow these instructions in reverse order.

2 andere personen hebben deze handleiding voltooid.

Jason Pinto

Lid sinds: 03/22/21

187 Reputatie

1 Handleiding geschreven

Team

Één opmerking

I just used a drill.

Lee Hunt - Antwoord

Voeg opmerking toe

Weergavestatistieken:

Afgelopen 24 uren: 5

Afgelopen 7 dagen: 67

Afgelopen 30 dagen: 242

Altijd: 5,094